So you’ve got those ridiculously ripe, almost-black bananas sitting on your counter, giving you the side-eye, huh? And a sudden, overwhelming, must-have-it-now craving for something sweet, creamy, and ridiculously easy? My friend, clear your schedule for the next five minutes, because you’ve stumbled upon the holy grail of lazy-but-luxe desserts: Banana Ice Cream with Nuts. It’s practically magic, and definitely a vibe.
Why This Recipe is Awesome
Let’s be real, most ice cream recipes involve churning, obscure ingredients, and a level of commitment I just don’t possess on a Tuesday night. But this? This banana ice cream recipe is the culinary equivalent of wearing sweatpants to a fancy dinner – effortlessly chic and incredibly comfortable. It’s:
- Idiot-proof: Seriously, if I can do it without setting off the smoke alarm, anyone can.
- Essentially a smoothie cosplaying as ice cream: So, practically health food! You’re welcome.
- Requires no fancy equipment: Just your trusty blender or food processor. No ice cream maker, no fuss.
- Ready in mere minutes: Instant gratification, baby!
- Deliciously customizable: More on that later, but just know your wildest sweet dreams are about to come true.
It’s basically guilt-free indulgence that tastes like you put in way more effort than you actually did. Score!
Ingredients You’ll Need
Get ready for a super short shopping list. We’re talking minimal effort for maximum deliciousness.
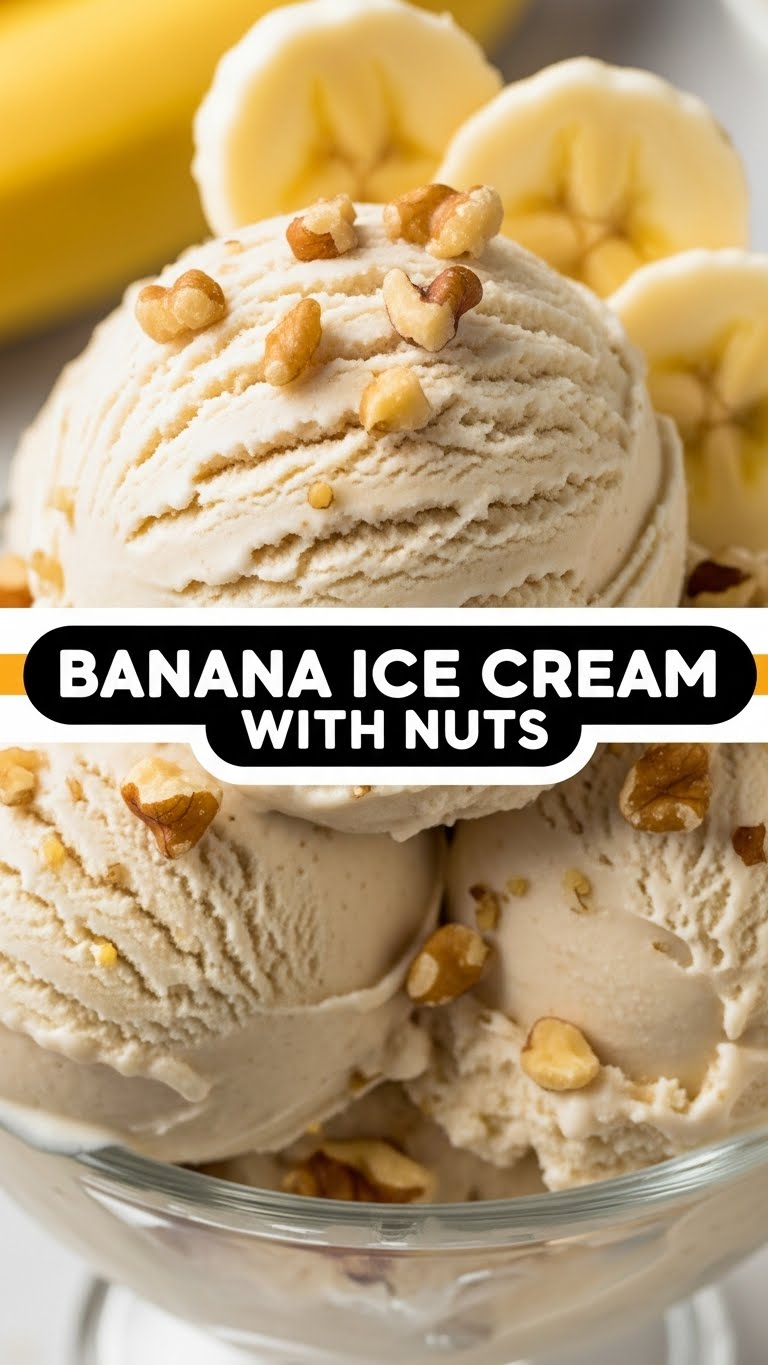
- 3-4 Ripe Bananas, sliced and frozen: The uglier and spottier, the better! These are the real MVPs. Make sure they’re frozen solid for at least 4 hours, or overnight is best.
- 1-2 tablespoons Nut Butter: Your choice! Peanut, almond, cashew – whatever makes your heart sing. This adds creaminess and a lovely nutty depth.
- 1-2 tablespoons Milk (or non-dairy alternative): Just a splash to get things moving. Start with less, you can always add more.
- 1/4 cup Chopped Nuts: Almonds, walnuts, pecans, pistachios – go wild! For that delightful crunch and extra texture.
- Optional additions: A pinch of cinnamon, a tiny splash of vanilla extract, a drizzle of maple syrup if your bananas aren’t super sweet.
Step-by-Step Instructions
Okay, pay attention, because this is going to be quick. Like, blink-and-you’ll-miss-it quick. Ready?
- Grab your frozen bananas: Take those rock-hard banana slices out of the freezer. Let them sit on the counter for 5-10 minutes if they’re super solid, just to soften *slightly*. This makes blending easier.
- Into the blender they go: Dump your frozen banana slices into a high-speed blender or food processor.
- Add the nut butter and milk: Spoon in your chosen nut butter and add one tablespoon of milk to start.
- Blend, blend, blend: Start blending! It’ll look crumbly and chunky at first. Keep scraping down the sides with a spatula. You might need to add the second tablespoon of milk, a tiny bit at a time, until it starts to come together and smooth out. Be patient, it will get creamy!
- Achieve creamy perfection: Continue blending until it’s the consistency of soft-serve ice cream. Seriously, you’ll be amazed.
- Stir in the nuts: Gently fold in your chopped nuts. Give it a good mix so they’re evenly distributed.
- Serve immediately (or freeze for later): Scoop it into a bowl and devour! If you prefer a firmer ice cream, transfer it to a freezer-safe container and freeze for another 30-60 minutes.
Common Mistakes to Avoid
Even though this recipe is practically foolproof, there are a few rookie errors that can turn your creamy dream into a banana-flavored disaster. Don’t be that person.
- Using fresh bananas: This is the number one cardinal sin. You’ll end up with a smoothie, not ice cream. Frozen bananas are non-negotiable!
- Adding too much liquid too soon: “Just a splash” means just that. If you dump in half a cup of milk, you’ll have banana soup. Start small and add gradually.
- Not scraping down the sides: The mixture gets thick and sticky. You *have* to stop and scrape. Otherwise, the stuff at the bottom will blend, and the stuff at the top will just stare at you.
- Forgetting the nuts (or skipping the crunch): Sure, it’s optional, but why would you deny yourself that glorious texture contrast? It’s like a symphony in your mouth, and the nuts are the drum section.
Alternatives & Substitutions
This recipe is super flexible! Here are some ways to shake things up:
- Nut Butter Swaps: Not a peanut butter fan? Try almond, cashew, or even sunflower seed butter for a nut-free option. Each one gives a slightly different flavor profile, so experiment!
- Milk Alternatives: Any milk works! Almond, oat, soy, coconut milk (full-fat for extra creaminess, IMO). Or heck, even a splash of heavy cream if you’re really leaning into the indulgence.
- Nuts, Glorious Nuts: Walnuts, pecans, pistachios, cashews – all fantastic. You can even use toasted coconut flakes or chia seeds for a different kind of crunch.
- Flavor Boosters:
- Chocolate Lover? Add a tablespoon of unsweetened cocoa powder to the blender or stir in some mini chocolate chips at the end.
- Vanilla Vibes: A half teaspoon of vanilla extract takes it up a notch.
- Spice it Up: A pinch of cinnamon or a tiny dash of nutmeg makes it feel cozy.
- Fruity Fun: Blend in a handful of frozen berries with the bananas for a mixed fruit ice cream experience!
FAQ (Frequently Asked Questions)
Got questions? I’ve got (casual) answers.
Q: Do the bananas *really* need to be frozen?
A: Yes. Absolutely. Unquestionably. Frozen bananas are what create that creamy, ice cream-like texture. Fresh bananas will give you a smoothie. A delicious smoothie, sure, but not ice cream. So, don’t skip the freeze!
Q: My blender is struggling! What do I do?
A: First, make sure your bananas aren’t absolute bricks. Letting them soften for 5-10 minutes helps. Second, add milk a tablespoon at a time. Too much, and it’s soup; too little, and it’s stuck. Keep scraping the sides, and sometimes a quick pulse helps to break things up. A food processor often works even better than a blender for this due to its wider base.
Q: Can I skip the nut butter?
A: Technically yes, but why would you want to? The nut butter adds a wonderful richness and helps with the creamy texture. If you must, add an extra splash of milk and maybe a touch more sweetness (like a date or a dash of maple syrup) to compensate.
Q: How long does this ice cream last?
A: It’s best eaten fresh, TBH. The texture is glorious right after blending. If you freeze it, it tends to get very hard. You’ll need to let it thaw for 15-30 minutes before scooping, or give it a quick re-blend for that soft-serve goodness again.
Q: Is this *actually* healthy?
A: Well, it’s mostly fruit, a little nut butter, and some actual nuts. Compared to a store-bought pint loaded with sugar and additives, yes, it’s a much healthier alternative! Plus, fiber and potassium! You’re basically eating a wholesome dessert. You’re a health guru now, FYI.
Final Thoughts
So there you have it, friend. A ridiculously simple, incredibly delicious, and deceptively healthy banana ice cream recipe that tastes like a dream. No fancy gadgets, no complicated steps, just pure, unadulterated joy in a bowl. Now go impress someone – or, let’s be real, just yourself – with your new culinary superpowers. You’ve earned this creamy, nutty slice of heaven. Enjoy!


