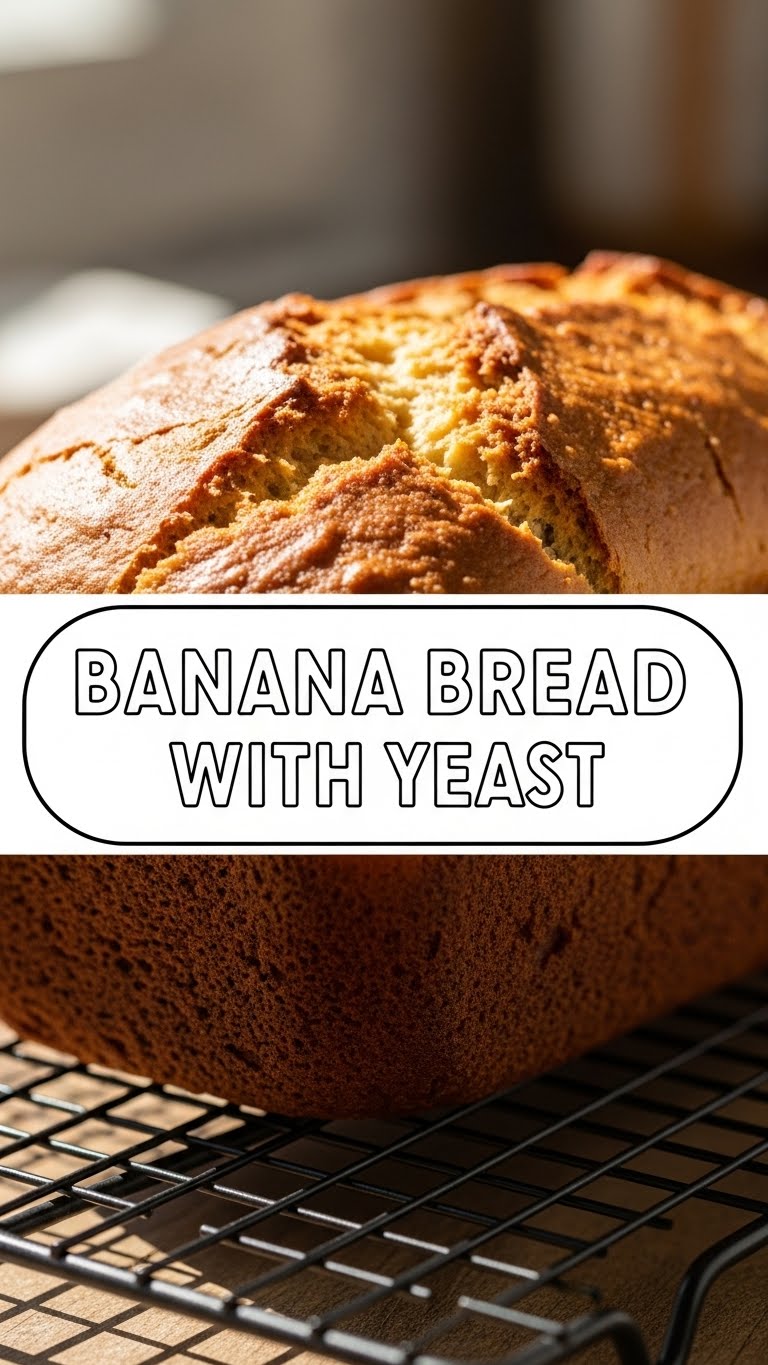
Ever stare at those sad, spotty bananas on your counter and think, “What a waste… unless?” Yeah, me too. And then my brain whispered, “Banana bread!” But wait, what if we made it… better? Like, yeasted better? Buckle up, buttercup, because we’re about to make the banana bread of your dreams. No more dense, sad loaves. We’re going for fluffy, tender, and oh-so-flavorful. And guess what? It’s not nearly as complicated as it sounds. Pinky promise.
Why This Recipe is Awesome
Okay, so why bother with yeast when regular banana bread is a thing? Because we’re not just making a thing, we’re making the thing. This isn’t your grandma’s quick bread (no offense to grandma, love her). This is banana bread that thinks it’s a brioche. It’s got that soft, pillowy texture, a gorgeous crust, and the banana flavor just sings. Plus, there’s something incredibly satisfying about watching dough rise, right? It’s like magic, but edible. It’s also surprisingly forgiving, so even if you’re a yeast-phobe, you got this. Seriously, if I can do it without setting off the smoke detector, so can you.
Ingredients You’ll Need
- Ripe Bananas (3-4 medium): The spottier, the better! We’re talking practically black. Don’t be shy. These are your flavor bombs.
- All-Purpose Flour (2 ¾ cups): The backbone of our bread. Don’t try to get fancy with whole wheat unless you know what you’re doing.
- Granulated Sugar (½ cup): Just enough sweetness to balance those bananas. Feel free to adjust if your bananas are basically candy.
- Unsalted Butter (½ cup / 1 stick), melted: Because butter makes everything better. And easier to mix when melted.
- Large Egg (1): Our binder, our friend. Room temp, if you’re feeling fancy.
- Milk (½ cup), warm (about 105-115°F): Not hot enough to kill the yeast, not cold enough to make it grumpy. Think a warm bath.
- Active Dry Yeast (2 ¼ teaspoons / 1 standard packet): The star of the show! Make sure it’s not expired, or your bread will be sad and flat.
- Salt (1 teaspoon): Don’t skip this! It enhances all the flavors and makes your bread taste less like… well, nothing.
- Vanilla Extract (1 teaspoon): A little hug of warmth.
Step-by-Step Instructions
Awaken the Yeast: In a large bowl, whisk together your warm milk, a pinch of sugar (from the ½ cup), and the yeast. Let it sit for about 5-10 minutes until it gets foamy. This means your yeast is alive and ready to party! If it doesn’t foam, your yeast might be dead, or your milk was too hot/cold. Start over, no biggie.
Mash ‘Em Up: While your yeast is doing its thing, mash your ripe bananas in a separate bowl until mostly smooth. A few lumps are totally fine for texture.
Mix the Wet: To the mashed bananas, add the melted butter, the remaining sugar, egg, and vanilla extract. Stir it all together until well combined.
Combine Forces: Pour the banana mixture into your foamy yeast mixture. Stir gently.
Add the Dry: Gradually add the flour and salt to the wet ingredients, mixing with a wooden spoon or spatula until a shaggy dough forms. Don’t overmix!
Knead It Out: Turn the dough out onto a lightly floured surface. Knead for about 5-7 minutes until it’s smooth and elastic. It might be a bit sticky, but resist the urge to add too much extra flour.
First Rise (The Beauty Sleep): Lightly grease a clean bowl, place the dough in it, and turn once to coat. Cover with plastic wrap or a clean kitchen towel. Let it rise in a warm spot for 1 to 1.5 hours, or until doubled in size. Patience is a virtue here!
Shape and Second Rise: Gently punch down the risen dough to release the air. Shape it into a loaf and place it in a greased 9×5 inch loaf pan. Cover again and let it rise for another 30-45 minutes, or until it looks puffy and almost doubled.
Bake It Up: Preheat your oven to 375°F (190°C). Once preheated and the dough has risen, bake for 35-45 minutes. The top should be golden brown, and a wooden skewer inserted into the center should come out clean. If it’s browning too quickly, you can loosely tent it with foil.
Cool Down: Let your glorious banana bread cool in the pan for 10-15 minutes before transferring it to a wire rack to cool completely. Resist the urge to slice it hot! It’ll continue to set up as it cools.
Common Mistakes to Avoid
Killing the Yeast: If your milk is boiling hot, your yeast is toast. If it’s fridge-cold, your yeast is just sleepy. Aim for lukewarm – think baby bathwater.
Ignoring the Rise: Thinking you can rush the rising process? Rookie mistake. Give that yeast time to do its job. A cold kitchen can slow things down, so find a cozy spot.
Over-flouring: When kneading, it’s tempting to keep adding flour if the dough is sticky. Don’t! Too much flour makes for a dense, dry bread. A little stickiness is okay.
Over-mixing: Once the flour is incorporated, stop mixing. Over-mixing develops gluten too much, leading to a tough bread. We want tender!
Cutting It Hot: Seriously, I know it’s hard, but let it cool! The bread is still cooking and settling internally. Slice too soon, and it might be gummy.
Alternatives & Substitutions
- Spice it Up: Add 1 teaspoon of cinnamon, a pinch of nutmeg, or even a dash of allspice for extra warmth. Highly recommend the cinnamon, IMO.
- Nutty Goodness: Fold in ½ cup of chopped walnuts or pecans with the flour. Toast them beforehand for extra flavor!
- Chocolate Dreams: Who doesn’t love chocolate? Add ½ cup of chocolate chips (milk, dark, or semi-sweet) to the dough. You won’t regret it.
- Dairy-Free? You can absolutely substitute plant-based milk (almond, soy, oat) for regular milk. For butter, a good vegan butter substitute works well. Just ensure it melts similarly.
- Sugar Swap: Brown sugar can be used instead of granulated sugar for a deeper, more molasses-y flavor. Totally valid.
FAQ (Frequently Asked Questions)
- My yeast didn’t foam. What now? Uh oh! Your yeast might be dead (check expiration date) or your milk temperature was off. Toss it and start with fresh yeast and properly warmed milk. Don’t waste your other ingredients on dead yeast!
- Can I use frozen bananas? Absolutely! Thaw them completely, drain any excess liquid (seriously, there will be a lot!), and then mash them as usual. They might make your bread a little denser, but the flavor is still great.
- What if my kitchen is cold and my dough isn’t rising? Find a warmer spot! A slightly warm oven (turned off, obviously!), near a sunny window, or even on top of a warm appliance are good options. Just make sure it’s not too hot.
- How do I know when it’s done? The top will be golden brown, and a wooden skewer or toothpick inserted into the center should come out clean. If it’s not clean, give it a few more minutes.
- Can I make this ahead of time? You bet! You can let the dough do its first rise in the fridge overnight. Just pull it out and let it come to room temperature for about an hour before punching it down and shaping for the second rise.
- Can I add more bananas for extra banana-y goodness? You can, but be careful. Too many bananas can make the bread too wet and dense. Stick to the recipe’s ratio for the best texture. Maybe just eat the extra banana.
Final Thoughts
So there you have it, fellow baking adventurer! You’ve just mastered (or are about to master) a banana bread that’s a step above the rest. It’s fluffy, it’s flavorful, and it’s proof that a little yeast can make a big difference in the most delicious way possible. Go on, slice yourself a thick piece, smear it with some butter (or not, if you’re feeling wild), and bask in the glory of your creation. You’ve earned this. Now go impress someone – or just yourself – with your new culinary superpower. Happy baking!
