
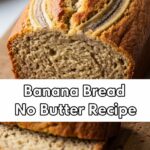
So you’ve got some sad, spotty bananas eyeing you from the counter, practically begging for a glow-up? And you’re *also* kinda craving something cozy but don’t want to spend your entire Sunday achieving it? My friend, you’ve come to the right place. We’re about to transform those forgotten fruits into a masterpiece: Banana Bread with Oats! It’s so good, you’ll wonder why you ever let a banana go to waste. Get ready for some serious, yet ridiculously easy, baking fun.
Why This Recipe is Awesome
Listen, this isn’t just *any* banana bread. This is the “I woke up like this” of banana breads – effortlessly delicious, naturally sweet, and with a bonus oat-y hug that makes it feel slightly more virtuous. It’s practically a health food… right? Plus, it’s so **dummy-proof**, even my cat could probably supervise the mixing. No fancy equipment, no bizarre techniques, just pure, unadulterated comfort in a loaf pan. We’re talking minimal effort, maximum reward. You’re welcome.
Ingredients You’ll Need
Gather your troops! Here’s what you’ll need to make this magic happen:
- 3-4 Ripe Bananas: The browner, the better. Seriously, don’t be shy about those spots. They’re flavor bombs.
- 1 ½ cups All-Purpose Flour: The basic building block of joy.
- 1 cup Old-Fashioned Rolled Oats: Not the instant stuff, unless you’re aiming for sad, soggy bread.
- 1 teaspoon Baking Soda: For that beautiful, fluffy lift. Don’t skip it!
- ½ teaspoon Salt: Just a pinch to make everything pop.
- 1 teaspoon Ground Cinnamon: Because what’s banana bread without a warm, spicy hug?
- ¼ teaspoon Ground Nutmeg (optional): If you’re feeling a bit fancy, this adds a nice touch.
- ½ cup (1 stick) Unsalted Butter: Melted and slightly cooled. The good stuff. If you’re feeling adventurous (or out of butter), you can use oil, but butter is undeniably better, IMO.
- ¾ cup Granulated Sugar: Just enough to sweeten the deal without making it overly cloying.
- 1 Large Egg: Lightly beaten. The binder of dreams.
- 1 teaspoon Vanilla Extract: Don’t skip this. It’s flavor magic.
- Optional: A sprinkle of extra oats or brown sugar for the top before baking – because why not?
Step-by-Step Instructions
- Oven Warm-Up & Pan Prep: First things first, preheat your oven to 350°F (175°C). Then, lightly grease and flour a standard 9×5-inch loaf pan. Trust me, you don’t want your beautiful bread stuck to the bottom.
- Banana Mash Party: In a medium bowl, take those ripe bananas and mash ’em up good with a fork. You want them mostly smooth, but a few lumps are totally fine. Adds character, right?
- Dry Ingredients Unite: In a separate, larger bowl, whisk together the flour, oats, baking soda, salt, cinnamon, and nutmeg (if using). Give it a good whisk to make sure everything’s evenly distributed.
- Wet Wonders: Back to another bowl! Whisk together the melted butter, granulated sugar, beaten egg, and vanilla extract until well combined. This is where the sweet magic happens.
- The Grand Combination: Pour the wet ingredients into the mashed bananas and stir gently. Then, add this banana-wet mixture to your dry ingredients. Mix with a spoon or spatula until *just* combined. **Important:** Don’t overmix! Lumps are okay. Overmixing makes for tough bread, and we’re not about that life.
- Into the Pan It Goes: Pour the batter into your prepared loaf pan. If you’re feeling extra, sprinkle a few extra oats or a bit of brown sugar on top for a delightful crust.
- Bake Until Golden: Pop it into your preheated oven and bake for 50-65 minutes. How do you know it’s done? A toothpick inserted into the center should come out clean, or with just a few moist crumbs.
- Cool Down & Devour: Let the bread cool in the pan for about 10-15 minutes before carefully transferring it to a wire rack to cool completely. I know, I know, it’s hard to wait. But **patience is a virtue, especially with warm bread**.
Common Mistakes to Avoid
We all make mistakes, but let’s try to avoid these rookie errors, shall we?
- Using Under-Ripe Bananas: This is probably the biggest sin. Green or yellow bananas won’t give you that intense banana flavor or the natural sweetness you crave. **Wait for those spots!**
- Overmixing the Batter: I can’t stress this enough. Mix until *just* combined. Overworking the gluten in the flour leads to dense, tough bread. We want fluffy, tender goodness!
- Not Preheating the Oven: Thinking you can skip this step? Nope. A properly preheated oven ensures even baking from the start. Otherwise, your bake time will be all out of whack.
- Forgetting to Grease the Pan: Unless you enjoy chiseling your banana bread out of the pan in sad, broken pieces, always grease and lightly flour your pan.
- Cutting it Hot Off the Press: As tempting as it is, slicing into piping hot banana bread can make it crumble and dry out faster. **Let it cool!**
Alternatives & Substitutions
Feeling creative? Or maybe you just ran out of something? No worries, I got you!
- Flour Power: You can swap out up to half of the all-purpose flour for whole wheat flour for an even nuttier flavor and a touch more fiber. Gluten-free flour blends work too!
- Butter’s Best Friend: For a dairy-free option, use coconut oil (melted) or even unsweetened applesauce (use about ¼ cup more for extra moisture) in place of butter. It changes the flavor a bit, but still yummy!
- Sugar Swap: If your bananas are super ripe, you could reduce the granulated sugar by ¼ cup. Maple syrup or honey can also be used, but you might need to adjust other liquid ingredients slightly.
- Mix-in Mania: This recipe is a blank canvas! Add ½ cup of chocolate chips (because, duh), chopped walnuts or pecans for crunch, or dried cranberries for a tangy twist.
- Spice it Up: A pinch of ground ginger or cardamom can add another layer of warm spice if you’re feeling adventurous beyond cinnamon and nutmeg.
FAQ (Frequently Asked Questions)
- Can I use green bananas for banana bread?
Absolutely not! Well, technically you *can*, but why would you want to? They won’t mash well, and your bread will lack that deep, sweet banana flavor. **Wait for the brown spots, people!** - What if I don’t have old-fashioned rolled oats? Can I use instant?
You *could* in a pinch, but it might change the texture. Instant oats tend to get mushier and won’t give you that delightful chewiness that rolled oats do. Stick to rolled for the best results, trust me. - How long does homemade banana bread last?
On the counter, tightly wrapped, it’ll last about 3-4 days. In the fridge, maybe a week. But honestly, if it lasts more than two days in your house, you’re doing something wrong (or you live alone and have immense self-control). - Can I make muffins instead of a loaf?
Heck yes! Just fill muffin liners about two-thirds full and bake for 20-25 minutes, or until a toothpick comes out clean. Smaller portions, less waiting! - My banana bread turned out dry, what went wrong?
Oh no! Usually, this means you either overbaked it or used too much flour (which can happen if you scoop flour directly from the bag instead of spooning it into your measuring cup). Next time, be careful with the flour and **don’t overbake!** - Can I freeze banana bread?
You bet! Once completely cooled, wrap the loaf tightly in plastic wrap, then foil, and freeze for up to 3 months. Thaw on the counter overnight or gently in the microwave. Future you will thank present you!
Final Thoughts
See? Told ya it was easy! Now you’ve got yourself a gorgeous, golden loaf of banana-oat goodness, ready to impress anyone who walks through your door (or just yourself, curled up with a good book – no judgment here!). Go on, pat yourself on the back. You earned those carbs! And maybe, just maybe, you’ve convinced those skeptical brown bananas that they, too, can achieve greatness. Happy baking, my friend!

