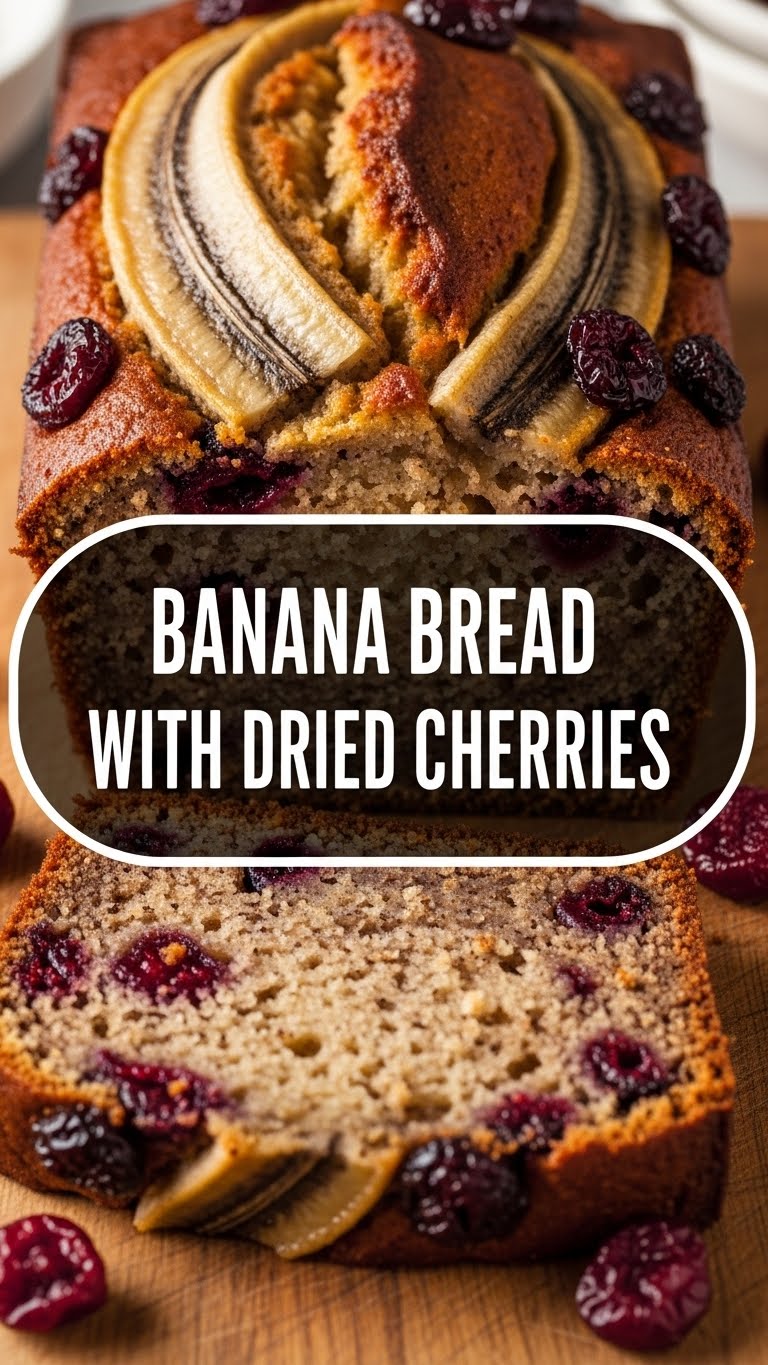
Banana Bread With Dried Cherries: Because Life Needs More Deliciousness!
So, you’re staring into the abyss of your fruit bowl and those bananas are looking…well, let’s just say they’ve seen better days. Before you chuck ’em, or worse, let them become banana-shaped sadness, let’s turn them into something truly magical. We’re talking about banana bread, but not just *any* banana bread. This is the upgraded, fancy-pants version with bursts of tart-sweet dried cherries. Prepare for your taste buds to do a happy dance!
Why This Recipe is Awesome (Seriously, It Is)
Honestly, this recipe is pretty darn awesome because it’s ridiculously forgiving. Did you slightly over-mush the bananas? No biggie. Did you eyeball the flour measurement a *little* too much? Chances are, it’ll still turn out delicious. It’s the kind of recipe that makes you feel like a baking wizard, even if your kitchen is usually a disaster zone. Plus, who doesn’t love the sweet-tart surprise of dried cherries mingling with that comforting banana goodness? It’s like a party in your mouth, and everyone’s invited.
Ingredients You’ll Need (Don’t Freak Out)
* ¾ cup (1.5 sticks) unsalted butter, softened (aka, leave it on the counter for an hour. No microwave magic unless you’re feeling brave.)
* 1 ½ cups granulated sugar (or less if you’re trying to be a “health nut,” but who are we kidding?)
* 2 large eggs, at room temperature (cold eggs = sad batter)
* 3 ripe, **seriously ripe** bananas, mashed (the spottier, the better! They’re practically begging to be baked.)
* 1 teaspoon vanilla extract (the good stuff, please and thank you.)
* 1 ¾ cups all-purpose flour (your basic white stuff is fine)
* 1 teaspoon baking soda (this is important for lift-off!)
* ½ teaspoon salt (enhances all the flavors, y’all)
* ½ cup dried cherries (tart ones are my jam, but sweet work too!)
* ¼ cup chopped walnuts or pecans (optional, but highly recommended for that crunch factor)
Step-by-Step Instructions (Let’s Do This!)
1. **Preheat and Prep:** Get that oven fired up to **350°F (175°C)**. Grease and flour a standard loaf pan. Nobody likes a bread stuck to the pan.
2. **Cream Machine:** In a big ol’ bowl, cream together the softened butter and sugar until it’s light and fluffy. Think fluffy clouds, but edible.
3. **Eggcellent Addition:** Beat in the eggs, one at a time, until they’re fully incorporated. Don’t be shy with the beating!
4. **Banana Bonanza:** Stir in the mashed bananas and vanilla extract. It might look a little lumpy, and that’s totally okay.
5. **Dry Stuff Unite:** In a separate bowl, whisk together the flour, baking soda, and salt. This ensures everything is evenly distributed.
6. **Combine & Conquer:** Gradually add the dry ingredients to the wet ingredients, mixing until *just* combined. **Do not overmix!** Seriously, resist the urge. A few streaks of flour are fine.
7. **Cherry Bomb:** Gently fold in the dried cherries and nuts (if using). Be delicate here; we want them evenly dispersed, not pulverized.
8. **Into the Pan:** Pour the batter into your prepared loaf pan and spread it out evenly.
9. **Bake it Up:** Bake for **50-60 minutes**, or until a toothpick inserted into the center comes out clean. Keep an eye on it; ovens can be divas.
10. **Cool Down:** Let it cool in the pan for about 10 minutes before carefully transferring it to a wire rack to cool completely. Patience, grasshopper!
Common Mistakes to Avoid (Don’t Be That Guy/Gal)
* **Underripe Bananas:** Seriously, the mushier and spottier, the better. Those green ones? They’re just not ready for their close-up.
* **Overmixing:** This is a biggie! Overmixing develops the gluten in the flour, resulting in a tough, dense loaf. Gentle is the name of the game.
* **Oven Shenanigans:** Not preheating your oven is like asking your date to show up in sweatpants – just not a good start. Also, **don’t open the oven door too early**. Let that heat do its job!
* **Forgetting the Baking Soda:** Baking soda is what gives your bread its glorious lift. Without it, you’ve basically made a dense, sweet brick.
Alternatives & Substitutions (Because We’re All About Options)
* **No Dried Cherries?** No problem! Try dried cranberries for a similar tartness, or even chocolate chips for a sweeter twist. Raisins work, but they’re a bit basic, IMO.
* **Nut Allergy?** Just skip the nuts! The bread will still be delicious, I promise.
* **Butter Substitute:** You *can* use oil (like vegetable or canola), but butter really brings the flavor party. If you must use oil, start with about ⅔ cup.
* **Gluten-Free?** While I haven’t personally tested it, you could try a good quality 1-to-1 gluten-free baking flour. Just be aware that texture might vary slightly.
FAQ (The Burning Questions You Probably Have)
* **Can I make this in muffin tins?** Heck yes! Reduce the baking time to around 20-25 minutes. Keep an eye on them; they bake faster.
* **How ripe do the bananas *really* need to be?** Think “banana bread ready.” They should be soft, mushy, and covered in dark spots. The browner, the better!
* **Why is my bread sinking in the middle?** Usually caused by opening the oven door too early, **underbaking**, or too much leavening. Make sure that toothpick comes out clean!
* **Can I add other fruits?** Sure! A handful of blueberries or chopped apples would be lovely. Just don’t go overboard, or things can get soggy.
* **How long does this last?** If you can resist eating it all in one sitting, it’ll last about 3-4 days at room temperature, nicely wrapped. For longer storage, the fridge or freezer is your friend.
* **Can I make it vegan?** You’d need to swap the butter for vegan butter or oil and the eggs for a flax egg (1 tbsp flaxseed meal + 3 tbsp water, let sit for 5 mins) or a commercial egg replacer.
Final Thoughts
There you have it! A ridiculously delicious banana bread with the added zing of dried cherries. It’s the perfect companion for your morning coffee, afternoon snack, or even a light dessert. Now go forth and bake! Don’t be afraid to get a little messy; that’s part of the fun. Go impress someone—or yourself—with your new culinary skills. You’ve earned it!
