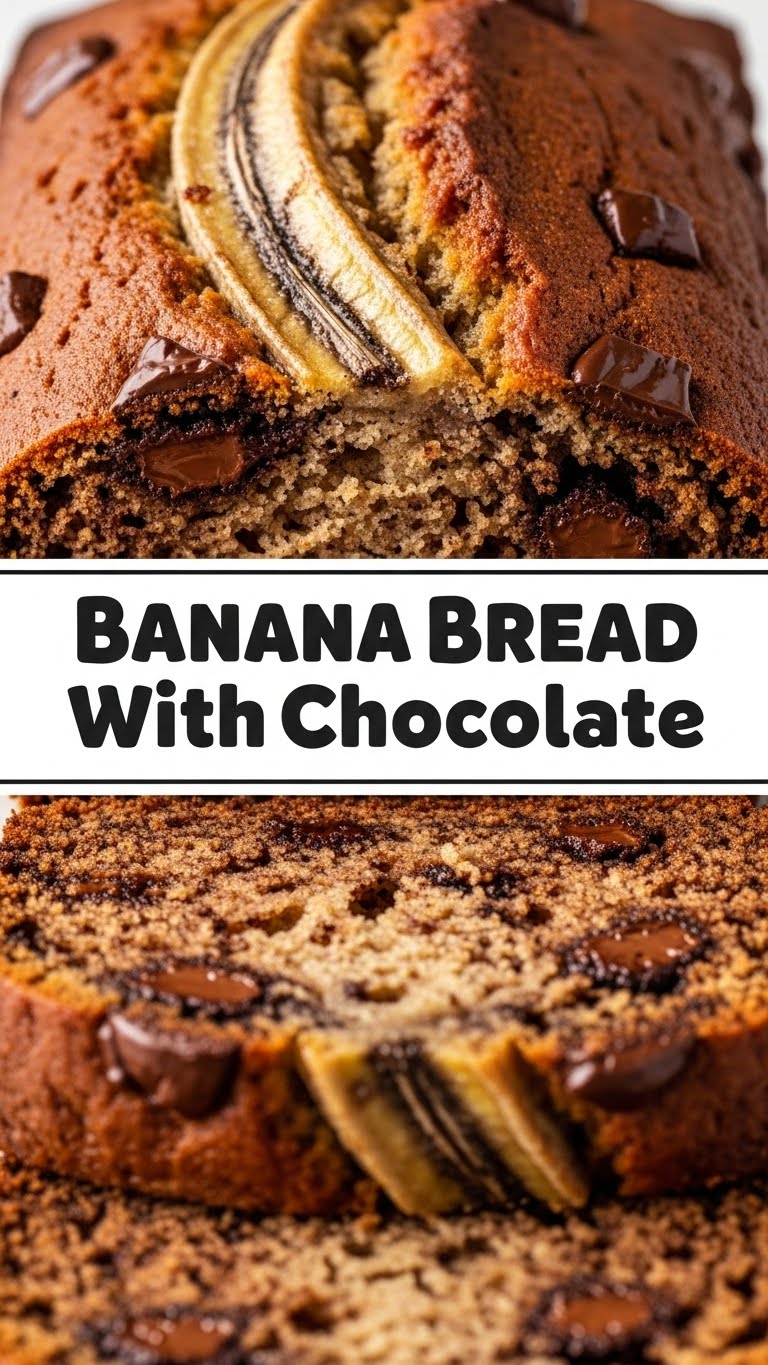
So you’re staring at those sad, spotty bananas on your counter, feeling guilty, and wondering if they’re still edible or if they’ve crossed over to the dark side? Been there, friend. But guess what? Those mushy masterpieces are about to become your new favorite excuse to eat chocolate for breakfast. We’re making banana bread with chocolate. Because why not?
Why This Recipe is Awesome
Alright, so why *this* one? First off, it’s **stupid easy**. Seriously. If you can mash a banana and stir things, you’re basically a Michelin-star chef in the making. Second, it’s the perfect way to use up those bananas that look like they’re auditioning for a horror movie. Third, chocolate. Need I say more? It’s basically a hug in loaf form.
And trust me, I’ve had my share of kitchen disasters (RIP that one soufflé), but this recipe? **It’s practically foolproof.** Even I didn’t mess it up. Plus, the smell alone is worth the minimal effort. Your kitchen will smell like a bakery, and your tastebuds will thank you.
Ingredients You’ll Need
- Ripe Bananas (3-4 medium): We’re talking brown, spotty, almost-ready-to-be-thrown-out bananas. The uglier, the better! This is where all the banana-y goodness comes from.
- All-Purpose Flour (1 ½ cups): The backbone of our bread. No fancy stuff needed.
- Granulated Sugar (¾ cup): Sweetness! Adjust if your bananas are super ripe (they’re already doing half the work, you know).
- Egg (1 large): Our binder. Make sure it’s at room temp if you’re feeling extra fancy.
- Melted Unsalted Butter (½ cup or 1 stick): Because butter makes everything better. Don’t even think about margarine. (Seriously, just don’t.)
- Baking Soda (1 teaspoon): The magic leavening agent that makes it fluffy.
- Salt (½ teaspoon): Balances the sweetness, trust the process.
- Vanilla Extract (1 teaspoon): A warm, cozy flavor hug for your bread.
- Chocolate Chips (1 cup): Milk, semi-sweet, dark—your call. More is always an option, obviously. This is non-negotiable for me.
- Optional: Chopped Nuts (½ cup): Walnuts or pecans if you’re feeling extra crunchy.
Step-by-Step Instructions
- Prep Your Pan and Oven: First things first, get that oven to **350°F (175°C)**. Then, grease and flour a 9×5-inch loaf pan, or line it with parchment paper. Trust me, you don’t want your masterpiece stuck.
- Mash Those Bananas: In a large bowl, mash your super-ripe bananas with a fork. Don’t overdo it; a few small lumps are totally welcome for texture. Think rustic, not baby food.
- Wet Ingredients Party: Add the melted butter, sugar, egg, and vanilla extract to the mashed bananas. Stir it all up until just combined. You don’t need to beat it to death, just make friends.
- Dry Ingredients Join In: In a separate medium bowl, whisk together the flour, baking soda, and salt. This ensures everything is evenly distributed and you don’t get a random pocket of salt.
- Combine & Conquer: Gently add the dry ingredients to the wet ingredients. **Mix until just combined.** Overmixing is the enemy of tender banana bread, making it tough. Lumps of flour are actually okay here!
- Chocolate Time! Fold in the chocolate chips (and nuts, if you’re using them). Be gentle, we’re not trying to destroy the chocolate here, just distribute its deliciousness.
- Bake It Up: Pour the batter into your prepared loaf pan. Pop it into the preheated oven and bake for **50-65 minutes**. Don’t peek too much!
- Check for Doneness: How do you know it’s ready? Stick a toothpick into the center. If it comes out clean, you’re golden. If it’s gooey, give it another 5-10 minutes.
- Cool Down: Let it cool in the pan for about 10 minutes before transferring it to a wire rack to cool completely. **Patience is a virtue**, especially when warm, gooey chocolate is involved.
Common Mistakes to Avoid
- Underripe Bananas: Using yellow, firm bananas? Rookie mistake. They won’t give you that intense banana flavor or the moist texture we’re aiming for. Wait until they’re brown and spotty, seriously.
- Overmixing the Batter: This is a big one, folks. Mixing too much develops the gluten, leading to a tough, dense bread instead of a soft, tender crumb. **Mix until just combined, even if there are a few lumps.**
- Not Greasing the Pan Properly: Ever had your delicious bread stick to the pan? The absolute worst. **Grease and flour (or use parchment paper!) your pan thoroughly.** You’ll thank yourself later.
- Baking at the Wrong Temperature: Oven temps can be tricky. Too hot, and the outside burns before the inside cooks. Too low, and it might not rise properly. **Trust your oven thermometer** if you have one, or just know your oven’s quirks.
- Cutting it Too Soon: I know, the smell is intoxicating. But slicing into warm banana bread too quickly can make it crumble. **Give it time to cool** for a cleaner slice and better texture. (This is probably the hardest step, FYI.)
Alternatives & Substitutions
Don’t have everything on hand, or just feeling adventurous? No worries, I got you!
- Flour Power: Want to go whole wheat? You can substitute **up to half** of the all-purpose flour with whole wheat flour for a nuttier flavor and a bit more fiber. Don’t swap it all, though, or it might get too dense.
- Butter vs. Oil: Out of butter? You can use **vegetable oil or canola oil** instead, cup for cup. It’ll still be super moist, just with a slightly different flavor profile. But IMO, butter reigns supreme for taste.
- Sweetener Swap: If you prefer, **brown sugar** can replace granulated sugar for a deeper, molasses-y flavor. It makes the bread even moister, which is never a bad thing in my book!
- Chocolate Choices: Not a fan of regular chocolate chips? Try **chopped chocolate bars**, mini chips, white chocolate, or even a swirl of Nutella in the batter (heavenly!). Get creative!
- Add-ins: Get wild! A sprinkle of cinnamon or nutmeg, shredded coconut, or different nuts (pecans, walnuts) are all fantastic additions. Don’t be afraid to experiment!
FAQ (Frequently Asked Questions)
- Q: My bananas aren’t ripe enough! What do I do?
A: Panic! Kidding. You can bake them unpeeled on a baking sheet at 300°F (150°C) for 15-20 minutes until they’re black and soft. Or, microwave them for 30 seconds at a time until soft. Not ideal, but it works in a pinch when that craving hits! - Q: Can I make this into muffins instead?
A: Absolutely! Just pour the batter into a greased muffin tin, fill ’em about two-thirds full, and bake for **20-25 minutes**. Keep an eye on them, muffin times are shorter! - Q: How long does this banana bread last?
A: If it even makes it past day one, it’ll keep for about **3-4 days** at room temperature in an airtight container. In the fridge? A bit longer, maybe up to a week. Good luck making it last that long, though! - Q: Can I freeze banana bread?
A: You betcha! Let it cool completely, then wrap it tightly in plastic wrap and then foil. It’ll last in the freezer for **up to 3 months**. Thaw at room temperature when you’re ready for a treat. Future you will be so grateful! - Q: My banana bread always sinks in the middle, what gives?
A: Ah, the dreaded sinkhole! This usually means it’s **undercooked** or you opened the oven door too early, letting cold air collapse the structure. Make sure that toothpick comes out clean from the very center!
Final Thoughts
So there you have it, folks! Your new go-to recipe for transforming those forlorn bananas into a chocolatey, moist masterpiece. It’s perfect for breakfast, a mid-afternoon pick-me-up, or even dessert (let’s be real, it’s always dessert). Now go forth, conquer those overripe bananas, and make some magic happen in your kitchen. You’ve totally got this!
And remember, life’s too short for boring banana bread. Now go impress someone—or yourself—with your new culinary skills. You’ve earned it! Enjoy!
