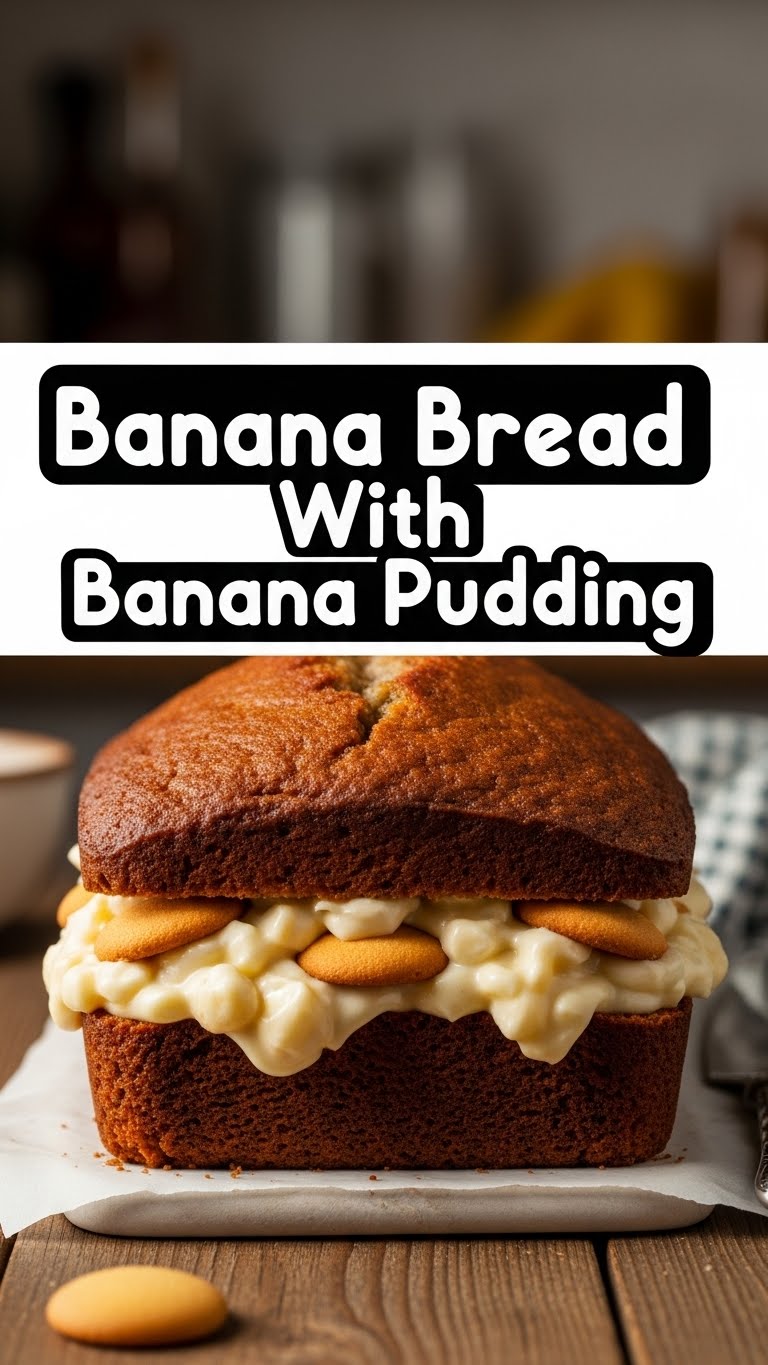
So, you’ve got a pile of those suspiciously dark, spotty bananas sitting on your counter, practically begging for a glow-up? And maybe, just maybe, you’ve also got a secret hankering for something ridiculously comforting and next-level delicious? Like, “hug in a bowl, but also a slice” kind of craving? Same, friend, same. Get ready to have your mind (and taste buds) absolutely blown, because we’re not just making banana bread today. Oh no, we’re taking it to the VIP section: **Banana Bread with a Banana Pudding party inside!** It’s a mash-up so good, it should be illegal.
Why This Recipe is Awesome
Look, I get it. The world is full of recipes. But this one? This one is different. It’s not just a recipe; it’s an experience. Think of it as the culinary equivalent of putting on your comfiest sweats, lighting a fancy candle, and binging your favorite show. It’s pure, unadulterated joy.
First off, it’s a genius way to use up those overripe bananas before they stage a protest on your counter. Secondly, it’s **idiot-proof**. Seriously, if I can pull this off without setting off the smoke detector, you definitely can. We’re talking two beloved desserts joining forces to create something even greater than the sum of their parts. It’s moist, it’s creamy, it’s got texture, and it’s basically an edible hug. Plus, it looks fancy enough to impress your in-laws, but it’s easy enough for a Tuesday night.
Ingredients You’ll Need
Alright, assemble your culinary troops! No fancy-pants, obscure ingredients here, just good old pantry staples. (Except maybe for those super ripe bananas – consider them your secret weapon.)
For the Banana Bread:
- **3-4 Very Ripe Bananas:** The spottier, the better! We’re talking almost black. Don’t be shy.
- **1 ½ cups All-Purpose Flour:** The backbone of our bread.
- **¾ cup Granulated Sugar:** Sweetness without being cloying.
- **1 Large Egg:** A binder, a unifier.
- **⅓ cup Melted Unsalted Butter or Vegetable Oil:** Your choice! Butter for flavor, oil for extra moistness.
- **1 teaspoon Baking Soda:** Our leavening MVP, making it fluffy.
- **½ teaspoon Salt:** Balances the sweetness, trust me.
- **1 teaspoon Vanilla Extract:** The secret to making everything taste better.
For the Banana Pudding & Assembly:
- **1 (5.1 oz) box Instant Vanilla Pudding Mix (large box):** Yes, instant! We’re not making this harder than it needs to be.
- **3 cups Cold Milk (dairy or non-dairy):** The pudding’s best friend.
- **1 (8 oz) container Whipped Topping (like Cool Whip), thawed:** For that cloud-like fluffiness.
- **1 box Nilla Wafers:** The classic crunch and flavor component.
- **2-3 Fresh Bananas:** Sliced, for layering and ultimate banana-y goodness.
Step-by-Step Instructions
Ready? Let’s bake some magic, and then layer some more magic on top! **Read through all steps before you begin.**
- **Preheat & Prep:** First things first, get your oven preheated to **350°F (175°C)**. Grease and flour a 9×5 inch loaf pan. Or, if you’re lazy like me, line it with parchment paper for easy removal.
- **Mash Those Bananas:** In a large bowl, mash your ripe bananas with a fork until they’re mostly smooth but still have a few small lumps. We’re not making baby food, just breaking them down.
- **Wet Ingredients Unite:** Add the egg, melted butter (or oil), sugar, and vanilla extract to the mashed bananas. Stir until everything is just combined. Don’t go crazy here; overmixing is the enemy of tender banana bread.
- **Dry Ingredients Join the Party:** In a separate medium bowl, whisk together the flour, baking soda, and salt.
- **Combine Gently:** Pour the dry ingredients into the wet ingredients. Mix *just* until no streaks of flour remain. Seriously, **stop mixing as soon as it’s combined!** This is key for a tender crumb.
- **Bake Away:** Pour the batter into your prepared loaf pan. Bake for **50-65 minutes**, or until a toothpick inserted into the center comes out clean. If it’s browning too quickly, you can loosely tent it with foil.
- **Cool Down:** Once baked, let the banana bread cool in the pan for about 10 minutes before transferring it to a wire rack to cool completely. This is super important! **Resist the urge to cut into it hot.**
- **Pudding Time:** While the bread is cooling (or beforehand, if you’re a super planner), whisk the instant vanilla pudding mix and cold milk in a large bowl for 2 minutes. Let it set in the fridge for about 5 minutes until thick.
- **Whip It Good:** Gently fold in about half of your thawed whipped topping into the pudding. This makes it light and airy, perfect for our layered masterpiece.
- **Assemble the Dream:** Once the banana bread is completely cool, slice it into about 1-inch thick pieces. Now, you have a couple of options:
- **The “One Big Bowl” Method:** Crumble some banana bread slices into the bottom of a large serving bowl. Layer with a dollop of pudding mixture, fresh banana slices, and a few Nilla Wafers. Repeat layers until you run out of ingredients, finishing with pudding, more Nilla Wafers, and a swirl of the remaining whipped topping.
- **Individual Servings (Fancy!):** Layer small chunks of banana bread, pudding, banana slices, and Nilla Wafers in individual glasses or jars.
- **Chill Out:** Cover your banana bread pudding creation and chill in the refrigerator for at least 1-2 hours. This allows the Nilla Wafers to soften and all the flavors to meld beautifully.
Common Mistakes to Avoid
Nobody’s perfect, but we can learn from past blunders! Here are some common pitfalls to sidestep:
- **Using Under-Ripe Bananas:** This is perhaps the biggest rookie mistake. Those firm, yellow bananas are great for smoothies, but for banana bread, you need the brown, mushy, intensely sweet ones. **No brown spots, no party!**
- **Overmixing the Batter:** I know, it’s tempting to get every single lump out. But seriously, **overmixing develops gluten too much, leading to a tough, dense bread.** Mix *just* until the flour disappears. Lumps are character!
- **Not Cooling the Bread Completely:** I get it, the smell is intoxicating. But slicing hot banana bread can make it crumble, and trying to layer warm bread with cold pudding is just asking for a soggy mess. **Patience, young grasshopper.**
- **Skipping the Chill Time:** Sure, you *could* eat it right away. But allowing the pudding to set fully and the Nilla Wafers to soften slightly is what makes banana pudding *banana pudding*. **Don’t rob yourself of the full experience!**
Alternatives & Substitutions
Feel like getting a little wild? Or maybe you’re missing an ingredient? Here are some simple swaps:
- **Chocolate Chips? Heck Yes!** Fold in ½ to ¾ cup of chocolate chips (dark, milk, white – your call!) into the banana bread batter. Because chocolate and banana are a match made in heaven, IMO.
- **Nutty Professor:** Add ½ cup of chopped walnuts or pecans to the banana bread batter for some extra crunch and flavor. Toasted nuts are even better!
- **Different Pudding Flavors:** While vanilla is classic, you could totally experiment with banana cream pudding for an extra banana punch, or even cheesecake pudding for a tangy twist. Go nuts!
- **Gluten-Free Flour:** You can usually substitute a 1:1 gluten-free baking blend for the all-purpose flour in the banana bread. Just make sure your blend contains xanthan gum!
- **Dairy-Free Options:** Use a plant-based milk (like almond or oat) for the pudding, a dairy-free butter alternative for the bread, and a coconut-based whipped topping. Easy peasy!
- **Spice It Up:** A pinch of cinnamon or nutmeg in the banana bread batter can add a lovely warmth.
FAQ (Frequently Asked Questions)
Got questions? I’ve got (casual) answers!
- **Can I use fresh bananas instead of instant pudding?** Well, technically yes, you *could* make a custard from scratch. But why put yourself through that when we’re aiming for delicious, easy, and fun? Instant pudding is our secret weapon here!
- **My bananas aren’t super ripe. Can I still use them?** You *can*, but the bread won’t be as naturally sweet or moist, and the banana flavor won’t be as intense. **Pro Tip:** You can ripen bananas quickly in the oven! Bake unpeeled bananas at 300°F (150°C) for 15-30 minutes until skins are black. Let them cool, then mash.
- **How long does this glorious creation last?** Covered tightly in the fridge, it’s usually good for 3-4 days. The bananas might start to brown a bit, but the flavor will still be amazing.
- **Can I make the banana bread ahead of time?** Absolutely! Bake the banana bread a day or two in advance. Store it wrapped at room temperature. Then, just assemble the pudding layers when you’re ready.
- **Can I freeze the banana bread?** Yes! The plain banana bread freezes beautifully. Wrap it tightly in plastic wrap, then foil, and it’ll last for a couple of months. Just thaw at room temperature before slicing and assembling with the pudding. You probably shouldn’t freeze the assembled pudding, though.
- **Is this good for breakfast?** Is a bear Catholic? Does the Pope live in the woods? Okay, maybe those aren’t the right sayings, but **yes!** It’s banana bread! It has fruit! We won’t tell anyone it’s also dessert.
Final Thoughts
So there you have it, folks! Not just banana bread, not just banana pudding, but a beautiful, harmonious marriage of the two. This isn’t just a recipe; it’s an invitation to treat yourself (and maybe a few lucky friends) to something truly special without pulling out all the stops. It’s comforting, it’s decadent, and it’s surprisingly simple. Now go forth, conquer those ripe bananas, and bask in the glory of your culinary genius. You’ve earned it!

