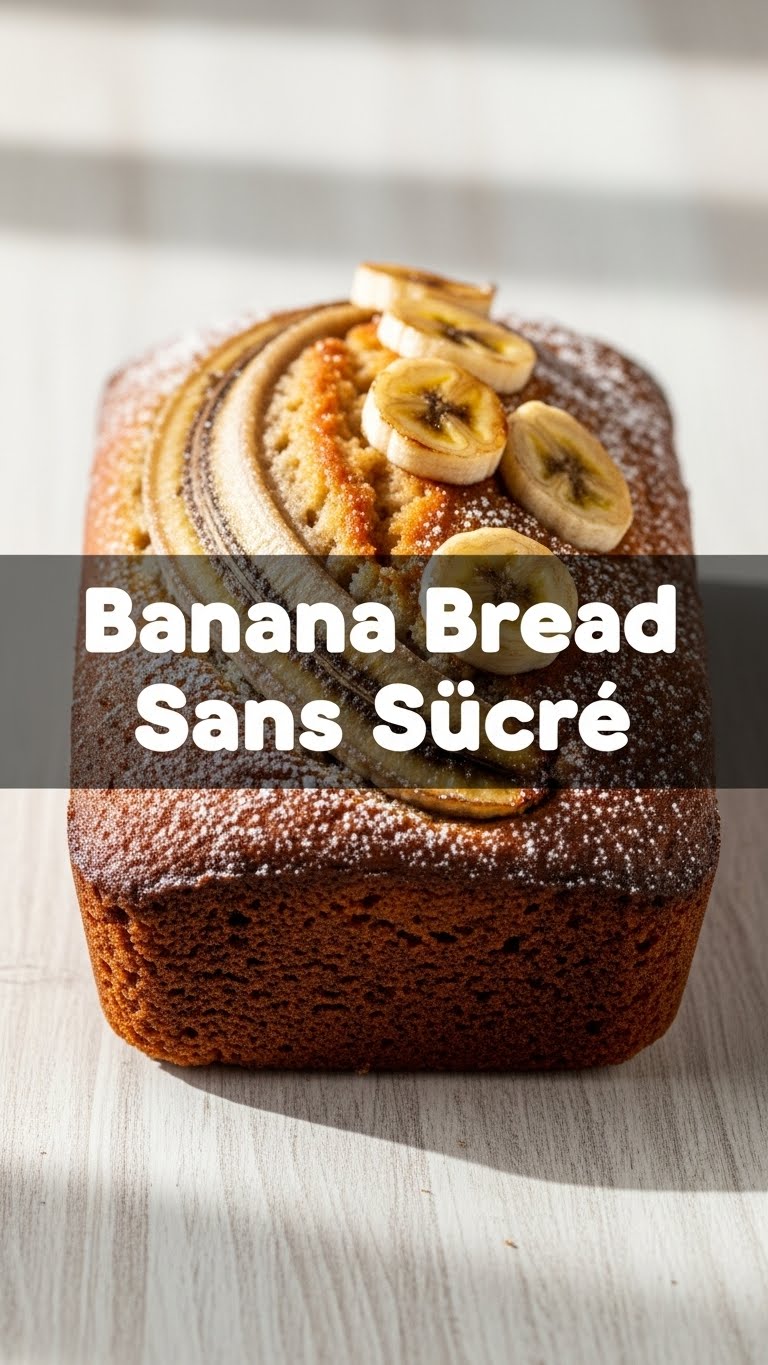
So, you’ve got those tragically brown bananas staring back at you from the fruit bowl, practically begging for a purpose beyond the compost bin, right? And the thought of adding a ton of extra sugar just feels… well, *extra*? My friend, I get it. We’re about to turn those overripe beauties into a loaf of pure, unadulterated comfort without all the refined sugar nonsense. Get ready for some serious banana bread magic!
Why This Recipe is Awesome
Okay, let’s be real. This isn’t just *any* banana bread. This is the “I can’t believe it’s this easy and tastes this good” banana bread. It’s perfect for those mornings when you want something warm and delicious but also kinda want to feel like a health guru (without actually being one). Here’s the lowdown on why this recipe is about to become your new best friend:
- **Zero Refined Sugar:** Yep, you heard that right! We’re letting the bananas do all the sweet talking. Talk about natural charisma!
- **Foolproof:** Seriously, it’s so simple, even your most “culinary-challenged” friend could ace it. I’ve made this while half-asleep, and it still turned out amazing.
- **Quick Cleanup:** Minimal dishes because who has time for scrubbing when there’s banana bread to eat?
- **Moist AF:** We’re talking melt-in-your-mouth, perfect texture every single time. No dry, crumbly sadness here.
Ingredients You’ll Need
Gather ’round, my baking buddy. Here’s what you’ll need for this glorious creation. Don’t worry, it’s nothing fancy, just good ol’ kitchen staples:
- **3-4 Very Ripe Bananas:** The uglier, the better! We’re talking brown spots, almost black. These are your natural sugar factories, so embrace the squish.
- **1 ½ cups All-Purpose Flour:** Your basic pantry hero. Don’t overthink it.
- **1 teaspoon Baking Soda:** This is our leavening MVP, giving our bread that fluffy lift.
- **½ teaspoon Salt:** A little pinch goes a long way to balance the sweetness.
- **1 Large Egg:** Room temperature if you’re feeling fancy, straight from the fridge if you’re like me and forget these things.
- **¼ cup Melted Coconut Oil (or any neutral oil like vegetable/canola):** For that glorious moisture.
- **1 teaspoon Vanilla Extract:** Because everything’s better with a splash of vanilla, am I right?
- **Optional Add-ins (for extra razzle-dazzle):**
- **½ cup Chopped Nuts:** Walnuts or pecans are classic, IMO.
- **½ cup Sugar-Free Chocolate Chips:** Because sometimes you just need that chocolate fix.
- **1 teaspoon Cinnamon:** Adds a lovely warmth, but totally optional.
Step-by-Step Instructions
Alright, apron on (or not, we don’t judge). Let’s get this deliciousness going!
- **Preheat Your Oven & Prep Your Pan:** First things first, get that oven to 350°F (175°C). Then, lightly grease and flour a standard loaf pan (9×5 inches). You can also line it with parchment paper for easy removal – a pro tip from someone who’s scraped a lot of bread out of pans.
- **Mash Those Bananas:** In a large bowl, mash your super ripe bananas with a fork until they’re mostly smooth but still have a few small lumps. We like a little texture!
- **Whisk the Wet Stuff:** To the mashed bananas, add the egg, melted oil, and vanilla extract. Whisk them all together until just combined. Don’t go crazy, we’re not making meringue here.
- **Combine the Dry Stuff:** In a separate medium bowl, whisk together the flour, baking soda, and salt. If you’re adding cinnamon, toss it in here too.
- **Marry Them Together:** Gently add the dry ingredients to the wet ingredients. **Mix until *just* combined.** Seriously, stop when you no longer see streaks of flour. A few lumps are totally fine, even desirable! If you’re adding nuts or chocolate chips, fold them in now.
- **Into the Pan it Goes:** Pour your beautiful batter into the prepared loaf pan. Spread it out evenly. Give the pan a gentle tap on the counter to settle it.
- **Bake Away!** Pop that pan into your preheated oven. Bake for 50-65 minutes. It really depends on your oven, so keep an eye on it.
- **Test for Doneness:** The bread is ready when a wooden skewer or toothpick inserted into the center comes out clean or with just a few moist crumbs.
- **Cool Down:** Once baked, let the bread cool in the pan for about 10-15 minutes before carefully transferring it to a wire rack to cool completely. This is the hardest part, FYI, because it smells SO good.
Common Mistakes to Avoid
We all make mistakes, especially in the kitchen. Here are a few to dodge so your banana bread dreams don’t turn into a baking nightmare:
- **Under-ripe Bananas:** Seriously, those yellow bananas aren’t ready for their big moment. They won’t give you the natural sweetness or the moist texture you crave. Wait for the dark spots – the darker, the sweeter, the better!
- **Overmixing the Batter:** Unless you want brick-bread, mix until *just* combined. Lumps are your friend here, embrace them! Overmixing develops the gluten too much, leading to a tough loaf.
- **Opening the Oven Door Too Early:** Resist the urge to peek! Especially in the first 30 minutes, opening the oven can cause your bread to sink in the middle. Patience, young padawan.
- **Not Greasing Your Pan Properly:** There’s nothing sadder than a perfect loaf stuck to the pan. Take an extra minute to grease and flour (or parchment line) your pan properly.
Alternatives & Substitutions
Feeling adventurous or just missing an ingredient? No stress! Here are some simple swaps to keep the banana bread party going:
- **Flour Power:** Want to go a little healthier? You *can* swap up to half of the all-purpose flour for whole wheat flour, but it might result in a slightly denser loaf. For a gluten-free version, use a 1:1 gluten-free baking blend (though I haven’t personally perfected that one, so proceed with a sense of adventure!).
- **Oil Alternatives:** If you’re out of coconut oil, any neutral oil like vegetable, canola, or even a light olive oil will work. For a lower-fat option, you could try unsweetened applesauce, but this might make your bread a bit denser.
- **Extra Sweetness (Natural Kind!):** If your bananas weren’t *super* ripe or you just prefer a sweeter kick without refined sugar, consider adding a handful of chopped dates or raisins to the batter.
- **Nut-Free Zone:** Not a fan of nuts? Or allergic? Skip ’em! Or try sunflower seeds or pumpkin seeds for a nice crunch.
FAQ (Frequently Asked Questions)
- **My bananas aren’t ripe enough! Can I still make it?**
Technically, yes, but your bread won’t be as sweet or moist. For a quick ripen, bake unpeeled bananas on a baking sheet at 300°F (150°C) for 15-30 minutes until they’re black and soft. Let ’em cool, and then you’re golden!
- **How long does this sans sucre banana bread last?**
At room temperature, tightly wrapped, it’ll last 3-4 days. In the fridge, it’s good for up to a week. For longer storage, slice and freeze individual pieces for a quick, guilt-free treat whenever you want!
- **Can I add chocolate chips?**
Absolutely! I even listed it as an optional add-in. Just make sure they’re sugar-free or a very dark chocolate (70% cocoa or higher) if you’re sticking to the “sans sucre” vibe.
- **What if I don’t have baking soda?**
You can try using baking powder instead, but you’ll need a bit more – typically 3 times the amount of baking soda. So, 3 teaspoons of baking powder for this recipe. Just know the texture might be slightly different.
- **Can I make muffins instead of a loaf?**
Oh, heck yes! Just divide the batter among 12 muffin cups (lined, of course). Bake at the same temperature for 20-25 minutes, or until a toothpick comes out clean. Muffins are great for portion control, LOL.
- **Is this bread actually healthy?**
Well, it’s definitely *healthier* than most traditional banana bread recipes because we’re skipping all the refined sugar. It still has flour and oil, so it’s not exactly a salad, but it’s a great option for a treat that you can feel good about enjoying. Balance, right?
Final Thoughts
So there you have it, my friend. A delicious, guilt-free-ish banana bread that practically bakes itself. It’s warm, it’s comforting, and it makes your whole house smell incredible. Slice yourself a generous piece, maybe slather on a little nut butter if you’re feeling wild, and enjoy! You’ve earned this moment of pure, banana-y bliss. Now go impress someone—or yourself—with your new culinary skills. You’re basically a chef now!
