So you’re craving something tasty but too lazy to spend forever in the kitchen, huh? Same. And maybe you’re also trying to cut down on flour, or just ran out? Double same. Good news, my friend, because I’ve got a recipe that’s about to blow your mind and your taste buds: Banana Bread. But like, the *cool* banana bread. The no-flour, “OMG did I just make this?!” kind of banana bread. Get ready to be a kitchen wizard without all the hocus pocus.
Why This Recipe is Awesome
Okay, let’s be real. Most banana bread recipes are a *thing*. Flour everywhere, multiple bowls, the whole nine yards. This one? Nah. This recipe is your new best friend because:
- It’s literally **idiot-proof**. Seriously, even I didn’t mess it up, and my kitchen adventures often involve smoke alarms.
- No flour! Which means it’s naturally gluten-free if you’re into that, or just out of flour (hey, we’ve all been there).
- It’s ridiculously moist and flavorful. Like, “why haven’t I been making banana bread like this my whole life?” levels of delicious.
- Minimal cleanup. One bowl, baby! (Mostly). Your future self will thank you.
- It uses up those sad, spotty bananas on your counter that are judging you.
Ingredients You’ll Need
Gather your troops! Here’s what you’ll need to make this magic happen. Don’t worry, it’s not a long list, and most of these are probably chilling in your pantry already.
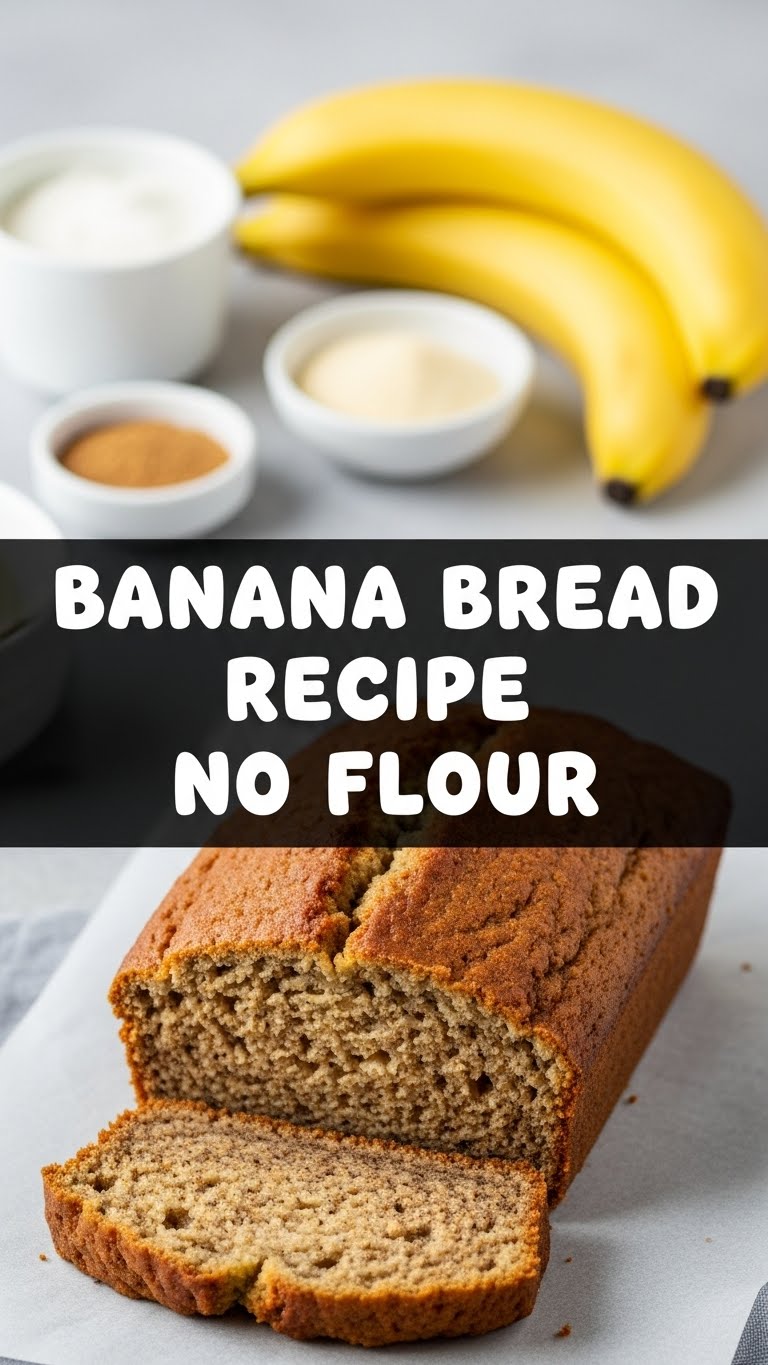
- **3 ripe bananas:** And I mean RIPE. Like, brown, spotty, almost-black ripe. Don’t even think about using yellow ones unless you want bland banana bread. Don’t waste your time.
- **2 large eggs:** Room temperature is ideal, but honestly, who has time for that? Just grab ’em from the fridge.
- **1/2 cup nut butter:** Creamy peanut butter is classic, but almond butter or cashew butter works too. **Avoid the chunky stuff** unless you like surprises.
- **1/4 cup maple syrup or honey:** For that natural sweetness. Adjust to your personal sweet tooth level.
- **1 tsp vanilla extract:** Because everything is better with vanilla. It’s a fact.
- **1 tsp baking soda:** Our leavening friend. Don’t skip it unless you want a banana brick.
- **Pinch of salt:** Enhances all those yummy flavors. Science!
- **Optional add-ins:** 1/2 cup chocolate chips (duh), chopped nuts, a sprinkle of cinnamon. Go wild!
Step-by-Step Instructions
Alright, apron on, good vibes only! Let’s get baking. This is so easy, you’ll wonder if you missed a step (you didn’t).
- Preheat your oven to 350°F (175°C). Seriously, do it now. Line a loaf pan (8×4 or 9×5 inches) with parchment paper or grease it really well. Don’t be lazy on this step.
- Mash those bananas: In a large bowl, mash your super ripe bananas with a fork until they’re mostly smooth. A few lumps are totally fine and add character.
- Mix in the wet stuff: Add the eggs, nut butter, maple syrup (or honey), and vanilla extract to the mashed bananas. Stir it all together until well combined. Don’t overmix, just get it cozy.
- Add the dry stuff: Sprinkle in the baking soda and salt. Mix again until just combined. If you’re using optional add-ins like chocolate chips, gently fold them in now.
- Pour and bake: Pour the batter into your prepared loaf pan. Give it a gentle tap on the counter to settle.
- Bake for 35-45 minutes. Or until a toothpick inserted into the center comes out clean. **Keep an eye on it** after 30 minutes, ovens vary!
- Cool down: Let the banana bread cool in the pan for about 10-15 minutes before transferring it to a wire rack to cool completely. This part is torture, but essential for perfect slices.
Common Mistakes to Avoid
Nobody’s perfect, but we can try to avoid these rookie errors, right?
- **Using under-ripe bananas:** This is like the cardinal sin of banana bread. You won’t get that deep, sweet banana flavor. Don’t do it. Just… don’t.
- **Thinking you don’t need to preheat the oven:** Rookie mistake! Your bread won’t rise properly, and you’ll end up with a dense hockey puck.
- **Overmixing the batter:** While it’s hard to truly overmix with no flour, vigorous mixing can still develop any remaining gluten in the nut butter or make the texture less tender. Mix until *just* combined.
- **Not greasing your pan properly (or using parchment):** Unless you enjoy chiseling bread out of a pan, take an extra minute to prep.
- **Cutting into it too soon:** I know, the smell is intoxicating. But let it cool! It continues to set as it cools, giving you better slices and less crumble.
Alternatives & Substitutions
Life’s about options, darling! Here are some ways to tweak this recipe to your heart’s content, or just because you ran out of something important.
- **Nut Butter Swap:** Any creamy nut butter works! Peanut butter gives a classic, slightly nutty flavor, while almond butter is a bit milder. Sunflower seed butter (SunButter) is a great nut-free option if allergies are a concern.
- **Sweetener Switch:** Maple syrup or honey are my faves, but you could try agave nectar too. Just remember to taste the batter (before adding eggs, obvs) if you’re unsure about the sweetness level.
- **Add-ins Extravaganza:** Chocolate chips are non-negotiable IMO, but don’t stop there! Walnuts, pecans, shredded coconut, dried cranberries, or a dash of cinnamon or nutmeg would be fantastic.
- **Make it Mini:** Bake in a muffin tin for banana bread muffins! Reduce baking time to about 20-25 minutes. So cute, so portion-controlled (or not!).
FAQ (Frequently Asked Questions)
Got questions? I’ve got answers! (Mostly.)
- **”Can I use frozen bananas?”** Yes, absolutely! Just thaw them first and drain any excess liquid. They’ll be extra mushy, which is perfect for mashing.
- **”My bananas aren’t super ripe, help!”** Ugh, rookie move. If you’re desperate, you can bake them on a baking sheet at 300°F (150°C) for 15-20 minutes until their skins turn black. Let them cool, then mash. Crisis averted!
- **”Is this healthy?”** Define “healthy.” It’s flourless and uses natural sweeteners and healthy fats, which is a win in my book. But it’s still dessert, so, you know, moderation and all that jazz.
- **”Can I make this vegan?”** You can try substituting “flax eggs” (1 tbsp ground flaxseed + 3 tbsp water per egg, let sit for 5 mins) for the eggs. I haven’t personally tested it for this specific recipe, but it often works well in similar bakes.
- **”How do I store it?”** Keep it covered at room temperature for 2-3 days, or in the fridge for up to a week. It also freezes beautifully for up to 3 months. Just wrap slices tightly!
- **”Can I use sugar instead of maple syrup?”** Well, technically yes, but why hurt your soul like that? If you absolutely must, you could try 1/4 cup brown sugar, but the texture might be slightly different. The liquids contribute to the moisture.
Final Thoughts
And there you have it, folks! Your very own, incredibly easy, absolutely delicious, no-flour banana bread. You just went from “I have sad bananas” to “I am a baking god/goddess” in less than an hour of active time. How cool is that?
Now go impress someone—or yourself—with your new culinary skills. You’ve earned it! Grab a slice, maybe a cup of coffee, and pat yourself on the back. You’re awesome. Happy baking (and eating)!


