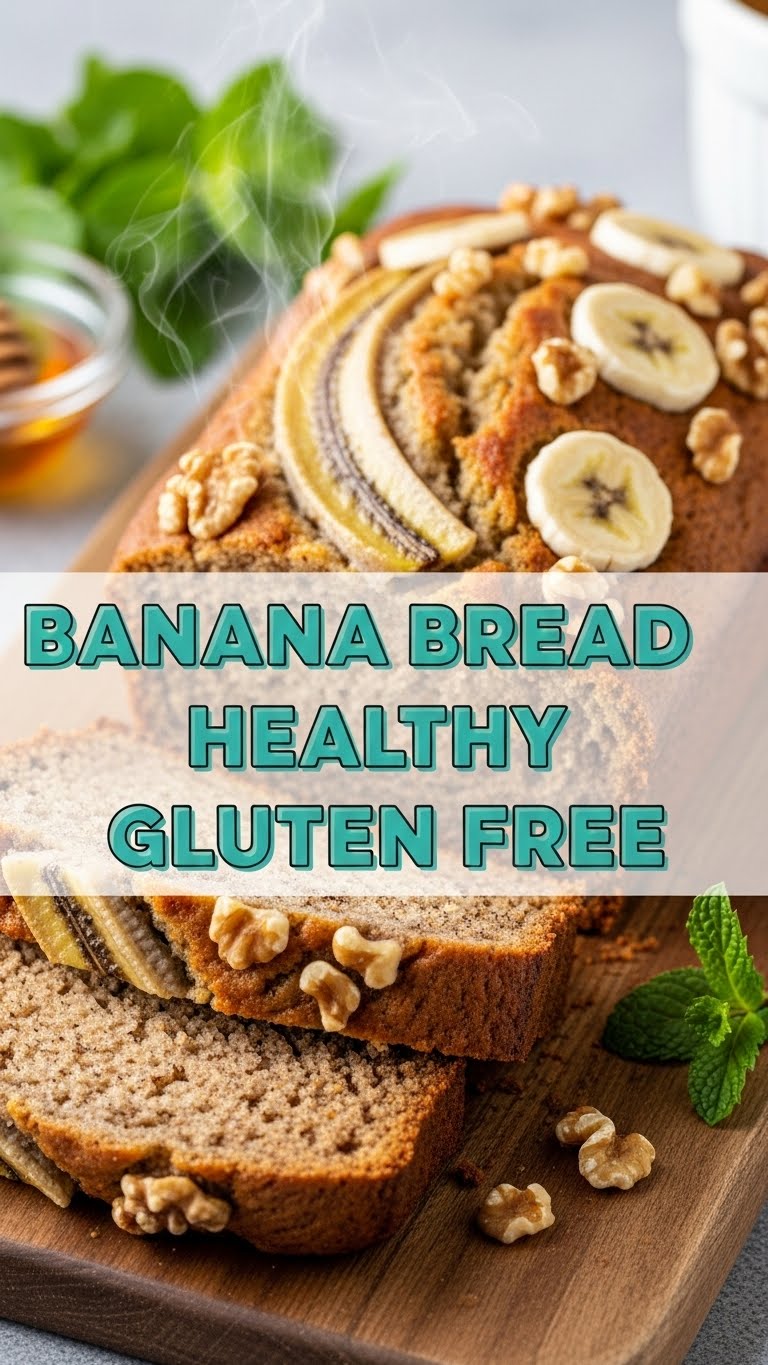
So you’re craving something tasty but too lazy to spend forever in the kitchen, huh? Same. And maybe your gut throws a tantrum if gluten even *looks* at it, or you’re just trying to be a bit healthier without sacrificing all joy? My friend, you’ve landed in the right spot. Get ready for a banana bread recipe that’s so good, you’ll forget it’s actually good for you (mostly). We’re talking healthy, gluten-free, and embarrassingly easy. Let’s do this!
Why This Recipe is Awesome
Okay, let’s be real. Banana bread is already a hug in food form. But *this* banana bread? It’s like a warm, fuzzy, guilt-free hug that doesn’t upset your stomach. Here’s why it’s about to become your new favorite:
- It’s **idiot-proof**. Seriously, if I can make it without setting off the smoke alarm, you’re golden.
- **Gluten-free** and delicious. No cardboard taste, no weird textures. Just pure banana-y bliss.
- **Healthier-ish.** We’re swapping some less-great stuff for better alternatives, so you can totally have that second slice (don’t tell anyone I said that).
- **Minimal dishes.** Because who has time for scrubbing pots and pans when there’s banana bread to be eaten?
- Your house will smell like a bakery, which is a major win, **IMO**.
Ingredients You’ll Need
Gather your troops! No exotic spices from the deepest Amazon required, just everyday (ish) stuff.
- **3-4 Ripe Bananas:** The browner, the better! We’re talking black spots, mushy gloriousness. If they still look like they belong in a fruit bowl, you’ve got a problem. These are the stars of the show!
- **2 Large Eggs:** The binders, the glue, the unsung heroes.
- **1/2 cup Maple Syrup or Honey:** Your liquid gold for sweetness. Adjust to your sweet tooth’s desire.
- **1/4 cup Melted Coconut Oil or Ghee/Melted Butter:** Adds richness and moisture. Choose your fighter!
- **1 teaspoon Vanilla Extract:** Because everything is better with a splash of vanilla.
- **1 1/2 cups Gluten-Free All-Purpose Flour Blend:** Make sure it has xanthan gum already in it, or add 1/2 tsp if not. This is where the GF magic happens.
- **1 teaspoon Baking Soda:** For that beautiful rise. Nobody likes a flat personality, or a flat banana bread.
- **1/2 teaspoon Ground Cinnamon:** Optional, but why wouldn’t you? It’s like a warm hug.
- **Pinch of Salt:** Just a tiny bit to make all the other flavors sing.
- **Optional Mix-ins (1/2 cup):** Chocolate chips (dark, because balance!), chopped walnuts, pecans, or a sprinkle of shredded coconut. Live a little!
Step-by-Step Instructions
Alright, apron on (or not, we don’t judge). Let’s get baking!
- **Preheat Your Oven & Prep Your Pan:** First things first, turn your oven to **350°F (175°C)**. Grease a standard loaf pan (8.5 x 4.5 inches or similar) or line it with parchment paper, leaving an overhang to easily lift it out later. This is a **pro tip** for easy removal.
- **Mash Those Bananas:** In a large bowl, take your gloriously overripe bananas and mash them up with a fork until they’re mostly smooth with a few lumps. Texture is character!
- **Whisk the Wet Stuff:** To your mashed bananas, add the eggs, maple syrup (or honey), melted coconut oil (or butter/ghee), and vanilla extract. Give it a good whisk until everything is nicely combined.
- **Combine the Dry Ingredients:** In a separate medium bowl, whisk together your gluten-free flour blend, baking soda, cinnamon (if using), and salt. Ensure there are no clumps.
- **Bring Them Together:** Pour the dry ingredients into the wet ingredients. Mix gently with a spatula until just combined. **Don’t overmix!** A few streaks of flour are totally fine; overmixing develops gluten (even in GF flour sometimes) and can lead to tough bread.
- **Fold in Your Goodies:** If you’re adding chocolate chips, nuts, or coconut, gently fold them into the batter now.
- **Into the Pan it Goes:** Pour your beautiful batter into the prepared loaf pan. You can sprinkle a few extra chocolate chips or nuts on top if you’re feeling fancy.
- **Bake It Up:** Pop the pan into your preheated oven and bake for **45-60 minutes**. The exact time will depend on your oven. You’ll know it’s ready when a toothpick inserted into the center comes out clean or with just a few moist crumbs.
- **Cool Down:** Once baked, let the banana bread cool in the pan for about 10-15 minutes. Then, using the parchment paper overhang (see, I told you that was a pro tip!), lift it out and transfer it to a wire rack to cool completely before slicing. This part is crucial for texture!
Common Mistakes to Avoid
We all make mistakes, darling. Let’s try to avoid these common banana bread blunders:
- **Using Under-ripe Bananas:** This is perhaps the biggest sin. Green-ish bananas just won’t give you that intense banana flavor or the natural sweetness you crave. **Wait for those brown spots!**
- **Overmixing the Batter:** Seriously, once the wet and dry ingredients are *just* combined, stop. Mixing too much develops the gluten (yes, even GF flour can get a bit gummy if overmixed) and makes your bread tough. We want tender, not chew-toy.
- **Not Preheating the Oven:** Your oven isn’t psychic. Give it time to get to the right temperature. Baking in a cold oven results in uneven baking and a weird texture.
- **Cutting it While Hot:** I know, the smell is intoxicating, and patience is a virtue you sometimes lack. But **let it cool!** Cutting hot banana bread will make it crumbly and difficult to slice cleanly.
- **Forgetting to Grease the Pan:** Unless you want to chisel your banana bread out of the pan, don’t skip this step. Or use parchment paper!
Alternatives & Substitutions
Feeling adventurous? Or just realized you’re missing an ingredient? Here are some tweaks:
- **Flour Power:**
- **For a nuttier flavor:** You can sometimes swap out 1/4 – 1/2 cup of the GF all-purpose flour for almond flour. It’ll give it a slightly different, denser crumb.
- **Oat Flour:** If you’re into a heartier texture and don’t mind a slightly denser loaf, certified gluten-free oat flour can work as a direct substitute for the GF blend.
- **Sweetener Swaps:**
- **Agave Nectar:** Can be used instead of maple syrup or honey, usually in the same quantity.
- **Coconut Sugar/Brown Sugar:** If you prefer a granulated sweetener, you can use 1/2 cup of coconut sugar or packed brown sugar. Just know it might alter the moisture slightly.
- **Oil Alternatives:**
- **Applesauce:** For a lower-fat option, you can swap the oil for an equal amount of unsweetened applesauce. Your bread might be a tad denser, but still delicious!
- **Greek Yogurt:** A similar amount of plain Greek yogurt can also add moisture and a slight tang.
- **Make it Vegan:**
- **Flax Eggs:** Replace the 2 eggs with 2 “flax eggs” (2 tablespoons ground flaxseed meal mixed with 6 tablespoons water, let sit for 5 minutes until gel-like).
- **Oil:** Ensure you’re using coconut oil or another plant-based oil, not butter or ghee.
FAQ (Frequently Asked Questions)
Got questions? I’ve got answers (and opinions, naturally).
- **My bananas aren’t ripe enough, help! Can I still use them?**
Well, technically yes, but why would you want bland banana bread? **FYI**, if you’re in a pinch, you can bake unpeeled bananas on a baking sheet at 300°F (150°C) for 15-20 minutes until their skins are shiny black. Let them cool, then proceed. Otherwise, wait! Patience is a virtue, especially for deliciousness.
- **Can I use regular flour instead of gluten-free?**
Sure, but then it’s just regular banana bread, not our fancy, gut-friendly version! If you’re not avoiding gluten, feel free to use 1 1/2 cups of all-purpose wheat flour.
- **How long does this glorious banana bread last?**
In your house? Probably 2 days before it magically vanishes. Realistically, stored at room temperature in an airtight container, it’s good for 3-4 days. In the fridge, it’ll last a week. It also freezes beautifully!
- **Why is my banana bread dry and crumbly?**
Oh no! Usually, this means you’ve either over-baked it, or you might have used too much flour (especially if you scooped it with the measuring cup instead of spooning it in and leveling). Make sure your measurements are accurate and don’t bake it past the toothpick test.
- **Can I add other fruits or veggies?**
Absolutely! Shredded zucchini or carrots (squeeze out excess water!) can be folded in for extra moisture and nutrients. Berries also work, but they might make the bread a bit wetter. Experiment!
- **Can I make muffins instead of a loaf?**
Yes! This recipe easily converts to muffins. Fill a greased muffin tin about two-thirds full and bake for 20-25 minutes. Keep an eye on them, as baking times will be shorter.
Final Thoughts
There you have it, folks! A banana bread recipe that’s kind to your body, easy on your schedule, and an absolute delight for your taste buds. Go on, whip up a batch. Your kitchen will smell amazing, your tummy will be happy, and you’ll officially be a banana bread wizard. Now go impress someone—or yourself—with your new culinary skills. You’ve earned it!

