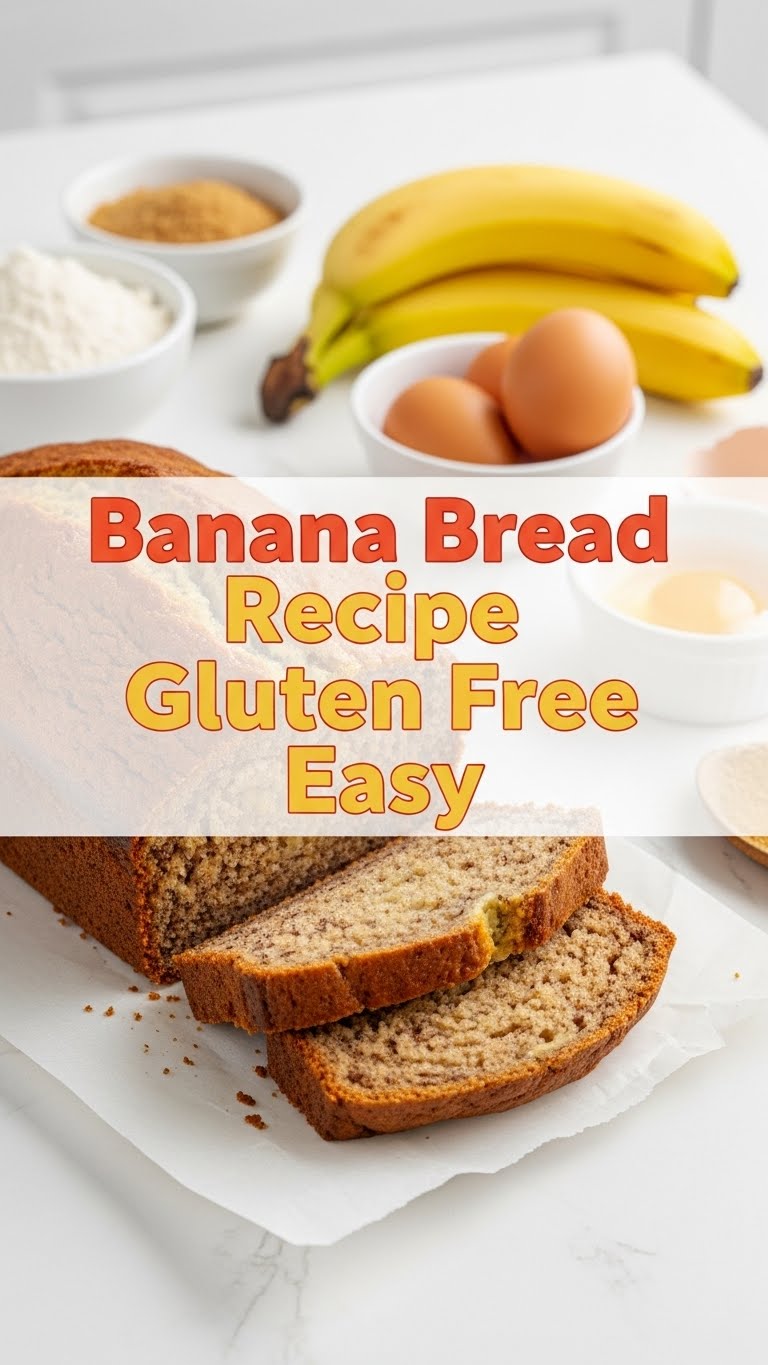
So, you’re craving something warm, comforting, and utterly delicious but the thought of spending hours in the kitchen (or, gasp, dealing with complicated gluten-free baking) makes you want to just order takeout? Same, friend, same. But hold your horses, because I’m about to drop a recipe on you that’s so ridiculously easy and so incredibly good, you’ll wonder why you ever hesitated. We’re talking about **Gluten-Free Banana Bread** – the kind that makes your kitchen smell like a warm hug and your taste buds sing.
Why This Recipe is Awesome
Listen, I get it. Gluten-free baking can sometimes feel like a high-stakes science experiment. But not this one. This recipe is your culinary superhero cape, your secret weapon, your, dare I say, *idiot-proof* guide to banana bread glory. Seriously, I’ve made it on a Tuesday afternoon when my brain was mostly static, and it still turned out perfectly. It’s naturally sweet from those glorious overripe bananas, perfectly moist, and has that classic banana bread comfort factor without any gluten-induced drama. Plus, the best part? It uses super common ingredients, so no hunting for obscure flours or weird starches. **It’s the kind of recipe that makes you look like a baking genius with minimal effort.** Winning!
Ingredients You’ll Need
Gather ’round, folks! Here’s what you need to whip up this magic. Don’t worry, it’s all chill:
- **3-4 Ripe to Overripe Bananas:** No, seriously, the browner and spottier, the better. These are the unsung heroes bringing all the natural sweetness and moisture to the party. Think “too far gone for eating raw, but perfect for baking.”
- **1/2 cup Unsalted Butter:** Melted and cooled slightly. Or use coconut oil if you’re feeling tropical.
- **1/2 cup Granulated Sugar:** Just enough sweetness to complement the bananas. If your bananas are super ripe, you might even get away with a little less.
- **1 Large Egg:** Room temperature is ideal, but honestly, who has time for that? Just grab one from the fridge.
- **1 tsp Vanilla Extract:** Because everything is better with vanilla. It’s a fact.
- **1 1/2 cups Gluten-Free All-Purpose Flour Blend:** **This is key!** Make sure it’s a blend that contains xanthan gum (most good ones do). If yours doesn’t, add 1/2 tsp of xanthan gum to your dry ingredients.
- **1 tsp Baking Soda:** For that lovely lift and fluffiness.
- **1/2 tsp Salt:** Balances all the sweet flavors and makes them pop.
- **Optional Add-ins (but highly recommended):** 1/2 cup chocolate chips (because, duh), chopped walnuts, or pecans.
Step-by-Step Instructions
Alright, let’s get down to business. These steps are so easy, you could probably do them in your sleep:
- **Get Preheated & Prepped:** Preheat your oven to 350°F (175°C). Lightly grease and flour a 9×5-inch loaf pan with some of your GF flour blend (or line with parchment paper for easy removal).
- **Mash Those Bananas:** In a medium bowl, mash your ripe bananas with a fork until they’re mostly smooth with a few small lumps. We’re going for rustic, not baby food.
- **Mix the Wet Stuff:** In a separate large bowl, whisk together the melted butter, granulated sugar, egg, and vanilla extract until well combined.
- **Combine Wet & Bananas:** Pour the mashed bananas into the wet mixture. Stir gently until just combined. Don’t overmix here!
- **Whisk the Dry Stuff:** In another bowl (yes, another one, it’s worth it), whisk together the gluten-free flour blend, baking soda, and salt. Make sure there are no lumps.
- **Bring Them Together:** Add the dry ingredients to the wet banana mixture. Mix with a spatula or spoon until *just combined*. **A few streaks of flour are totally fine!** Overmixing develops gluten (even in GF flour blends, some starches can become gummy) and will give you a tough loaf.
- **Fold in the Goodies (Optional but YAY!):** If you’re using chocolate chips or nuts, gently fold them into the batter now.
- **Bake It Up!** Pour the batter into your prepared loaf pan. Bake for 50-60 minutes, or until a wooden skewer or toothpick inserted into the center comes out clean or with moist crumbs (no wet batter!).
- **Cool Down:** Let the banana bread cool in the pan for about 10-15 minutes before carefully transferring it to a wire rack to cool completely. Or, if you’re like me, slice it warm and burn your tongue. Your call.
Common Mistakes to Avoid
Nobody’s perfect, but we can at least try to avoid some classic blunders:
- **Using Underripe Bananas:** This is perhaps the biggest sin. Green bananas lack the sugar and moisture needed for truly spectacular banana bread. **Wait for the brown spots!** Seriously.
- **Overmixing the Batter:** We talked about this, but it bears repeating. Once the wet and dry ingredients meet, mix *just until combined*. It’s not a smoothie, it’s banana bread.
- **Not Greasing/Lining the Pan:** Trust me, you don’t want to spend 20 minutes chiseling your beautiful loaf out of the pan. **Take the extra 30 seconds to prep.**
- **Opening the Oven Door Too Often:** I know, the smell is intoxicating, but resist the urge! Every time you open the door, the temperature drops, messing with your bread’s rise. Patience, young padawan.
- **Eating the Whole Loaf in One Sitting:** Okay, fine, this isn’t a “mistake” per se, but it definitely impacts your future snack plans. Pace yourself… or don’t. I’m not your mom.
Alternatives & Substitutions
Feeling a little adventurous, or missing an ingredient? No stress, we can totally roll with it:
- **Flour Power:** If you don’t have an all-purpose GF blend, you can experiment with a mix of almond flour and tapioca starch, but the liquid ratios might need tweaking. For a simpler swap, just stick to a good store-bought GF all-purpose blend.
- **Sweetener Swaps:** You can totally use brown sugar instead of granulated for a deeper, more caramel-like flavor. Maple syrup or honey can also work, but reduce the butter/oil by a tablespoon or two to account for the extra liquid.
- **Fat Facts:** Melted coconut oil works beautifully in place of butter for a dairy-free option. For a lighter loaf, you can even swap half the butter for unsweetened applesauce, but know it might be slightly less rich.
- **Vegan Vibes:** For a vegan version, swap the egg for a “flax egg” (1 tbsp ground flaxseed mixed with 3 tbsp water, let sit for 5 minutes) and use coconut oil or a plant-based butter.
- **Spice It Up:** A pinch of cinnamon or nutmeg can add a wonderful warmth. Or throw in some shredded coconut for a tropical twist!
FAQ (Frequently Asked Questions)
Got questions? I’ve got (casual) answers!
- **”My bananas aren’t overripe! Can I still make this?”** Well, technically yes, but why hurt your soul like that? If you’re desperate, you can bake them in their peels at 300°F (150°C) for 15-20 minutes until they’re black and soft. Or just wait. Patience is a virtue, especially for delicious banana bread.
- **”Can I make this dairy-free too?”** You betcha! Just swap the butter for an equal amount of melted coconut oil or a dairy-free butter alternative. Easy peasy.
- **”How do I know when it’s perfectly baked?”** A good ol’ toothpick or wooden skewer inserted into the center should come out clean or with just a few moist crumbs attached. If it’s gooey, give it a few more minutes.
- **”How long does this gluten-free goodness last?”** Honestly? Not long in my house. But officially, it’ll keep covered at room temperature for 2-3 days, or in the fridge for up to a week. It also freezes beautifully for up to 3 months.
- **”Can I add other things besides chocolate chips?”** **OMG YES!** Walnuts, pecans, shredded coconut, dried cranberries, a sprinkle of cinnamon, a dash of nutmeg… the world is your oyster! Don’t be shy!
- **”Do I *really* need gluten-free flour, or can I just use regular?”** Well, since this is a *gluten-free* banana bread recipe, using regular flour would defeat the purpose, wouldn’t it? 😉 Stick to a good GF all-purpose blend for best results.
Final Thoughts
And there you have it! Your new go-to, stress-free, utterly delectable gluten-free banana bread recipe. Whether you’re making it for yourself (smart move), impressing friends, or just because you had some sad-looking bananas on the counter, you’re now armed with the knowledge and power to create pure deliciousness. It’s comforting, it’s easy, and it tastes like happiness. So go ahead, whip up a batch, make your kitchen smell divine, and treat yourself. You absolutely, 100%, totally deserve it. Happy baking, superstar!
