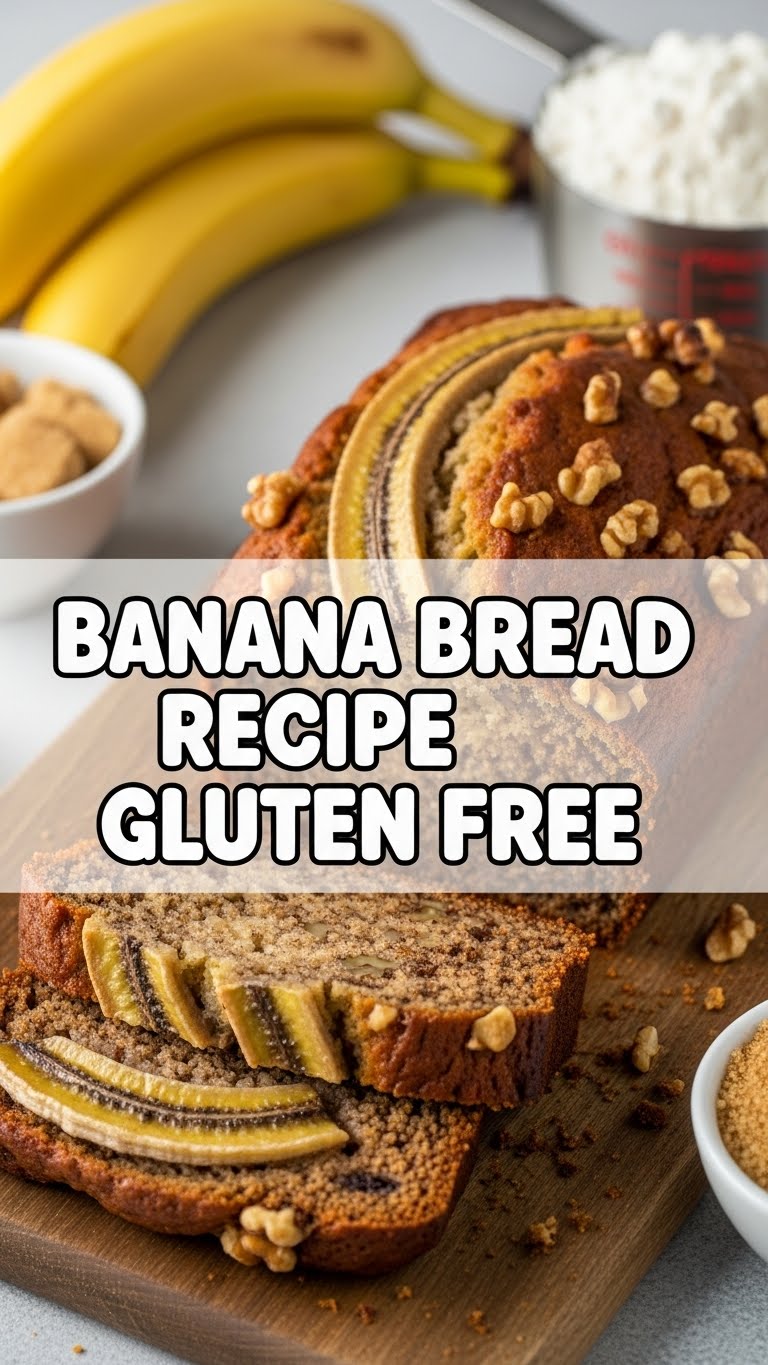
So you’re craving something warm, sweet, and comforting, but also want to keep your tummy happy and skip the gluten drama, huh? Same, friend, same. And what if I told you that making an utterly delicious gluten-free banana bread doesn’t require a science degree or the patience of a saint? Because, let’s be real, who has time for that when there are perfectly ripe (or, let’s be honest, aggressively brown) bananas begging for their destiny? Get ready, because we’re about to bake some magic!
Why This Recipe is Awesome
Okay, buckle up buttercup, because this isn’t just *any* banana bread recipe. This is THE banana bread recipe. Why? Let me count the ways (or at least, a few of the most important ones):
- It’s **idiot-proof**. Seriously, even I, a person who once set off a smoke alarm making toast, can nail this.
- **Gluten-Free Goodness**: Your gut will thank you. No bloat, all joy. You can finally enjoy a slice (or three) without feeling like you swallowed a brick.
- **Uses up those sad, forgotten bananas**: You know, the ones that have been sitting on your counter for a week, judging you with their darkening skins. This recipe gives them a glorious second life.
- **Moist, flavorful, and perfectly sweet**: We’re talking melt-in-your-mouth deliciousness here. None of that dry, crumbly GF nonsense.
- It makes your house smell like a bakery, which is basically free aromatherapy. You’re welcome.
Ingredients You’ll Need
Gather your troops! Here’s what you’ll need to transform those lonely bananas into a masterpiece. Don’t worry, it’s nothing too exotic.
- 3-4 Ripe Bananas: The blacker, the better! Seriously, embrace the spots. They’re nature’s sugar bombs.
- 1/2 cup Unsalted Butter (1 stick), melted: Or coconut oil if you’re feeling tropical.
- 1/2 cup Granulated Sugar: Or brown sugar for a deeper, caramel-y vibe. Your call!
- 1 Large Egg: Room temp, if you’re fancy.
- 1 teaspoon Vanilla Extract: Because vanilla makes everything better, duh.
- 1 1/2 cups Gluten-Free All-Purpose Flour Blend: Make sure it’s a blend with xanthan gum, or add 1/2 tsp if yours doesn’t have it. This is important for structure!
- 1 teaspoon Baking Soda: Our lift-off fuel.
- 1/2 teaspoon Salt: Don’t skip it! It balances the sweetness.
- Optional Add-ins: 1/2 cup chocolate chips (practically mandatory, IMO), chopped nuts, a dash of cinnamon… get creative!
Step-by-Step Instructions
Alright, apron on, good tunes playing, let’s do this! These steps are so easy, you’ll be wondering why you ever bought banana bread.
- Prep Your Stage: First things first, preheat your oven to 350°F (175°C). Then, lightly grease and flour a 9×5 inch loaf pan. You can also line it with parchment paper if you want an easy lift-out.
- Mash ‘Em Up: In a medium bowl, mash your ripe bananas with a fork until they’re mostly smooth but still have a few small lumps. We like texture!
- Wet Ingredients Unite!: Add the melted butter (or coconut oil), sugar, egg, and vanilla extract to the mashed bananas. Whisk it all together until it’s well combined and looks delightfully gooey.
- Dry Goods Party: In a separate, larger bowl, whisk together your gluten-free flour blend, baking soda, and salt. Make sure everything is evenly distributed.
- Marry Wet & Dry: Pour the wet banana mixture into the dry flour mixture. Stir gently with a spatula until just combined. **Don’t overmix!** A few flour streaks are totally fine; overmixing leads to tough bread, and we don’t want tough bread.
- Fold in the Goodies: If you’re adding chocolate chips, nuts, or anything else, now’s the time! Gently fold them into the batter.
- Into the Pan: Pour your glorious batter into the prepared loaf pan. Spread it evenly.
- Bake It Off: Pop that pan into your preheated oven and bake for 50-65 minutes. Baking times can vary, so keep an eye on it.
- The Toothpick Test: You’ll know it’s done when a toothpick inserted into the center comes out clean or with a few moist crumbs (but no wet batter!).
- Cool Down, Then Devour: Let the banana bread cool in the pan for about 10-15 minutes before transferring it to a wire rack to cool completely. Or, if you’re impatient like me, slice into it while it’s still warm and gooey. Just be warned, it might be a bit crumbly if you cut it too soon!
Common Mistakes to Avoid
Even though this recipe is practically foolproof, there are a few banana bread blunders you can easily sidestep. Consider this your cheat sheet to perfection!
- **Using Under-Ripe Bananas**: This is a flavor killer! Green or yellow bananas just don’t have the sweetness or the moisture needed. Wait for those glorious brown spots, my friend.
- **Overmixing the Batter**: I know it’s tempting to get every lump out, but resist! Overmixing develops gluten (even in GF flour blends, which can make things tough) and incorporates too much air, leading to dry, dense bread. Just mix until *just* combined.
- **Not Preheating Your Oven**: Rookie mistake! A properly preheated oven ensures even baking from the start. Cold oven, sad bread.
- **Opening the Oven Door Too Early**: Your banana bread needs time to set. Peeking too often can cause it to sink in the middle. Be patient!
- **Not Letting it Cool (Enough)**: I get it, the smell is intoxicating. But slicing into piping hot banana bread can make it fall apart. A little cooling time helps it firm up.
Alternatives & Substitutions
Feeling adventurous? Or maybe you just ran out of something? No worries, here are some easy swaps and additions to keep things interesting:
- **Sweeteners**: Instead of granulated sugar, you can use maple syrup (reduce other liquids slightly) or honey for a different flavor profile. Just make sure your maple syrup is pure, not that corn syrup stuff.
- **Fats**: Coconut oil is a fantastic alternative to butter for a slightly tropical flavor and a dairy-free option. Unsweetened applesauce can also replace half the fat for a lighter version, but use sparingly to avoid gumminess.
- **Gluten-Free Flour**: While an all-purpose GF blend is best, if you’re experimenting, ensure your blend has a good balance of starches and flours, and don’t forget that xanthan gum! Using just rice flour, for example, is a recipe for disaster, FYI.
- **Add-ins**: Go wild! Try walnuts, pecans, dried cranberries, shredded coconut, or even a swirl of cream cheese filling. Just keep total add-ins to about 1/2 to 3/4 cup so you don’t overwhelm the batter.
- **Dairy-Free**: Use coconut oil or a plant-based butter alternative, and ensure your chocolate chips (if using) are dairy-free. Easy peasy!
FAQ (Frequently Asked Questions)
You’ve got questions, I’ve got (casual and hopefully helpful) answers!
- “Can I use less sugar? My bananas are SUPER ripe!” Yes, absolutely! If your bananas are practically liquid from ripeness, they’re super sweet. You can reduce the sugar by a quarter cup or so without much issue. Taste the mashed banana mixture before adding flour if you’re feeling brave!
- “My banana bread is dry! What went wrong?” Oh no! This usually points to one of two things: overbaking (keep an eye on that toothpick!) or overmixing the batter (which can develop too much structure and make it tough). Also, ensure your GF flour blend isn’t super starchy.
- “How do I store this deliciousness?” If it lasts longer than a day, you’re either a superhero or you made a double batch! Store at room temperature in an airtight container for 2-3 days, or in the fridge for up to a week. For longer storage, slice and freeze individual pieces for quick grab-and-go treats.
- “Can I make muffins instead of a loaf?” You betcha! Just divide the batter among 12 muffin cups (lined with paper liners or greased). Reduce the baking time to about 20-25 minutes, or until a toothpick comes out clean.
- “Is there a trick to getting those gorgeous cracked tops?” Sometimes a sprinkle of coarse sugar on top before baking helps, or just embracing the natural beauty of the bake! A slightly higher initial oven temp (for the first 10 mins) before reducing can also encourage a nice crack.
- “My banana bread sank in the middle! Help!” This can happen if your baking soda isn’t fresh, you opened the oven door too early, or it was underbaked. Make sure your leavening agents (baking soda, baking powder) aren’t expired!
- “Can I add more chocolate chips?” Is that even a question? The answer is always yes. Within reason, of course. Don’t go making a chocolate chip loaf with a hint of banana!
Final Thoughts
So there you have it, folks! Your new favorite gluten-free banana bread recipe, served with a side of sass and a whole lot of love. This isn’t just about baking; it’s about giving yourself a moment of sweet, comforting joy that happens to be tummy-friendly. Now go impress someone—or yourself—with your new culinary skills. You’ve earned that warm, fragrant slice. Enjoy every crumb!

