
So you’re staring at those four suspiciously dark bananas on your counter, wondering if they’re a science experiment or a sign from the baking gods, huh? Same. Good news: they’re about to become the best darn banana bread you’ve ever had, with minimal effort. This isn’t just a recipe; it’s a rescue mission for overripe fruit and your taste buds. Let’s make some magic!
Why This Recipe is Awesome
Okay, so why this particular banana bread recipe, when the internet is drowning in them? Because this one is genuinely, ridiculously good and *beyond* simple. We’re talking:
- It uses up those four very-close-to-being-compost bananas before they stage a protest. You’re basically a food waste hero.
- It’s mostly a one-bowl wonder, meaning less cleanup. Your future self will thank you.
- The result is a perfectly moist, deeply banana-flavored loaf that practically begs for a cup of coffee. Or wine. No judgment here.
- And the best part? **It’s idiot-proof.** Seriously, even I managed not to mess it up, and my kitchen adventures often involve the smoke detector.
Ingredients You’ll Need
Gather ’round, pantry warriors! Here’s what you’ll need for this glorious creation. Keep it simple, keep it fun!
- 4 super ripe bananas: The darker, the better. We’re talking practically black, mushy, almost-sentient bananas. Don’t be shy; embrace the squish. This is where all the flavor lives!
- 1/2 cup (113g) unsalted butter: Melted. Because melted butter is always a good idea.
- 1 large egg: Room temp if you’re feeling fancy, straight from the fridge if you’re like me and just want to get to the eating part.
- 1/2 cup (100g) granulated sugar: Your standard white sugar. If your bananas are practically liquid candy, you *could* reduce this a smidge, but don’t go too wild.
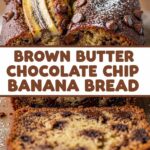
- 1/4 cup (50g) packed light brown sugar: This is our secret weapon for that lovely caramel-y depth. Chef’s kiss!
- 1 teaspoon vanilla extract: Don’t skimp! It’s the secret handshake of deliciousness.
- 1 1/2 cups (180g) all-purpose flour: The backbone of our bread.
- 1 teaspoon baking soda: Our leavening friend. It’s what makes it all fluffy and amazing.
- 1/2 teaspoon salt: Balances everything out and makes the banana flavor pop. Trust me on this one.
Step-by-Step Instructions
Alright, let’s get down to business! Follow these super simple steps, and you’ll be smelling banana bread heaven in no time.
- **Preheat & Prep:** First things first, get that oven heated to **350°F (175°C)**. Then, grease and flour a 9×5-inch loaf pan. Or, if you’re feeling extra, line it with parchment paper so you can just lift your beautiful loaf out.
- **Mash Those Bananas:** In a large bowl, dump your super-duper ripe bananas. Mash them with a fork until mostly smooth but with a few happy lumps. We like texture!
- **Wet Ingredients Party:** Add the melted butter, egg, granulated sugar, brown sugar, and vanilla extract to your mashed bananas. Stir it all together until it’s just combined. Don’t overmix at this stage; we’re just getting acquainted.
- **Dry Ingredients Unite:** In a *separate* medium bowl, whisk together the flour, baking soda, and salt. This ensures everything is evenly distributed. No one wants a surprise pocket of baking soda!
- **Combine Forces:** Gradually add the dry ingredients to the wet ingredients. Mix *just* until combined. A few streaks of flour are totally okay; **overmixing is the enemy of tender banana bread!** We’re aiming for moist, not tough.
- **Into the Pan:** Pour the glorious batter into your prepared loaf pan. Give it a gentle tap on the counter to settle any air bubbles and make the top even.
- **Bake It Baby!** Pop it in the preheated oven for **50-60 minutes**. You’ll know it’s done when a toothpick inserted into the center comes out clean or with a few moist crumbs attached. If it’s getting too dark on top, you can loosely tent it with foil.
- **Cool Down:** Let your gorgeous loaf cool in the pan for about 10-15 minutes. This helps it firm up. Then, carefully transfer it to a wire rack to cool completely. Patience is a virtue here, my friend.
Common Mistakes to Avoid
Nobody’s perfect, but we can definitely sidestep some common banana bread blunders. Learn from my (many) past mistakes!
- **Under-ripe bananas:** **No, just no.** This is probably the biggest rookie mistake. They won’t mash well, and your bread won’t have that deep, sweet banana flavor. Wait for the spots, embrace the mush!
- **Overmixing:** This is banana bread, not concrete. Overmixing develops the gluten too much, leading to a tough, dense loaf. **Mix gently, just until combined.** A few lumps are better than a brick!
- **Opening the oven door too soon:** Resist the urge! Your bread needs consistent heat to rise properly. Wait at least 40 minutes before peeking, or your beautiful loaf might collapse.
- **Not greasing the pan:** Unless you want to chisel your banana bread out in sad, broken pieces, grease that pan. Seriously, use butter, cooking spray, or parchment paper. Your future self will thank you.
Alternatives & Substitutions
Feeling adventurous? Or just missing an ingredient? Here are some simple swaps and additions to customize your banana bread masterpiece.
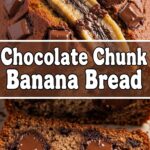
- **Chocolate Chips:** Because… chocolate. Add about 1/2 to 1 cup with the dry ingredients. Mini chips are great for even distribution. You can’t go wrong here.
- **Nuts:** Walnuts or pecans are classic for a reason! Toast them first for extra flavor. Add about 1/2 to 1 cup.
- **Spices:** A pinch of cinnamon or nutmeg can really elevate the flavor profile. **Just a pinch, though!** We want banana, not spice cake.
- **Dairy-free?** Use a plant-based butter alternative. This recipe is pretty minimal on dairy, so it’s an easy swap.
- **Less sugar?** If your bananas are extra, extra sweet, you *can* reduce the granulated sugar by a quarter cup. But, **don’t go too crazy,** as sugar affects not just sweetness but also moisture and texture. FYI!
FAQ (Frequently Asked Questions)
Got questions? I’ve got (mostly) snarky answers!
- **”Can I use frozen bananas?”** Absolutely! Just thaw them first, and don’t drain the liquid—that’s pure banana goodness. It’ll add even more moisture!
- **”My bananas aren’t super ripe, can I still make it?”** You *could*, but you shouldn’t. The flavor won’t be as intense, and the texture might be off. If you’re in a pinch, you can bake them in their peels on a baking sheet at 300°F (150°C) for 15-20 minutes until black, but truly ripe is best.
- **”Can I make muffins instead?”** You betcha! Reduce the baking time to about 20-25 minutes, or until a toothpick comes out clean. Get ready for 12-18 glorious muffins.
- **”How do I store banana bread?”** Store it tightly wrapped at room temperature for up to 3-4 days, or in the fridge for a week. It also freezes beautifully for up to 3 months! Wrap it well in plastic wrap and then foil.
- **”Is it okay if my banana bread has a crack on top?”** Totally normal, and actually a sign of a good, moist loaf! Embrace the rustic charm. It means it rose beautifully.
- **”Can I add oats?”** For a slightly heartier texture, sure! Add 1/2 cup of rolled oats with the dry ingredients. It’s a nice touch if you want a bit more chew.
Final Thoughts
And there you have it, folks! Your very own, absolutely fabulous, 4-banana banana bread. You’ve officially transformed those sad, spotty fruits into a warm, fragrant masterpiece. Go on, slice a thick piece, grab a coffee (or wine, no judgment here), and bask in your baking glory. You’ve earned it! Now go impress someone—or yourself—with your new culinary skills. Until next time, happy baking, my friend!
