So, you’ve got some sad-looking, spotty bananas eyeing you from the fruit bowl, practically begging for a delicious transformation, right? And you’re craving something warm, comforting, and ridiculously easy? My friend, you’ve stumbled into the right place. Because today, we’re making the *ultimate* banana bread loaf that’s so good, you’ll wonder why you ever let those bananas get any less ripe.
Why This Recipe is Awesome
First off, this isn’t your grandma’s ‘measure everything precisely or face her wrath’ kind of recipe. Oh no. This one is forgiving. It’s the kind of recipe that lets you eyeball a bit, maybe add an extra chocolate chip (or ten), and still come out looking like a kitchen goddess. **It’s practically idiot-proof**, which is saying something because, well, I’ve managed to mess up instant noodles before. Plus, it makes your house smell like a bakery without having to get up at 4 AM. Win-win!
And let’s be real, who doesn’t love a good excuse to eat cake for breakfast? Because that’s basically what this is. Delicious, moist, and utterly divine. You’re welcome.
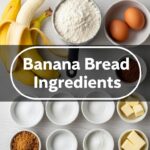
Ingredients You’ll Need
Gather ’round, my budding baker. Here’s your loot:
- 3-4 medium very ripe bananas: We’re talking brown spots, practically black. If they look like you’re about to toss them, they’re perfect. The riper, the sweeter, FYI.
- 1/2 cup (1 stick) unsalted butter: Softened. Leave it on the counter for a bit, or microwave it for like, 10 seconds. Don’t melt it completely, we’re not making soup here.
- 1 cup granulated sugar: Yep, a whole cup. Don’t judge. It’s bread, but it’s *dessert* bread.
- 1 large egg: Room temperature is best, but if you forgot, don’t sweat it. It’s not rocket science.
- 1 teaspoon vanilla extract: The good stuff. It makes everything better.
- 1 1/2 cups all-purpose flour: Just your basic flour. No fancy stuff needed.
- 1 teaspoon baking soda: This is our lift-off agent. Don’t skip it!
- 1/2 teaspoon salt: Balances out all that sweetness. A pinch of culinary genius, really.
- Optional add-ins (but highly recommended, IMO): A handful of chocolate chips (dark, milk, whatever your heart desires), chopped walnuts or pecans (if you’re feeling fancy and like a bit of crunch).
Step-by-Step Instructions
- Preheat & Prep: First things first, get that oven going! Preheat it to 350°F (175°C). Then, grease and flour a 9×5 inch loaf pan. Or, if you’re lazy like me, use parchment paper. So much easier.
- Mash ‘Em Up: In a medium bowl, mash those gloriously ripe bananas with a fork until they’re mostly smooth, but a few lumps are totally fine. Gives it character, right?
- Cream the Dream: In a separate, larger bowl, cream together the softened butter and granulated sugar until it’s light and fluffy. A hand mixer makes this easy, but a strong arm works too!
- Wet Ingredients Unite: Beat in the egg and vanilla extract into the butter-sugar mixture until just combined. Don’t overdo it!
- Dry Spell: In yet another bowl (yes, I know, dishes), whisk together the flour, baking soda, and salt. Make sure they’re well mixed.
- Combine & Conquer: Now for the magic! Add the dry ingredients to the wet ingredients. Mix until *just* combined. **Seriously, do not overmix!** A few streaks of flour are better than tough banana bread. Fold in your mashed bananas and any optional add-ins (chocolate chips, nuts) at this stage.
- Into the Pan: Pour the batter into your prepared loaf pan. Give it a little tap on the counter to settle.
- Bake It ‘Til You Make It: Bake for 50-65 minutes. How do you know it’s done? A toothpick inserted into the center should come out clean, or with just a few moist crumbs. If the top starts getting too dark, loosely tent it with foil.
- Cool Down: Let the loaf cool in the pan for about 10 minutes (patience, young padawan!), then carefully remove it and let it cool completely on a wire rack. Or, you know, cut a slice while it’s still warm and gooey. I won’t tell.
Common Mistakes to Avoid
Listen up, buttercup. Save yourself some heartache:
- Under-ripe bananas: This is the cardinal sin. Green bananas make sad, flavorless bread. You need those spotty, almost-ready-for-the-bin bananas. Trust me on this.
- Overmixing: I said it once, I’ll say it again. Overmixing develops the gluten in the flour, leading to tough, chewy bread. We want moist and tender! Mix until just combined, no more.
- Opening the oven door constantly: Resist the urge! Every time you peek, you let out heat and mess with the baking process. Only open it when it’s almost time to check for doneness.
- Not preheating the oven: Rookie mistake. A cold oven will give you unevenly baked, dense bread. Get that heat going *before* the batter goes in.
Alternatives & Substitutions
Feeling adventurous? Or just missing an ingredient? I got you:
- Flour Power: You can totally swap out a portion of the all-purpose flour for whole wheat flour if you’re trying to be *healthier*. Maybe replace 1/2 cup? Don’t go full whole wheat unless you want a denser loaf.
- Sweetener Swaps: Brown sugar instead of granulated sugar gives it a richer, more caramel-y flavor. Maple syrup or honey could work too, but you might need to adjust other liquids slightly.
- Butter alternatives: Vegetable oil or a neutral-flavored oil (like canola) can be used instead of butter for a slightly different texture, often a bit moister. But IMO, butter just tastes better. You do you.
- Spice it up: A dash of cinnamon, nutmeg, or even a tiny pinch of cloves can elevate the flavor profile. Spices are your friend!
- Add-in Bonanza: Besides chocolate chips and nuts, try dried cranberries, shredded coconut, or even a swirl of cream cheese for a truly decadent treat.
FAQ (Frequently Asked Questions)
- My banana bread is dry, what gives? Probably overbaked, or you didn’t use ripe enough bananas. Next time, keep an eye on that baking time and ensure your bananas are super ripe for maximum moisture.
- Can I make muffins instead of a loaf? Absolutely! Just fill a muffin tin about 2/3 full and bake for a shorter time, usually 20-25 minutes. Perfect for on-the-go snacks!
- How ripe do the bananas *really* need to be? The riper, the sweeter, and the easier they are to mash. If they’re still mostly yellow, give them a few more days. Patience is a virtue here.
- Can I use margarine instead of butter? Well, technically yes, but why hurt your soul like that? Butter just tastes better and contributes to a superior texture. But in a pinch, margarine will work.
- How do I store leftover banana bread? Ha, “leftover.” Good one! If you happen to have any, wrap it tightly in plastic wrap or foil and store at room temperature for up to 3 days, or in the fridge for up to a week. It also freezes beautifully for up to 3 months.
- Can I add anything else to the batter? Of course! Get creative! A swirl of Nutella, a handful of toasted coconut, or even a secret splash of rum for a grown-up version. The world is your banana bread oyster!
Final Thoughts
So there you have it, folks! Your new go-to recipe for banana bread that’s so good, you might just start buying extra bananas just to let them get overripe. It’s easy, it’s delicious, and it’s guaranteed to make your kitchen smell like pure happiness.
Now go impress someone—or yourself—with your new culinary skills. You’ve earned it! Seriously, grab a warm slice, make a cup of coffee, and just enjoy that moment of delicious triumph. You deserve it, TBH. Happy baking!

