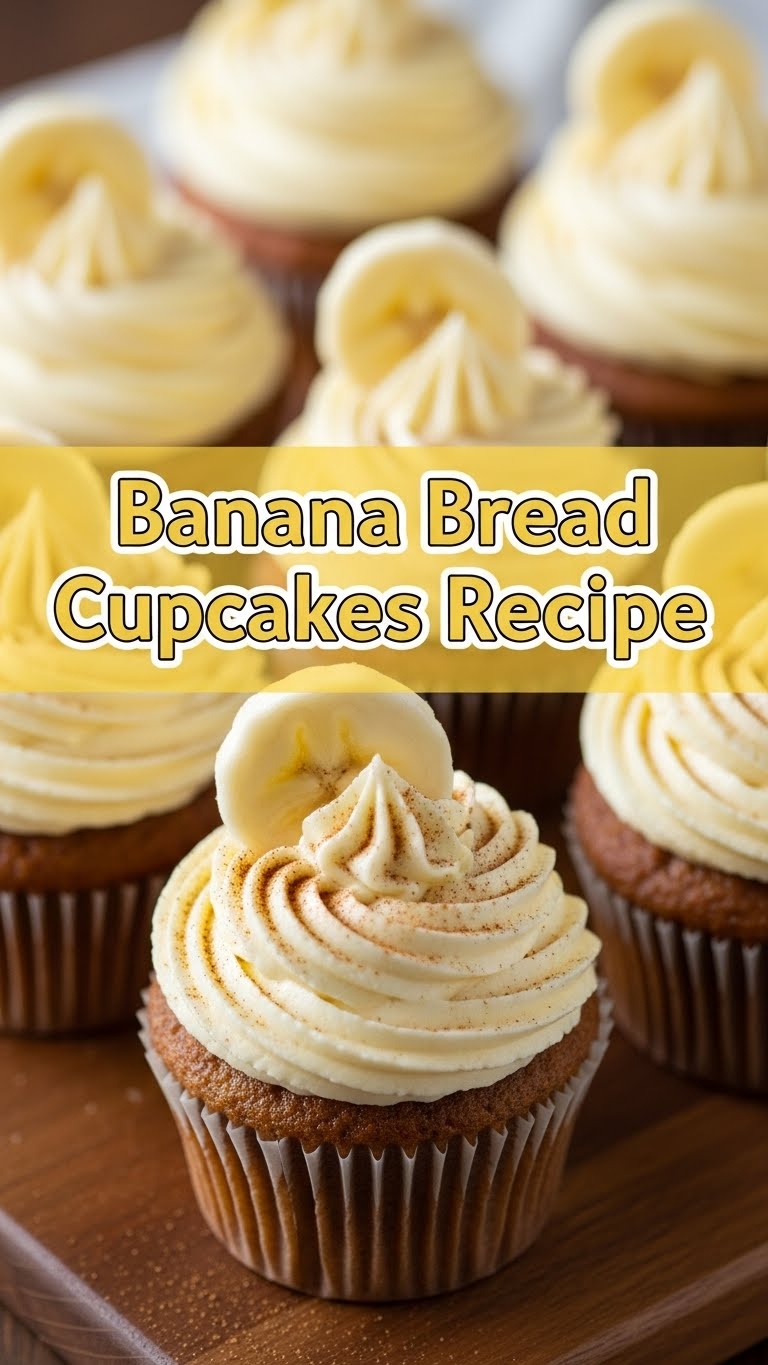
So you’re craving something warm, comforting, and utterly delicious but the thought of spending hours in the kitchen makes your soul tired? Same, friend, same. And let’s be real, sometimes a whole loaf of banana bread feels like a commitment. Like, “I will eat this entire thing, and then I will regret nothing, but also everything.” What if I told you there was a way to get all that cozy banana bread goodness in a perfectly portioned, totally adorable, and surprisingly quick package? Enter: **Banana Bread Cupcakes!** Your future self (and stomach) will thank you.
Why This Recipe is Awesome
Okay, let’s spill the tea on why these banana bread cupcakes are about to become your new best friend. First off, they’re practically **idiot-proof**. Seriously, even I, someone who once mistook baking soda for baking powder (don’t ask), have mastered these. They bake up faster than a big loaf, which means less waiting for that glorious aroma to fill your kitchen. Plus, they’re pre-portioned, so you can pretend you have self-control (or just grab three, no judgment here). They’re perfect for sharing (if you’re feeling generous), lunchboxes, or just a Tuesday afternoon pick-me-up. **No fancy equipment, no weird ingredients, just pure, unadulterated comfort.**
Ingredients You’ll Need
Gather ’round, my fellow kitchen adventurer! Here’s what you’ll need to conjure up these little rays of sunshine:
- **Old, spotty bananas (3-4 medium)**: The uglier, the better. We’re talking brown, mushy, practically begging to be baked. Don’t throw them out! This is their moment to shine.
- **All-purpose flour (1 ½ cups)**: Your basic flour, nothing fancy.
- **Granulated sugar (¾ cup)**: Sweetness is key, my friends.
- **Baking soda (1 teaspoon)**: Our trusty leavening agent.
- **Salt (½ teaspoon)**: Balances all that delicious sweetness.
- **Ground cinnamon (1 teaspoon)**: Because banana bread without cinnamon is just… sad.
- **Large egg (1)**: Room temperature if you’re feeling fancy, but straight from the fridge works too.
- **Unsalted butter (½ cup, melted)**: The good stuff! Melt it and let it cool a smidge.
- **Vanilla extract (1 teaspoon)**: A hug in a bottle.
- **Optional add-ins**: Chocolate chips (½ cup, because why not?), chopped walnuts, pecans, or whatever your heart desires.
Step-by-Step Instructions
- **Preheat Power-Up!** Get your oven fired up to **375°F (190°C)**. Line a 12-cup muffin tin with paper liners. Trust me, you want the liners.
- **Mash those Bananas!** In a medium bowl, mash your super ripe bananas with a fork until they’re mostly smooth but still have a few small lumps. We like texture!
- **Wet Ingredients Party!** To your mashed bananas, add the melted butter, egg, and vanilla extract. Whisk it all together until just combined. Don’t overdo it, we’re not making an omelet.
- **Dry Ingredients Dance!** In a separate, larger bowl, whisk together the flour, sugar, baking soda, salt, and cinnamon. Make sure there are no clumpy bits.
- **Combine & Conquer!** Pour the wet banana mixture into the dry ingredients. Stir with a spoon or spatula until *just* combined. A few streaks of flour are totally fine! **Overmixing is the enemy of tender cupcakes.** If you’re using chocolate chips or nuts, fold them in now.
- **Fill ‘Em Up!** Divide the batter evenly among the 12 muffin cups. They should be about two-thirds full.
- **Bake ‘Em Baby!** Pop that muffin tin into your preheated oven. Bake for **18-22 minutes**, or until a toothpick inserted into the center of a cupcake comes out clean (or with a few moist crumbs).
- **Cool Down!** Let the cupcakes cool in the muffin tin for about 5 minutes, then transfer them to a wire rack to cool completely. Or, you know, eat one warm. I won’t tell.
Common Mistakes to Avoid
Look, we all make mistakes. It’s how we learn! But let’s try to avoid these rookie errors to ensure cupcake perfection:
- **Using yellow bananas**: Save those for your smoothie. For banana bread, you want bananas so ripe they’re practically black. Seriously, the browner, the sweeter and more flavorful your cupcakes will be.
- **Overmixing the batter**: This is the cardinal sin of baking. Stirring too much develops the gluten, leading to tough, rubbery cupcakes. We want tender, fluffy goodness! **Mix until just combined.**
- **Not preheating your oven**: Thinking you can skip this step? Rookie mistake. A properly preheated oven ensures your cupcakes rise beautifully and cook evenly.
- **Opening the oven door too early**: Resist the urge! Opening the oven door lets out heat, which can cause your cupcakes to sink in the middle. Give them at least 15 minutes before peeking.
Alternatives & Substitutions
Feeling adventurous? Or just missing an ingredient? Here are a few ways to tweak this recipe:
- **No butter? No problem!** You can totally swap the melted butter for ½ cup of vegetable oil or melted coconut oil. The texture might be slightly different, but still delicious.
- **Brown sugar boost**: For an even deeper, more caramel-like flavor, use half brown sugar and half granulated sugar (or all brown sugar, IMO!).
- **Spice it up**: Add a pinch of nutmeg, allspice, or even a tiny bit of ginger for an extra warm kick.
- **Gluten-free option**: If you’re GF, a 1:1 gluten-free all-purpose flour blend usually works great in this recipe.
- **Extra goodies**: Beyond chocolate chips and nuts, consider shredded coconut, dried cranberries, or even a swirl of cream cheese frosting (after they’ve cooled!).
FAQ (Frequently Asked Questions)
- **My bananas aren’t ripe enough! What do I do?** Ah, the age-old dilemma. You can bake them (with the peel on!) at 300°F (150°C) for 15-30 minutes until they’re black. Or, just pop them in a brown paper bag with an apple for a day or two. Science!
- **Can I use margarine instead of butter?** Well, technically yes, but why hurt your soul like that? Butter just tastes better. But if it’s all you’ve got, go for it!
- **How do I store these magical cupcakes?** Keep them in an airtight container at room temperature for up to 3 days, or in the fridge for up to a week. They tend to get even moister the next day!
- **Can I freeze them?** Absolutely! Once completely cooled, wrap individual cupcakes tightly in plastic wrap, then place them in a freezer-safe bag or container for up to 3 months. Thaw at room temperature.
- **Do I need a mixer?** Nope! A good old whisk and a spatula are all you need. This recipe is designed to be simple and easy, even for those without fancy kitchen gadgets.
Final Thoughts
There you have it! A ridiculously easy, unbelievably tasty, and perfectly portioned banana bread cupcake recipe that’s guaranteed to bring a smile to your face. Whether you’re making them for breakfast, a snack, or just because it’s Tuesday, these little gems are a winner. So go ahead, grab those spotty bananas, get baking, and make some delicious memories. Now go impress someone—or yourself—with your new culinary skills. You’ve earned it!
