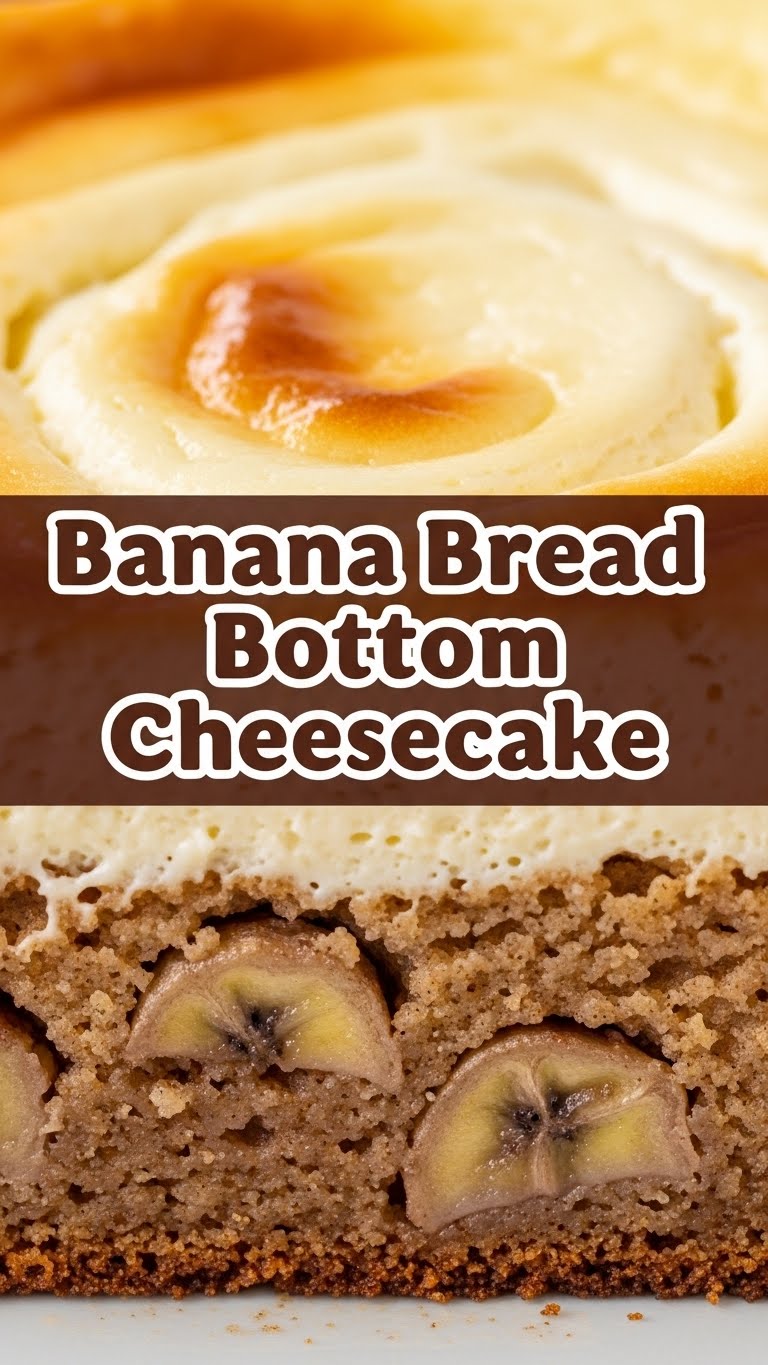
So, you’re standing in your kitchen, staring at those *very* ripe bananas, probably feeling a tiny pang of guilt for not making banana bread yet. And then, out of nowhere, a cheesecake craving hits you like a buttery, creamy truck. What’s a dessert-loving human to do? Combine them, obviously! Because why choose when you can have a culinary baby born of two legends: the Banana Bread Bottom Cheesecake!
Why This Recipe is Awesome
Let me tell you, this isn’t just another recipe; it’s a life hack disguised as dessert. First off, it’s **idiot-proof**. Seriously, if I didn’t mess it up, you’re golden. Second, it perfectly marries the cozy, comforting hug of banana bread with the silky, luxurious embrace of cheesecake. It’s like your favorite sweatpants and a silk robe had a delicious baby. The banana bread base isn’t just a crust; it’s a moist, flavorful foundation that adds a whole new dimension, making this dessert anything but basic. Plus, it’s a total crowd-pleaser that looks fancy but requires minimal brain power. Win-win, IMO.
Ingredients You’ll Need
For the Banana Bread Layer:
- **1 ½ cups all-purpose flour:** The backbone of your bread-y dreams.
- **1 teaspoon baking soda:** Our rising star.
- **½ teaspoon salt:** Just a pinch to make everything pop.
- **½ cup (1 stick) unsalted butter, softened:** Because everything’s better with butter.
- **¾ cup granulated sugar:** Your sweet escape.
- **1 large egg:** The glue that holds it all together.
- **1 teaspoon vanilla extract:** Liquid happiness.
- **3 very ripe bananas, mashed:** The squishier, the better! Think brown, not yellow. These are key for flavor and moisture.
- **(Optional) ½ cup chocolate chips or chopped nuts:** For an extra party in your mouth!
For the Cheesecake Layer:
- **2 (8-ounce) packages cream cheese, softened:** Full fat, obviously. We’re not health gurus here; we’re flavor seekers.
- **½ cup granulated sugar:** Again, sweet, sweet sugar.
- **1 large egg:** More binding magic.
- **1 teaspoon vanilla extract:** Another splash of joy.
- **¼ cup sour cream:** The secret weapon for extra creaminess and a slight tang. Don’t skip it!
Step-by-Step Instructions
- **Preheat Power-Up:** Get your oven hot! Preheat to 350°F (175°C). Grab a 9-inch springform pan, lightly grease it, and line the bottom with parchment paper. This will save you future heartache.
- **Banana Bread Boogie:** In a medium bowl, whisk together the flour, baking soda, and salt. Set aside. In a larger bowl, cream the softened butter and sugar until light and fluffy. Beat in the egg and vanilla until combined. Stir in the mashed bananas until just incorporated.
- **Combine Dry & Wet (Gently!):** Gradually add the dry ingredients to the wet ingredients, mixing until *just* combined. **Do not overmix!** A few lumps are totally fine. If using, fold in chocolate chips or nuts now.
- **Base Layer Build:** Press the banana bread batter evenly into the bottom of your prepared springform pan. This is your delicious foundation!
- **Cheesecake Charm:** In a clean large bowl, beat the softened cream cheese and sugar together until smooth and creamy. Scrape down the sides of the bowl. Beat in the egg and vanilla extract until just combined. Finally, mix in the sour cream until smooth. Again, **don’t overmix!**
- **Pour & Prep:** Carefully pour the cheesecake batter over the banana bread layer in the springform pan. Gently tap the pan on the counter a few times to release any air bubbles.
- **Water Bath Wonder (Crucial Step!):** Wrap the bottom and sides of your springform pan tightly with heavy-duty aluminum foil. Place the springform pan into a larger roasting pan. Pour hot water into the roasting pan until it comes about halfway up the sides of the springform pan. This water bath is your ticket to a crack-free, silky cheesecake!
- **Bake It Up:** Carefully transfer the roasting pan with your cheesecake creation into the preheated oven. Bake for 50-60 minutes, or until the edges are set but the center still jiggles slightly.
- **Cool Down & Chill Out:** Turn off the oven, crack the door open, and let the cheesecake cool in the water bath for an hour. This gradual cooling prevents cracks. Then, remove it from the water bath, unwrap the foil, and let it cool completely on a wire rack. Once fully cooled, transfer it to the fridge to chill for **at least 4 hours, but ideally overnight**. Patience, my friend, is a virtue here.
- **Serve It Up:** Carefully remove the cheesecake from the springform pan. Slice, serve, and bask in the glory of your masterpiece!
Common Mistakes to Avoid
- **Ignoring the Ripe Bananas:** Thinking slightly yellow bananas will do? Rookie mistake! You want those spotted, almost black bananas for maximum flavor and sweetness in your banana bread.
- **Cold Cream Cheese:** Trying to beat cold cream cheese is like trying to reason with a toddler – it just won’t be smooth. **Always ensure your cream cheese is softened** to room temperature.
- **Overmixing the Cheesecake Batter:** Once the egg and sour cream are in, mix *just* until combined. Overmixing incorporates too much air, which can lead to cracks. Nobody wants a cracked cheesecake, unless it’s a happy accident.
- **Skipping the Water Bath:** You might think it’s extra faff, but the water bath is your best friend for a smooth, even bake and preventing those dreaded cracks. Don’t skip this, FYI.
- **Impatience with Chilling:** Pulling it out of the fridge too soon is a crime against cheesecake. It needs that solid chill time to set properly and develop its full creamy texture. Resist the urge!
Alternatives & Substitutions
- **Spice It Up:** Add a pinch of cinnamon or nutmeg to your banana bread batter for an extra warm, cozy flavor.
- **Nutty or Chocolatey Banana Bread:** As mentioned, toss in some chopped walnuts, pecans, or chocolate chips to the banana bread layer. Trust me, it’s a game-changer.
- **Toppings Galore:** Once cooled, drizzle with a caramel sauce, melted chocolate, or even a sprinkle of toasted coconut flakes.
- **Gluten-Free Flour:** You can swap out the all-purpose flour for a 1:1 gluten-free baking blend if that’s your jam. Results may vary slightly, but it’s totally doable.
- **Dairy-Free Options?** Well, you *could* try dairy-free cream cheese and sour cream, but honestly, this recipe shines with the full-fat, real deal. If you *must*, proceed with caution and manage expectations.
FAQ (Frequently Asked Questions)
Do I *really* need those super ripe bananas?
Yes, my friend, absolutely! Those dark, spotty bananas aren’t just for show; they’re packed with sugar and moisture, giving your banana bread layer that incredible flavor and tenderness. Think of them as flavor gold!
Is a springform pan essential, or can I use a regular cake pan?
While you *could* technically use a regular cake pan, a springform pan makes your life infinitely easier for unmolding a beautiful, intact cheesecake. It’s a small investment for a lot less stress.
What’s the deal with the water bath? Do I have to do it?
Okay, real talk: the water bath is your secret weapon against cracks and for achieving that perfectly creamy, even texture. It insulates the cheesecake, keeping the temperature consistent. So, yes, if you want a perfect cheesecake, do the water bath!
Can I make this ahead of time for a party?
Oh, absolutely! In fact, this cheesecake tastes even better the next day once all those delicious flavors have had time to mingle and get cozy. It’s a fantastic make-ahead dessert!
How should I store leftovers (if there are any, ha!)?
Wrap any remaining cheesecake tightly in plastic wrap or store it in an airtight container in the fridge for up to 3-4 days. It holds up beautifully!
My cheesecake cracked! What went wrong?
Don’t panic! Cracks usually happen from overbaking, overmixing, or sudden temperature changes. Did you skip the water bath? Pull it out of the oven too quickly? Either way, it still tastes amazing! Just call it “rustic.”
Final Thoughts
There you have it! A dessert so good, it’ll make you wonder why you ever settled for just one amazing thing at a time. This Banana Bread Bottom Cheesecake is pure comfort food elevated to gourmet status, without any of the gourmet effort. So go forth, wield your spatula with confidence, and create some magic. Now go impress someone—or yourself—with your new culinary skills. You’ve earned it!
