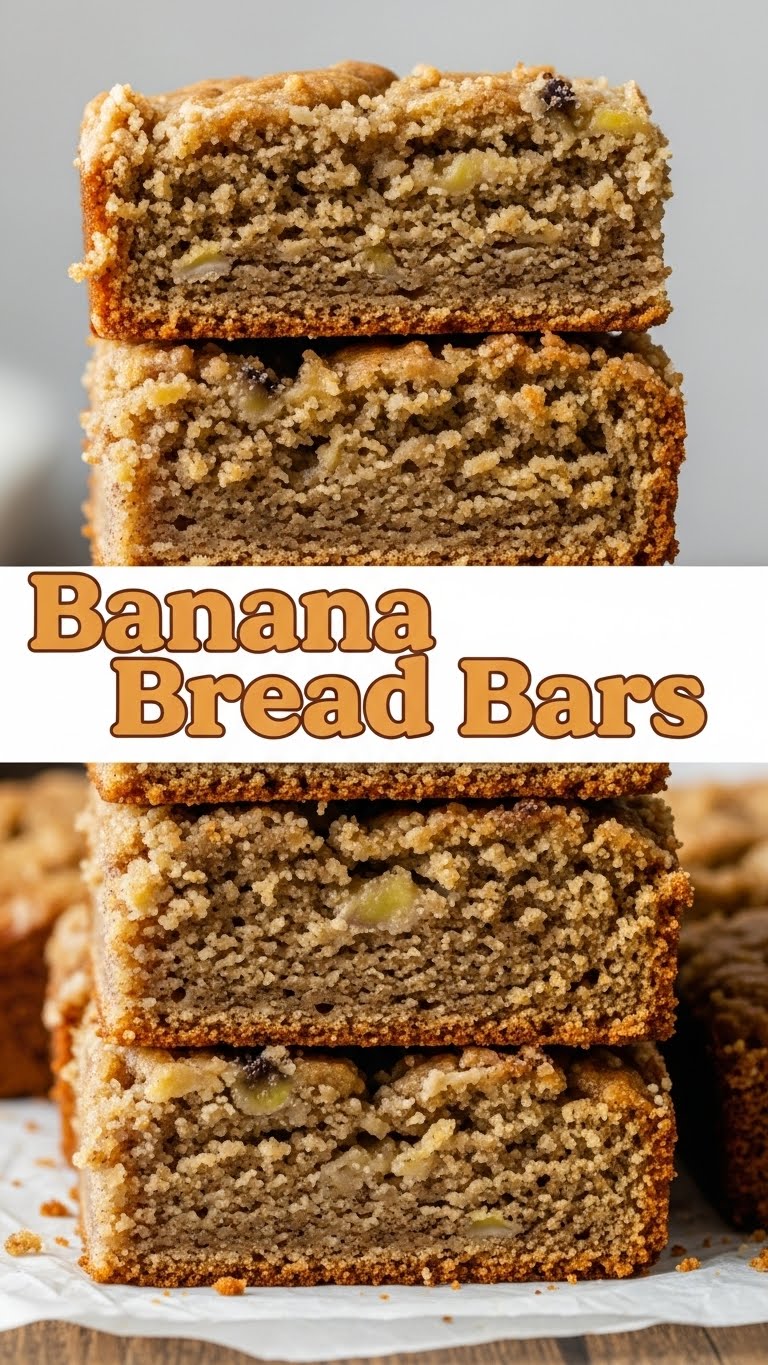
Got a bunch of those sad, spotty bananas glaring at you from the fruit bowl, practically begging to be put out of their misery? Don’t toss ’em! We’re about to turn those overripe beauties into something ridiculously good: Banana Bread Bars. And guess what? It’s easier than deciding what to watch on Netflix on a Friday night. So let’s get baking!
Why This Recipe is Awesome
First off, it’s banana bread, but in super convenient, grab-and-go bar form. That means no fussy slicing when you’re half-asleep on your way to work, just pure, unadulterated deliciousness you can practically eat with one hand. Plus, it’s basically a warm hug in food form. This recipe is **super easy**, I promise. Even if your culinary skills peak at microwaving popcorn (no judgment, we’ve all been there!), you can totally nail this. Seriously, it’s almost impossible to mess up, which is a win in my book because I’ve managed to burn toast before. Trust me on this one!
Ingredients You’ll Need
Gather your troops, my friend!
- Ripe Bananas (3-4, super spotty): The spottier, the better. No really, don’t be shy with those brown freckles! They’re packed with natural sweetness, which means less added sugar for us.
- All-Purpose Flour (1 ½ cups): The OG flour, always reliable.
- Baking Soda (1 tsp): Our little lift-me-up. Don’t skip it!
- Salt (½ tsp): Just a pinch to make everything pop and balance the sweetness.
- Cinnamon (1 tsp): Because banana bread without cinnamon is just… sad. It’s practically mandatory.
- Nutmeg (¼ tsp): Optional, but adds a lovely warmth and a little somethin’ somethin’.
- Unsalted Butter (½ cup / 1 stick, melted): Butter makes everything better, duh.
- Granulated Sugar (½ cup): For that classic sweetness.
- Brown Sugar (½ cup, packed): For a deeper, more caramel-y flavor. Yum!
- Egg (1 large): Our binder, our friend. Holds it all together.
- Vanilla Extract (1 tsp): Because you always need vanilla. Always.
- Optional Mix-ins (½ cup): Chocolate chips, walnuts, pecans – live your best life! Get creative!
Step-by-Step Instructions
- **Preheat & Prep:** Get that oven to a cozy 350°F (175°C). Grab a 9×13 inch baking pan, grease it, and flour it. Or, if you’re like me and love easy clean-up, just line it with parchment paper with a little overhang on the sides. You’re welcome.
- **Mash ‘Em Up:** In a large bowl, unleash your inner Hulk and mash your ripe bananas with a fork. Lumps are totally fine, even encouraged; they add character and little bursts of banana goodness.
- **Dry Mix:** In a separate medium bowl, whisk together the flour, baking soda, salt, cinnamon, and nutmeg (if you’re using it). Give it a good whisk to evenly distribute everything.
- **Wet Mix (Part 1):** Add the melted butter, granulated sugar, and brown sugar to your mashed bananas. Stir until they’re well combined and looking all gooey and delicious.
- **Wet Mix (Part 2):** Beat in the egg and vanilla extract until everything looks smooth and, honestly, smells amazing already.
- **Combine:** Now for the magic! Gradually add the dry ingredients to the wet ingredients, mixing with a spoon or spatula just until combined. **Don’t overmix!** A few streaks of flour are perfectly okay; overmixing leads to tough, sad bars. Nobody wants tough bars.
- **Fold in Goodies:** If you’re using chocolate chips, nuts, or whatever your heart desires, gently fold them in now. Be gentle!
- **Bake It Up:** Pour the batter into your prepared pan and spread it evenly. Try to make it look pretty, or don’t, it’ll still taste great.
- **Golden Brown Glory:** Bake for 25-30 minutes, or until a toothpick inserted into the center comes out clean or with just a few moist crumbs.
- **Cool Down:** Let those glorious bars cool in the pan on a wire rack before cutting. **Patience is a virtue here, seriously!** They’ll be much easier to cut and less crumbly if you give them a good 30 minutes to an hour to chill.
Common Mistakes to Avoid
We’re all human, and mistakes happen, but let’s try to dodge these common blunders:
- **Overmixing the batter:** I’m putting this first because it’s a biggie! You’ll end up with rubbery, dense bars instead of light, tender ones. Mix until *just* combined. You got this.
- **Not using ripe bananas:** This isn’t the time for those firm, green beauties. You need those mushy, spotted, practically black bananas for the best flavor and sweetness. Trust me, it makes all the difference.
- **Cutting them too soon:** I know, the smell is intoxicating! But if you go all knife-happy while they’re still hot, they’ll likely crumble. Let them chill out for a bit before you start slicing.
- **Skipping the grease/parchment:** Unless you enjoy scraping baked goods off the bottom of your pan, don’t do it. A little grease (or parchment) goes a long way.
Alternatives & Substitutions
Feeling adventurous? Or just missing an ingredient? Here are some ideas!
- **Flour Power:** Want to make it a bit healthier? Whole wheat flour works, but the texture will be denser. A 1:1 gluten-free blend should also work wonderfully; just make sure it has xanthan gum!
- **Sweet Swaps:** You can play around with the sugar ratios. If your bananas are extra ripe and sweet, you could reduce the sugar by a quarter cup. Maple syrup or honey could technically work, but they might change the texture a little. IMO, stick to the sugars for the best results!
- **Dairy-Free Dream:** For a dairy-free version, simply swap out the butter for a plant-based butter alternative or an equal amount of coconut oil (melted). Easy peasy!
- **Mix-in Madness:** Don’t stop at chocolate chips! How about dried cranberries, shredded coconut, or even a swirl of cream cheese frosting on top once they’re cool? A sprinkle of flaky sea salt on top before baking is also *chef’s kiss*.
FAQ (Frequently Asked Questions)
Got questions? I’ve got answers (mostly humorous ones).
- **Can I make these dairy-free?** Absolutely! Swap out the butter for a plant-based butter alternative or coconut oil (melted). You’re golden.
- **My bananas aren’t super ripe, what do I do?** *Sigh.* You can totally speed up the ripening process! Bake them unpeeled on a baking sheet at 300°F (150°C) for 15-20 minutes until their skins turn black and shiny. Or, you know, just wait. Patience, young padawan.
- **Can I freeze these?** Heck yeah! Once completely cooled, wrap individual bars tightly in plastic wrap, then pop them into a freezer-safe bag or container for up to 3 months. Thaw at room temperature for a quick treat.
- **What if I don’t have a 9×13 inch pan?** A 8×8 or 9×9 inch square pan will work, but you’ll have thicker bars and probably need to bake them a bit longer (around 35-45 minutes). Just keep an eye on them and do the toothpick test!
- **Is it okay to eat the entire pan myself?** Is that even a question? *Wink*. Of course it is. No judgment here. You baked them, you earned them!
Final Thoughts
See? Told you it was easy! Now you’ve got a batch of these ridiculously delicious Banana Bread Bars ready to rock your world. Share ’em with friends, bring ’em to work, or just hoard them for yourself (my personal preference, FYI). You’re basically a baking rockstar now, armed with banana-y goodness. Go forth and conquer that craving, my friend! You’ve earned it.
