So you’re craving something tasty but too lazy to spend forever in the kitchen, huh? Same. We’ve all been there: that undeniable sweet tooth nagging at you, but the thought of a complicated recipe makes you want to just scroll endlessly on your phone instead. Well, my friend, put down your phone (just for a bit!) because I’ve got the ultimate solution for your dessert dilemma: Baked Pears with Ice Cream. It’s ridiculously easy, super satisfying, and looks way fancier than the effort involved. Prepare to impress, even if it’s just yourself!
Why This Recipe is Awesome
Let’s be real, who needs a dissertation on why a dessert recipe is good? But since you asked (or, well, since I’m writing this), here’s the lowdown. First off, it’s practically **idiot-proof**. Even I, the queen of “oops, did I just burn water?”, can pull this off without setting off the smoke alarm. It’s also incredibly quick – we’re talking minimal prep, maximum payoff. Plus, it looks sophisticated. You bring this out, and people instantly think you spent hours slaving away, when in reality, you probably just binged another episode of your favorite show while it baked. Winning, right?
It’s warm, comforting, lightly spiced, and when paired with a scoop (or three, no judgment here) of cold, creamy ice cream? Chef’s kiss! Seriously, the contrast in temperatures and textures is divine. And dare I say it, it’s even a little bit “healthy-ish” because, well, fruit!
Ingredients You’ll Need
Get ready for a super short shopping list. You probably have half of these already, you culinary genius, you.
- 2-3 ripe, firm pears: Bosc, Anjou, or Bartlett work great. Please, for the love of all that is delicious, not those sad, mushy ones hiding in your fruit bowl.
- 2 tablespoons unsalted butter: Melted. Because everything is better with butter.
- 2 tablespoons brown sugar: Light or dark, doesn’t matter much. This is for that lovely caramelized sweetness.
- 1/2 teaspoon ground cinnamon: The essential warming spice.
- 1/4 teaspoon vanilla extract: A little goes a long way to boost those flavors.
- A pinch of salt: Just a tiny bit to balance the sweetness. Don’t skip it!
- Vanilla ice cream: Or whatever flavor makes your heart sing. This is non-negotiable, seriously.
- Optional: A handful of chopped walnuts or pecans for crunch.
Step-by-Step Instructions
- **Preheat that oven!** Set it to 375°F (190°C). Grab a small baking dish that can snugly fit your pear halves.
- **Prep the pears.** Wash ’em up, then carefully slice each pear in half lengthwise. Using a spoon or a melon baller, scoop out the core and those little hard bits. You want a nice, clean hollow for all that buttery goodness.
- **Mix the magic sauce.** In a small bowl, melt the butter. Stir in the brown sugar, cinnamon, vanilla extract, and that tiny pinch of salt until well combined. It should smell heavenly already.
- **Brush ’em up.** Place your pear halves cut-side up in the baking dish. Brush the cut surfaces generously with your buttery-sugary mixture. If you’re using nuts, sprinkle them over the top now.
- **Bake it ’til tender.** Pop the dish into your preheated oven and bake for 20-30 minutes. You want the pears to be fork-tender but not mushy. The exact time depends on the pear’s ripeness, so keep an eye on them!
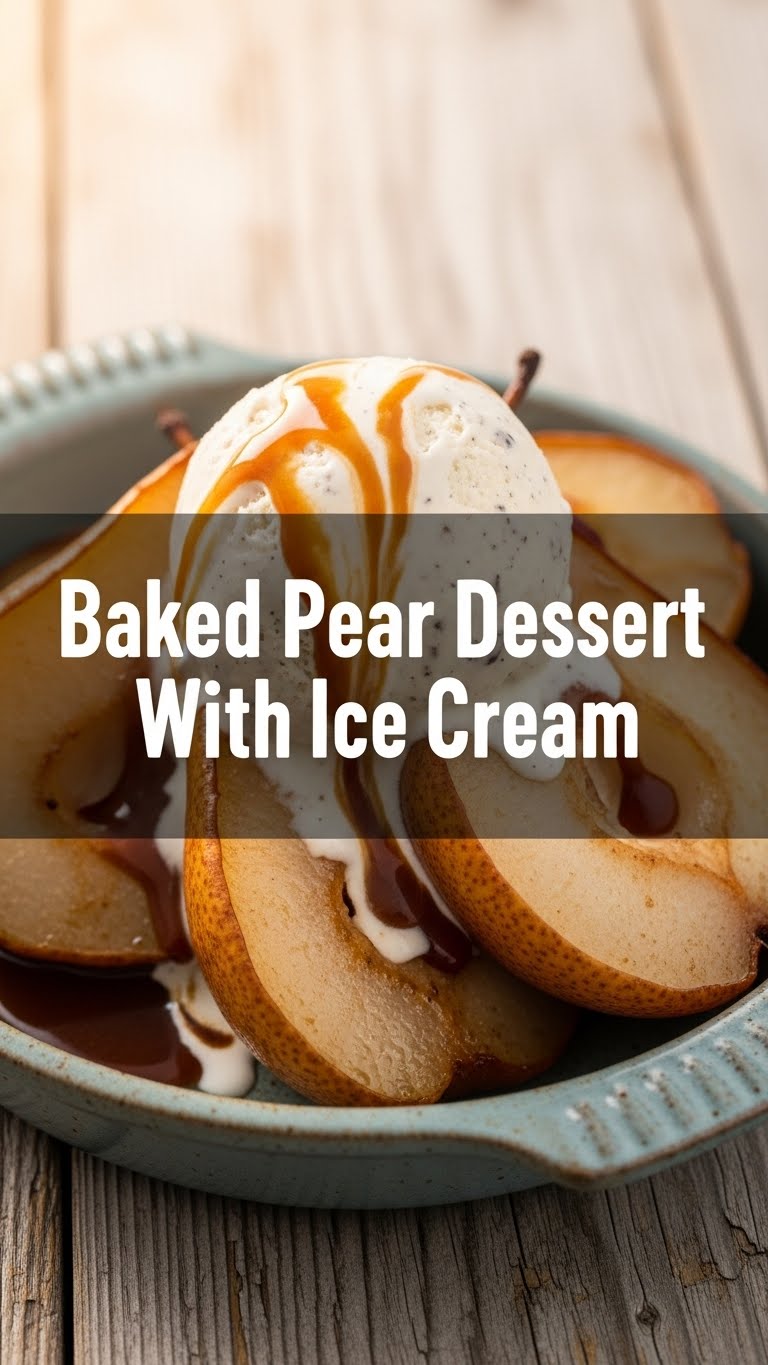
- **Serve it up!** Carefully remove the pears from the oven. Let them cool for just a couple of minutes – they’ll be scorching hot. Place one or two warm pear halves in a bowl and, with absolute reverence, top with a generous scoop of cold ice cream.
Common Mistakes to Avoid
- **Thinking you don’t need to preheat the oven** – rookie mistake! A properly preheated oven ensures even cooking and avoids sad, underbaked pears.
- **Using under-ripe pears:** They’ll be hard, gritty, and just generally unpleasant, no matter how long you bake them. Choose pears that give slightly when gently squeezed.
- **Overbaking:** Unless you’re aiming for pear puree, don’t let them turn to total mush. Keep an eye on them after 20 minutes.
- **Forgetting the ice cream:** Honestly, why are we even friends if you’d commit such a heinous crime? The warm pear and cold ice cream combo is key.
- **Burning the butter/sugar mixture:** If your oven runs hot, or if you’re using a very dark baking dish, keep an eye on the glaze. If it starts to brown too quickly, you can loosely tent the dish with foil.
Alternatives & Substitutions
Feeling adventurous? Or just missing an ingredient? No worries, we can totally improvise.
- **Fruit Swap:** Not a pear fan? This recipe works beautifully with apples (think Honeycrisp or Fuji) or even firm peaches. Adjust baking time as needed.
- **Sweetener Switch:** Maple syrup or honey can be used instead of brown sugar for a slightly different, but equally delicious, flavor profile.
- **Spice It Up:** A tiny dash of nutmeg, ginger, or even cardamom can join the cinnamon party for extra warmth.
- **Dairy-Free:** Easily make this vegan by using a plant-based butter alternative and your favorite dairy-free ice cream. Almond or coconut ice cream would be stellar here.
- **Add Texture:** Sprinkle some granola, crushed biscoff cookies, or a spoonful of quick oats mixed with a little butter and sugar over the pears before baking for a crumble-like topping.
- **Adult Version:** A splash of rum, brandy, or bourbon (like half a teaspoon) mixed into the butter sauce before brushing can add a sophisticated kick.
FAQ (Frequently Asked Questions)
Got questions? I probably already thought of them (because I ask myself these things while cooking).
- Can I use margarine instead of butter? Well, technically yes, but why hurt your soul like that? Butter just tastes better, IMO. But in a pinch, margarine will do.
- Do I need to peel the pears? Nope! The skin gets tender during baking and adds a nice rustic touch. Plus, less work! You’re welcome.
- What kind of pears are best? Bosc, Anjou, or Bartlett are great because they hold their shape well when baked. Avoid overly soft or mealy varieties.
- Can I make this ahead of time? You can prep the pears and the butter mixture a few hours in advance, but it’s really best baked fresh and served warm. Reheating might make them a bit too soft.
- What if I don’t have an oven? You can pan-fry the pear halves in the butter mixture on medium heat until tender, about 10-15 minutes, flipping occasionally. They won’t get that lovely baked caramelization, but still delicious!
- My pears aren’t getting tender! What gives? They might have been too under-ripe to begin with. Try covering the baking dish with foil for part of the baking time to steam them a bit, then remove the foil to let them brown.
- Can I add other toppings? Absolutely! A drizzle of caramel sauce, a sprinkle of flaky sea salt (trust me on this, it’s amazing), or even a dollop of whipped cream alongside the ice cream are all fantastic additions.
Final Thoughts
See? I told you it was easy! This baked pear dessert is the perfect little sweet treat that doesn’t require a culinary degree or a mountain of dishes. It’s comforting, satisfying, and just plain delicious. So go ahead, treat yourself, or better yet, whip this up for someone you want to impress without, you know, *actually* trying too hard. Now go impress someone—or yourself—with your new culinary skills. You’ve earned it!


