So, you’re staring at that lonely chicken breast in the fridge, huh? And a little voice is whispering, “Make it healthy! Make it delicious! But also, can you be done in like, 30 minutes?” My friend, that little voice is me, and I’ve got your back. Forget dry, bland chicken. We’re about to turn that lean protein into something you’ll actually *want* to eat. No stress, maximum flavor, and totally guilt-free. Let’s get cooking!
Why This Recipe is Awesome
Okay, buckle up, buttercup, because this recipe isn’t just “good,” it’s practically a culinary superpower. First off, it’s healthy AF without tasting like cardboard. We’re talking lean protein goodness that’ll fuel your day without feeling heavy. Secondly, it’s incredibly simple. Like, “even your dog could follow these instructions if he had opposable thumbs” simple. Seriously, it’s idiot-proof, even I didn’t mess it up the first time.
Plus, it’s super versatile, making it perfect for meal prep, a quick weeknight dinner, or pretending you’re a gourmet chef when guests come over. The best part? Minimal cleanup. Who doesn’t love that? (Don’t answer, that was rhetorical.)
Ingredients You’ll Need
Gather ’round, pantry explorers! Here’s what you’ll need for our healthy chicken breast masterpiece. No fancy-pants ingredients, just the good stuff.
- 2 boneless, skinless chicken breasts: The star of our show! Look for ones that are roughly the same size for even cooking.
- 1 tablespoon olive oil: Your kitchen’s MVP. Don’t skimp on the good stuff!
- 1 teaspoon garlic powder: Because everything’s better with garlic. Period.
- 1 teaspoon onion powder: Garlic’s best friend, adding that extra layer of savory yum.
- ½ teaspoon dried oregano: For a touch of Mediterranean magic.
- ¼ teaspoon smoked paprika: Gives it a lovely color and a subtle smoky kick. (Trust me on this one.)
- Salt and black pepper to taste: Don’t be shy! Seasoning is key to flavor.
- Optional: ½ lemon, for squeezing: A little citrus brightens everything up. Highly recommend!
- Optional: Fresh parsley or chives, for garnish: Makes it look fancy, like you tried.
Step-by-Step Instructions
Ready to make some magic happen? Follow these super easy steps, and you’ll be a chicken champ in no time!
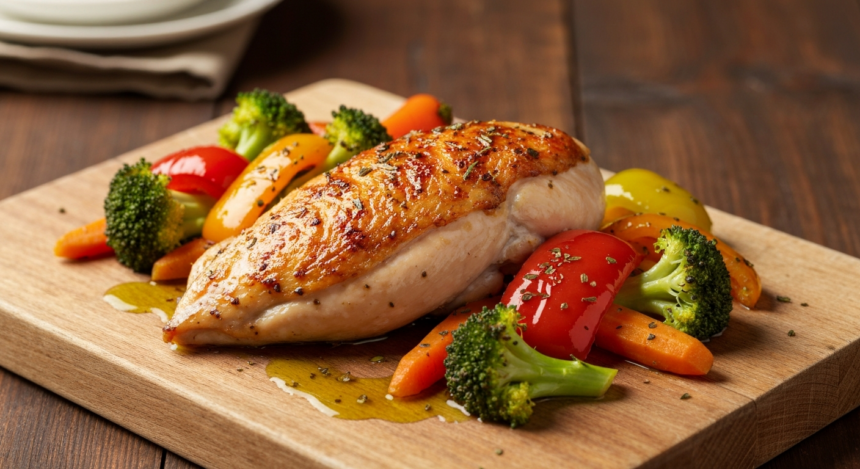
- Preheat & Prep: First things first, crank that oven up to 400°F (200°C). While it’s getting toasty, line a baking sheet with parchment paper or foil for easy cleanup. Your future self will thank you.
- Pat It Dry: Take those chicken breasts and pat them down with a paper towel. This is super important! **A dry surface means a better sear and crispier exterior.** We don’t want soggy chicken, do we?
- Season Like a Pro: In a small bowl, mix together the garlic powder, onion powder, oregano, smoked paprika, salt, and pepper. Drizzle the olive oil all over the chicken breasts, then sprinkle your seasoning mix evenly on both sides. **Don’t be afraid to really rub it in!**
- Bake It ‘Til Golden: Place the seasoned chicken breasts on your prepared baking sheet. Pop them into the preheated oven and bake for 18-22 minutes. Cooking time can vary depending on thickness, so keep an eye on them!
- Check for Doneness & Rest: The chicken is done when it reaches an internal temperature of 165°F (74°C). Use a meat thermometer if you have one – it’s your best friend for perfectly cooked chicken! Once done, remove from the oven, squeeze a little lemon juice over them if you’re feeling zesty, and **let them rest for 5-10 minutes** before slicing. This locks in all those delicious juices!
- Garnish & Serve: Slice your perfectly baked chicken against the grain (fancy chef talk for cutting across the muscle fibers for maximum tenderness). Garnish with fresh parsley or chives if you’re feeling extra, and serve immediately. Enjoy your masterpiece!
Common Mistakes to Avoid
We all make ’em, but let’s try to dodge these common pitfalls, shall we?
- Not Preheating the Oven: Rookie mistake! Throwing chicken into a cold oven means uneven cooking and a longer cook time. **Always preheat!**
- Not Patting Chicken Dry: As mentioned, wet chicken steams instead of bakes, leading to a sad, rubbery texture. Don’t be sad. Pat it dry!
- Under-Seasoning: A bland chicken breast is a tragedy. Don’t be shy with those spices! **Taste as you go (the spice mix, not raw chicken, obvi).**
- Overcooking: The cardinal sin of chicken. Dry, tough chicken is nobody’s friend. Use that meat thermometer! 165°F is the magic number.
- Not Resting the Chicken: This is crucial! Cutting into chicken immediately after baking lets all those glorious juices escape, leaving you with dry meat. **Let it chill for a bit!**
Alternatives & Substitutions
Got a bare pantry? Or just feeling adventurous? No worries, here are some ideas to mix things up:
- Spice Blends: Don’t have all those individual spices? Grab a pre-made blend! Italian seasoning, cajun, ranch, or even just salt and pepper work wonders. **IMO, a good chili powder blend is fantastic here.**
- Herbs: Fresh rosemary, thyme, or sage can be chopped and added for a different aromatic profile. Dried herbs work too, just use about a third of the amount of fresh.
- Citrus Kick: No lemon? A splash of lime juice, a tiny bit of orange juice, or even a dash of apple cider vinegar can give that needed brightness.
- Marinades: Feeling fancy? Marinate your chicken for 30 minutes to a few hours in Italian dressing, yogurt and spices, or a soy-ginger mixture before baking for extra flavor and tenderness.
- Add-ins: Throw some veggies on the same baking sheet for a complete meal! Broccoli florets, sliced bell peppers, or asparagus spears tossed with a little olive oil and salt bake perfectly alongside the chicken.
FAQ (Frequently Asked Questions)
You’ve got questions, I’ve got (casual and slightly snarky) answers!
- “Can I use bone-in chicken breasts?”
You can, but the cooking time will be longer (think 30-40 minutes) and they might not cook as evenly. Stick to boneless for this recipe’s perfect timing!
- “How do I know if it’s done without a thermometer?”
Good question! Cut into the thickest part. If the juices run clear and the meat is opaque white (no pink!), you’re good to go. But seriously, a meat thermometer is your friend. Get one, it’ll change your chicken game.
- “Can I cook this on a grill instead?”
Absolutely! Adjust cooking time (usually shorter, about 6-8 minutes per side on medium-high heat) and aim for the same internal temp. Get those grill marks, chef!
- “What can I serve with this chicken?”
So many options! A simple side salad, roasted veggies, quinoa, brown rice, or even some sweet potato fries. It’s a blank canvas for deliciousness!
- “Can I make this ahead for meal prep?”
OMG, yes! This chicken is fantastic for meal prep. Cook it, cool it, slice it, and store it in an airtight container for up to 3-4 days in the fridge. Reheats beautifully!
- “My chicken always comes out dry, what am I doing wrong?”
Nine times out of ten, it’s overcooking or not letting it rest! Remember, 165°F and a good rest are your secret weapons against dry chicken.
Final Thoughts
See? Who said healthy eating had to be boring or complicated? You just whipped up a delicious, juicy chicken breast that’s packed with flavor and perfect for whatever your day throws at you. You’re practically a kitchen wizard! So go ahead, pat yourself on the back. You earned it.
Now go impress someone – or just yourself – with your new culinary skills. Your taste buds (and your health goals) will thank you. Happy cooking, friend!
