So you’re craving something tasty but too lazy to spend forever in the kitchen, huh? Same. What if I told you we could whip up an apple pie that tastes like grandma spent all day on it, but *you* spent like, twenty minutes? Yeah, I’m talking about the mythical apple pie using canned apples. No peeling, no coring, just pure, unadulterated, glorious pie. Let’s get this delicious party started!
Why This Recipe is Awesome
Okay, let’s be real. This isn’t just a recipe; it’s a cheat code. Think of it as your secret weapon for when you want to impress without, you know, *trying too hard*. This pie is:
- Effortlessly Delicious: Tastes like a gourmet dessert, but your hands barely touched a knife.
- Idiot-Proof: Seriously, even I didn’t mess this up, and my kitchen skills sometimes peak at microwaving popcorn.
- Time-Saving: Forget hours of peeling and slicing. We’re talking minutes of prep here. Minutes!
- Perfect for Any Occasion: Impromptu dinner party? Last-minute dessert craving? This pie has your back.
Basically, it’s the culinary equivalent of ordering takeout but telling everyone you cooked. Only, you actually *did* cook, just… smart.
Ingredients You’ll Need
Gather ’round, my friends. Here’s what you’ll need for this masterpiece. Nothing too fancy, promise!
- 2 Store-Bought Pie Crusts: Pre-made, pre-rolled. Don’t even think about making your own unless you’re feeling dangerously ambitious.
- 2 Cans (20-21 oz each) Apple Pie Filling: The absolute hero of this story. Get the kind that’s already spiced and sliced. We’re not reinventing the wheel here.
- 2 Tablespoons Unsalted Butter: Melted. Because everything is better with butter, it’s just science.
- 1 Teaspoon Ground Cinnamon: For that warm, comforting, “I totally slaved over this” aroma.
- 1/2 Teaspoon Ground Nutmeg: A little whisper of spice. Don’t go overboard, unless you *really* love nutmeg.
- 1/4 Cup Granulated Sugar (optional): Taste your filling first! If it’s sweet enough for your soul, skip it. If you have a serious sweet tooth, go for it.
- 1 Large Egg: Beaten. This is our secret weapon for a beautiful, golden-brown crust.
- 1 Tablespoon Turbinado Sugar (optional): For a fancy, sparkly crunch on top. Because you’re extra, and that’s okay.
Step-by-Step Instructions
Alright, let’s turn these simple ingredients into a pie that’ll make your tastebuds sing. Follow these steps, and you’ll be golden!
Preheat Your Oven: Crank that baby up to 425°F (220°C). Your oven needs to warm up properly, just like you need your morning coffee.
Prep the Bottom Crust: Carefully unroll one pie crust and gently fit it into a standard 9-inch pie plate. Trim any excess, leaving about an inch overhang. We’ll deal with the edges later.
Mix the Filling: In a large bowl, gently combine the canned apple pie filling, melted butter, cinnamon, nutmeg, and the optional granulated sugar. Be gentle! We want apple chunks, not apple mush.
Fill ‘Er Up: Pour the glorious apple mixture into your prepared bottom pie crust. Try to mound it slightly in the middle; it’ll settle as it bakes.
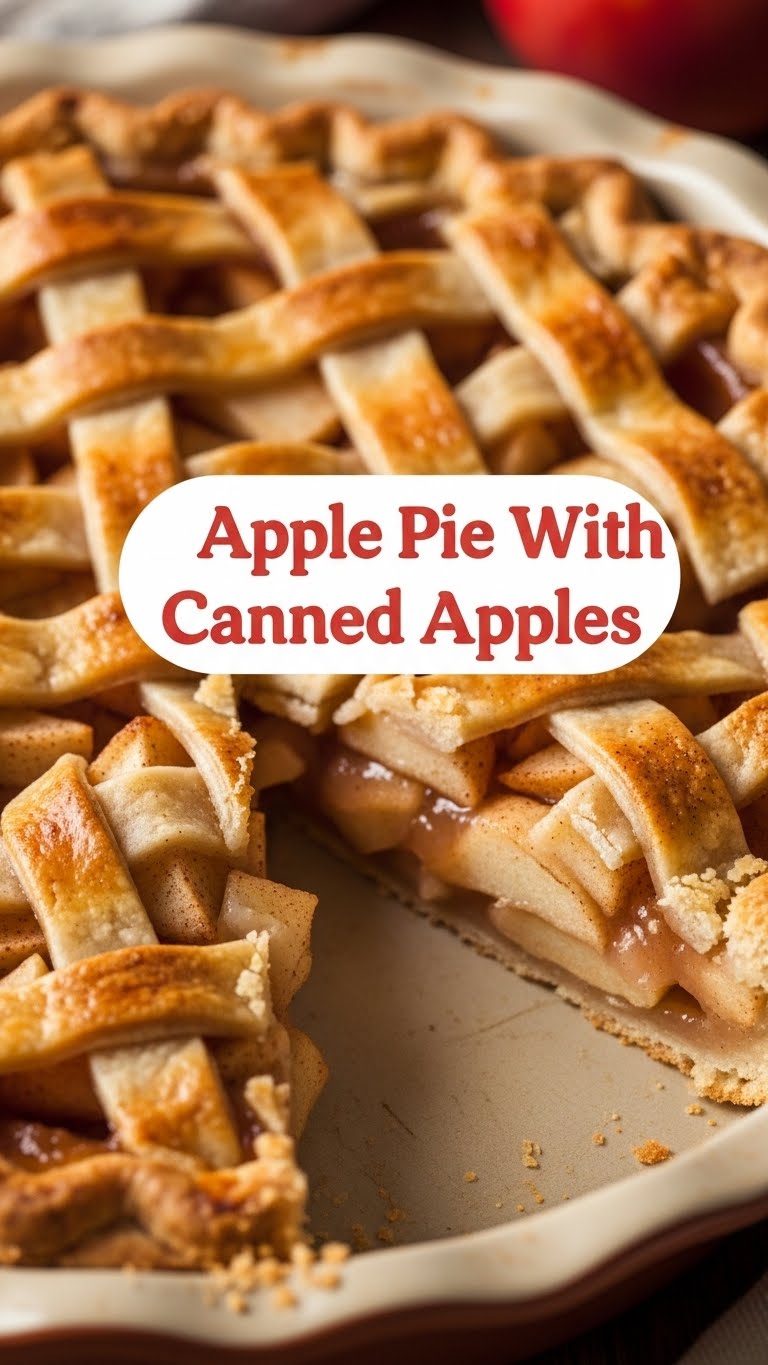
Top it Off: Unroll the second pie crust and carefully place it over the filling. Now, this is where you get creative: you can either lay it flat and cut a few vent slits for steam to escape, or if you’re feeling fancy, cut it into strips for a lattice top. Your call, superstar!
Seal the Deal: Trim the top crust to match the bottom, then fold the overhang under. Now, crimp those edges! You can use your fingers, a fork, or whatever wizardry you prefer to seal the crusts together and make it look pretty. Sealing is key to prevent filling leakage.
Egg Wash & Sparkle: Brush the entire top crust with your beaten egg. This is what gives it that beautiful, glossy, golden-brown finish. If you’re using turbinado sugar, sprinkle it generously over the egg wash. Boom, instant fancy!
Bake to Perfection: Place your pie on a baking sheet (to catch any potential drips) and pop it into the preheated oven. Bake for 15 minutes at 425°F (220°C). Then, reduce the oven temperature to 375°F (190°C) and continue baking for another 35-45 minutes, or until the crust is deeply golden brown and the filling is bubbly. If the crust edges start browning too quickly, tent them with aluminum foil!
The Hardest Part: Cool Down: This is crucial. Let the pie cool on a wire rack for at least 1 to 2 hours before slicing. I know, I know, it’s torture. But trust me, the filling needs time to set, otherwise, you’ll have a runny, soupy mess. Patience, my friend, patience!
Common Mistakes to Avoid
Listen, we all make mistakes. But with this pie, we’re aiming for perfection (or at least, “impressive”). Here are some common blunders to dodge:
- Not Preheating the Oven: Seriously, why do people skip this? It messes with the crust texture and overall bake. Rookie move.
- Overfilling the Pie Plate: Don’t be greedy! Too much filling means a bubbling-over disaster in your oven. Nobody wants to clean that.
- Skipping the Vent Slits: Those little cuts aren’t just for show. They let steam escape, preventing a pie explosion. Safety first, pie second.
- Cutting Into It Too Soon: I know it smells heavenly, but resist! The filling needs time to cool and set. If you cut it hot, it’ll just be a delicious, but shapeless, puddle.
- Thinking Store-Bought Crust is “Cheating”: It’s not cheating; it’s smart. And delicious. End of discussion.
Alternatives & Substitutions
Feeling a little wild? Want to put your own spin on it? Here are some ideas:
- Different Spices: Instead of (or in addition to) cinnamon and nutmeg, try a pinch of allspice, ground cloves, or even a tiny dash of cardamom for a more exotic twist.
- Sweetener Swap: If you’re adding sugar, consider brown sugar for a deeper, more molasses-y flavor. Or a drizzle of maple syrup for a subtle, earthy sweetness.
- Add-ins: A handful of dried cranberries, chopped pecans, or even some shredded coconut (if you’re feeling tropical) can add extra texture and flavor. Just don’t go overboard and overfill the pie!
- Crust Flair: If you’re feeling super lazy (or super fancy), you could use puff pastry sheets instead of pie crust for a different, flaky experience.
FAQ (Frequently Asked Questions)
Got questions? I’ve got answers. Mostly.
- “Do I *really* need to preheat the oven?” Yes! Your pie deserves a warm welcome to ensure a perfectly baked crust and filling. It’s like sending your kid to school without breakfast – just not right.
- “Can I skip the egg wash?” You *can*, but your crust won’t have that gorgeous, glossy, golden-brown sheen. It’s the difference between a good pie and a “wow, that looks professional” pie.
- “My pie crust is browning too fast! Help!” Fear not, my friend! Just gently tent the edges of the pie with aluminum foil. It’s like giving your pie a little sun hat to protect it from getting too toasty.
- “Can I use fresh apples instead of canned?” Well, technically yes, but then it wouldn’t be *this* glorious “canned apples are my hero” recipe, would it? You’d need to peel, core, slice, and cook them down with sugar and spices first. That’s a whole other (more involved) adventure!
- “How do I know when it’s done?” The crust will be golden brown, and you should see the filling bubbling up through the vent holes. If you’re unsure, carefully insert a knife into a vent; if it comes out warm and the filling looks bubbly, you’re good to go.
- “How long does it last?” Covered, on the counter for a day or two. In the fridge, it’ll last about 3-4 days. But let’s be honest, it probably won’t be around that long.
- “Can I add ice cream?” Is that even a question?! YES. A scoop (or three) of vanilla bean ice cream is practically mandatory. Warm pie + cold ice cream = pure bliss.
Final Thoughts
See? Told you it was easy peasy, lemon squeezy (or in this case, apple pie-sy)! You just whipped up a dessert that tastes like a labor of love but was actually a labor of pure genius (aka, using canned goods). Now go forth and conquer! Impress your friends, baffle your family, or just treat yourself. You’ve earned that warm, spicy, sweet slice of pie. Now, grab a fork!


