So you’re craving something tasty but too lazy to spend forever in the kitchen, huh? Same. We’ve all been there: that sudden, undeniable urge for warm, cinnamony, apple-y goodness, but the thought of wrestling with a full-sized pie crust just sends shivers down your spine. Fear not, my friend! I’ve got the perfect solution that lets you have your pie and eat it too, without the existential dread of pie crimping. Enter: Apple Pie Cups with Streusel Topping. Your future self will thank you.
Why This Recipe is Awesome
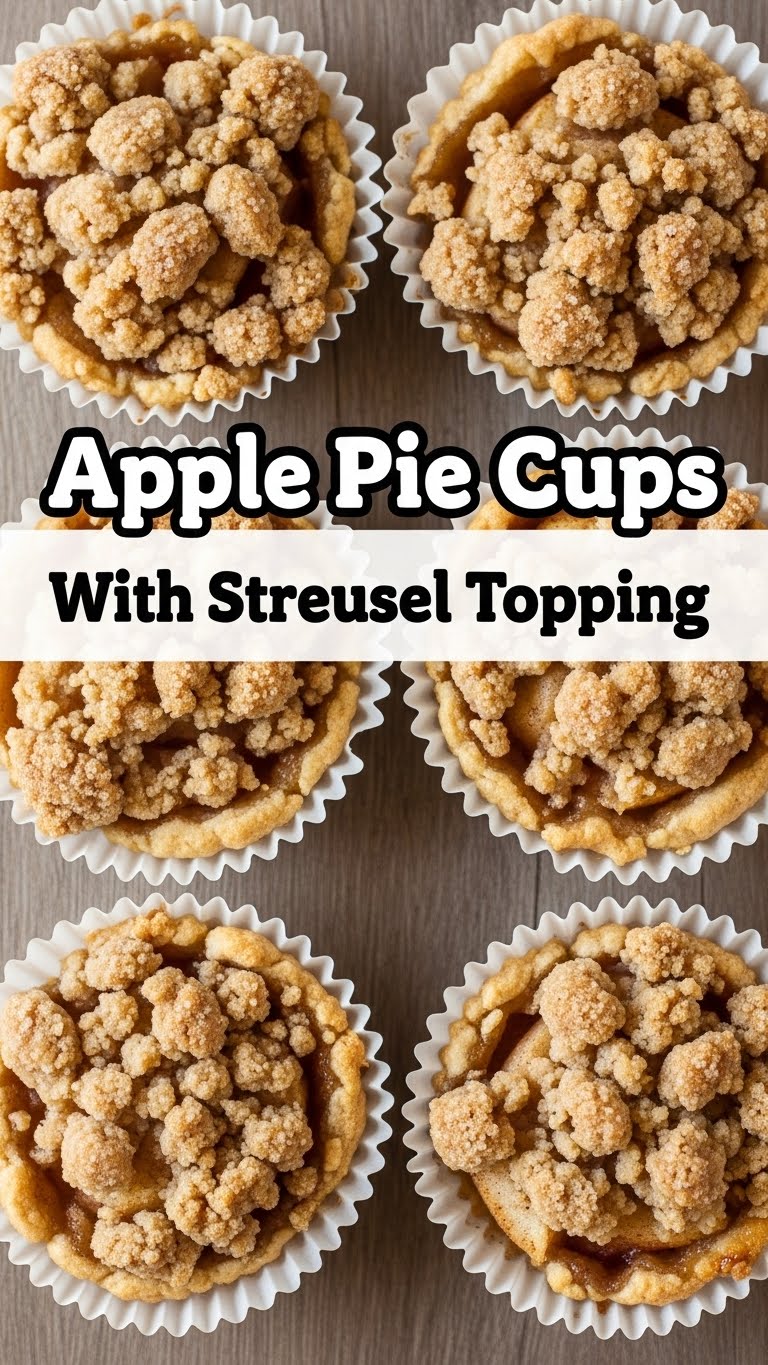
Okay, let’s be real. This isn’t just “awesome,” it’s practically a culinary superhero. First off, they’re individual portions, which means no awkward slicing and definitely no fighting over the biggest piece. (Unless you’re fighting over who gets the *last* piece, which is a whole other saga.) Secondly, these little beauties are **idiot-proof**. Seriously, if I can make them without setting off the smoke alarm or accidentally gluing myself to the counter, you absolutely can too. They’re quick, they’re cute, and they deliver all the cozy vibes of a traditional apple pie in a fraction of the time and effort. Plus, that streusel topping? **Chef’s kiss!** It’s the crunchy, buttery crown jewel on your little apple kingdom.
Ingredients You’ll Need
Gather ’round, culinary adventurers! Here’s your loot list:
For the Mini Pie Crusts (because store-bought is our secret weapon):
- 1 package (14.1 oz) refrigerated pie crusts (the kind that rolls out, not the frozen shells. Unless you like a challenge. But why?!)
For the Apple Filling (the heart of the matter):
- 2 medium-sized apples (Granny Smith for tartness, Fuji or Honeycrisp for sweetness, or a combo for balance – live a little!)
- 2 tablespoons unsalted butter (the real stuff, please; your taste buds will thank you)
- 2 tablespoons light brown sugar, packed (for that molasses-y goodness)
- 1 tablespoon granulated sugar (just a little extra sweetness)
- 1/2 teaspoon ground cinnamon (because is it even apple pie without cinnamon?)
- 1/4 teaspoon ground nutmeg (cinnamon’s best friend)
- 1 tablespoon all-purpose flour (to thicken things up a bit, no watery pie cups here!)
- 1 tablespoon lemon juice (to keep those apples from browning and add a zing)
For the Streusel Topping (the crunchy crown!):
- 1/4 cup all-purpose flour
- 1/4 cup light brown sugar, packed
- 2 tablespoons granulated sugar
- 1/4 teaspoon ground cinnamon
- 3 tablespoons unsalted butter, cold and diced (don’t even think about melting it, rebel)
Step-by-Step Instructions
- Preheat & Prep: First things first, get that oven hot! Preheat it to 375°F (190°C). Lightly grease a 12-cup muffin tin. You can use non-stick spray or a little butter.
- Make the Streusel: In a small bowl, whisk together the flour, both sugars, and cinnamon for the streusel. Now, add the cold, diced butter. Use your fingers (or a pastry blender, if you’re fancy) to cut the butter into the dry ingredients until it resembles coarse crumbs. **Don’t overmix!** Stick it in the fridge while you do the rest – a cold streusel is a happy streusel.
- Whip Up the Filling: Peel, core, and dice your apples into small, uniform pieces (about 1/2 inch). In a medium saucepan, melt the 2 tablespoons of butter over medium heat. Toss in your diced apples, both sugars, cinnamon, and nutmeg. Cook, stirring occasionally, for 5-7 minutes until the apples start to soften slightly but still have a bit of bite. Stir in the flour and lemon juice, and cook for another minute until the mixture thickens slightly. Remove from heat and let it cool down a bit.
- Crust Time: Unroll your pie crusts on a lightly floured surface. Using a 3-inch round cutter (or the rim of a glass if you’re like me and wing it), cut out 12 circles. Gently press each circle into the prepared muffin tin cups. Don’t worry if they don’t look perfect – rustic is in!
- Assemble Your Masterpieces: Spoon about 2 tablespoons of the apple filling into each pie crust cup. Don’t overfill, or you’ll have a lava situation in your oven.
- Top ‘Em Off: Grab that chilled streusel from the fridge and crumble it generously over the top of each apple-filled cup. The more streusel, the merrier, IMO.
- Bake It ‘Til It’s Golden: Pop the muffin tin into your preheated oven and bake for 20-25 minutes, or until the streusel is golden brown and the filling is bubbly. Keep an eye on them!
- Cool Down: Once baked, let the pie cups cool in the muffin tin for about 10 minutes before carefully transferring them to a wire rack to cool completely. Resist the urge to burn your tongue; it’s worth the wait.
Common Mistakes to Avoid
- Not Chilling the Streusel: You might think this is a minor detail, but a warm streusel just melts into a buttery puddle. We want crumbs, people, delicious crumbs! **Cold streusel prevents butter from melting too fast.**
- Overfilling the Cups: Rookie mistake! Your delicious apple filling will bubble over, creating a sticky, caramelized mess that’s a pain to clean. Less is more, just a little.
- Forgetting to Taste Test the Filling: This isn’t really a mistake, but more of a missed opportunity. Always taste your apple filling before baking to adjust sweetness or spices. It’s for quality control, obviously.
- Using Super Soft Butter for Streusel: We need that butter to be cold and firm so you can “cut” it into the flour, creating those glorious crumbs. Soft butter makes a paste. Nobody wants a streusel paste.
Alternatives & Substitutions
Feeling adventurous? Here are some tweaks:
- Different Fruits: Swap out apples for pears, peaches, or a mix of berries (strawberries, blueberries, raspberries). Adjust sugar if your fruit is super sweet or tart.
- Gluten-Free Crust: Many brands now offer gluten-free refrigerated pie crusts. Go for it!
- Nutty Streusel: Add 1/4 cup of finely chopped pecans or walnuts to your streusel mix for an extra layer of crunch and flavor. Yum!
- No Brown Sugar? If you’re out of brown sugar for the filling or streusel, you can use all granulated sugar. The flavor will be slightly different (less molasses-y depth), but it’ll still be tasty.
- Spice It Up: A tiny pinch of cardamom or allspice in the apple filling can add a lovely warmth and complexity.
FAQ (Frequently Asked Questions)
Got questions? I’ve got answers (mostly humorous ones).
- Can I make these ahead of time? Absolutely! You can bake them, let them cool, and store them at room temp in an airtight container for up to 2 days. Reheat briefly in the oven for that fresh-baked feel.
- What kind of apples are best? Granny Smith for tartness, Honeycrisp or Fuji for a sweeter, firmer bite. A mix of two gives you the best of both worlds. Don’t use those mealy Red Delicious apples unless you’re trying to punish yourself.
- Can I freeze these? Yes, you can! Once fully cooled, wrap them individually and freeze for up to 2-3 months. Thaw at room temperature and warm up in the oven.
- What if I don’t have a round cutter? No problem! Use the rim of a drinking glass, a clean tin can, or even a knife to cut squares. The goal is deliciousness, not perfect circles.
- Can I make them vegan? You bet! Use vegan pie crusts, a plant-based butter substitute (like Miyoko’s Kitchen or Earth Balance sticks), and ensure your sugars are vegan-friendly. Easy peasy!
- My streusel didn’t get crispy, what happened? You likely didn’t chill it enough or your oven wasn’t hot enough. Or you peeked too much. Stop peeking!
Final Thoughts
There you have it! Your new go-to recipe for when you want to feel fancy without actually *being* fancy. These Apple Pie Cups with Streusel Topping are the perfect little bundles of joy for a quick dessert, a potluck show-off, or just a Tuesday night treat because, well, why not? Now go impress someone—or yourself—with your new culinary skills. You’ve earned it, you magnificent baker, you!


