So, you’re dreaming of apple pie but the thought of wrangling pie dough, crimping edges, and generally just *adulting* that much is making you want to take a nap, huh? Been there, bought the T-shirt. What if I told you there’s a magical sweet spot between a cozy, warm apple pie and a perfectly chewy cookie? Enter: Apple Pie Cookies with Butter. These little gems are basically a hug in cookie form, and they bring all the autumn vibes without any of the crust-rolling stress. Get ready to impress your taste buds (and maybe your friends, if you decide to share!).
Why This Recipe is Awesome
Let’s be real, life is too short for complicated recipes unless you’re a professional baker or have an abundance of free time (who are you?!). This recipe? It’s the culinary equivalent of putting on your comfy pants. It’s simple, relatively quick, and tastes like you slaved away for hours. We’re talking tender, buttery cookies cradling a spoonful of warm, spiced apple goodness. It’s basically **all the best parts of apple pie, miniaturized and made handheld**. Plus, no soggy bottom worries! It’s practically idiot-proof, even for those of us who occasionally burn water. (Just kidding… mostly.)
Ingredients You’ll Need
Gather ’round, my sweet-toothed companions! Here’s your shopping list for buttery, appley bliss:
- Unsalted Butter (1 cup, softened): This is where the magic starts. Don’t skimp on the good stuff; it makes all the difference.
- Granulated Sugar (½ cup): For sweetness and that perfect cookie texture.
- Packed Light Brown Sugar (¼ cup): Adds a lovely depth of flavor and chewiness.
- Large Egg (1): Our binder, making everything stick together happily.
- Vanilla Extract (1 teaspoon): A splash of liquid gold for that warm, inviting aroma.
- All-Purpose Flour (2 ¼ cups): The foundation of our cookie kingdom.
- Baking Soda (1 teaspoon): Our little leavening friend, helping cookies puff up just right.
- Salt (½ teaspoon): Don’t skip it! It balances the sweetness like a pro.
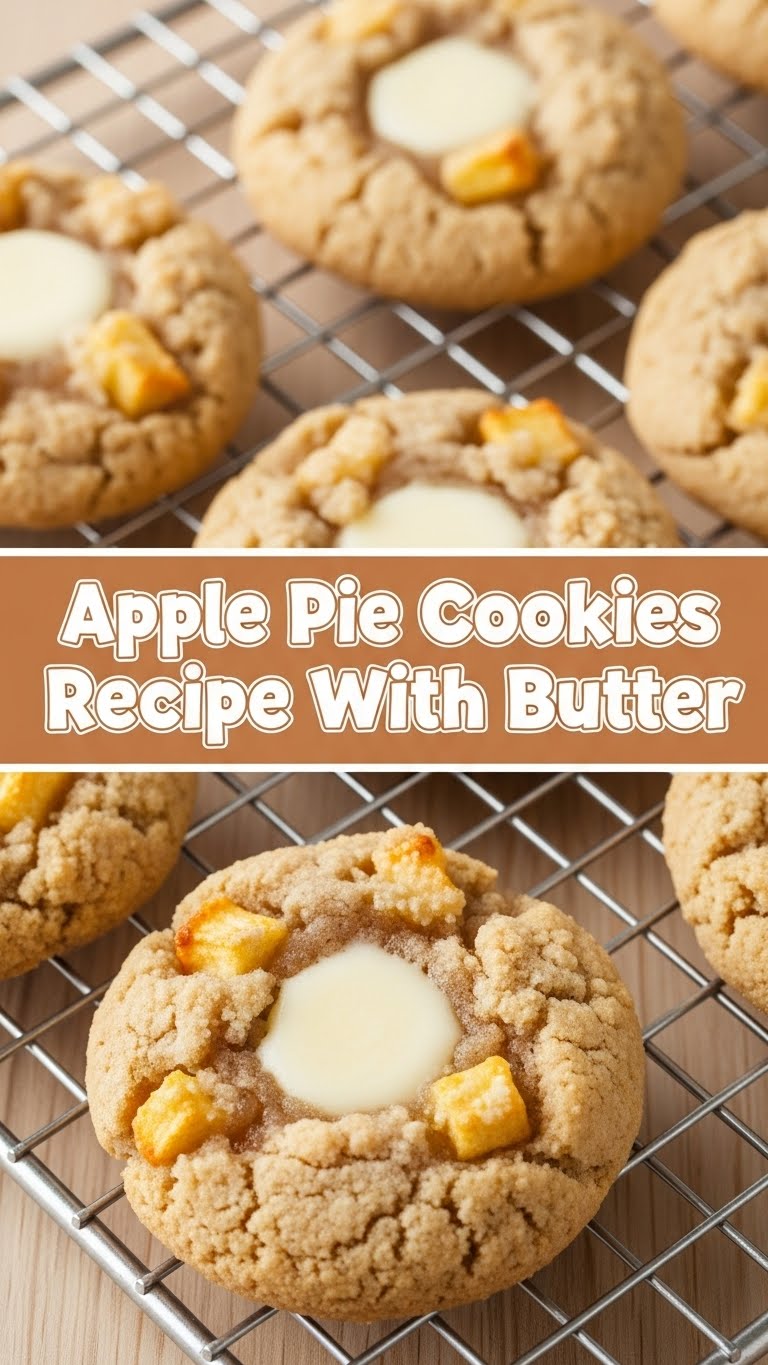
- Canned Apple Pie Filling (about 1 cup): The ultimate shortcut! Chopped into smaller bits, please.
- Ground Cinnamon (½ teaspoon): Because what’s apple pie without cinnamon?
- Optional: Turbinado Sugar or a little extra cinnamon for sprinkling: For that fancy, sparkling finish.
Step-by-Step Instructions
- Cream it Up: In a large bowl, or your stand mixer (your choice, boss!), cream together the softened butter, granulated sugar, and brown sugar until it’s light and fluffy. We’re talking cloud-like, but tastier.
- Egg & Vanilla Dive: Beat in the egg and vanilla extract until well combined. Scrape down the sides of the bowl to make sure everything gets acquainted.
- Dry Goods Party: In a separate medium bowl, whisk together the flour, baking soda, and salt. Make sure there are no lumpy surprises!
- Combine Forces: Gradually add the dry ingredients to the wet ingredients, mixing on low speed until *just* combined. Don’t overmix! We want tender cookies, not hockey pucks.
- Chill Out: Cover the dough and pop it in the fridge for at least 30 minutes. This helps prevent spreading and develops flavor. Patience, young grasshopper!
- Prep the Filling: While the dough is chilling, grab your apple pie filling. If the apple chunks are too big, give them a quick chop. Stir in the ½ teaspoon of cinnamon.
- Preheat & Prep: Preheat your oven to 375°F (190°C). Line a baking sheet with parchment paper – your future self will thank you for easier cleanup.
- Shape ‘Em Up: Take out your dough. Scoop about a tablespoon of dough and flatten it slightly in your palm. Place about ½ to 1 teaspoon of the apple filling in the center. Carefully bring the edges of the dough around the filling and pinch to seal, forming a ball. Repeat until you run out of dough or patience.
- Bake Time: Place the cookie dough balls about 2 inches apart on your prepared baking sheet. If you’re feeling fancy, sprinkle a little turbinado sugar or cinnamon on top.
- Golden Glory: Bake for 10-12 minutes, or until the edges are lightly golden brown. The centers might look a little soft, but they’ll firm up as they cool.
- Cool Down: Let the cookies cool on the baking sheet for a few minutes before transferring them to a wire rack to cool completely. Try not to eat them all immediately (it’s hard, I know).
Common Mistakes to Avoid
- Overmixing the Dough: This is a biggie! Overmixing develops the gluten in the flour, leading to tough, chewy cookies instead of tender ones. Mix until *just* combined, then stop.
- Skipping the Chill Time: I know, waiting is the worst. But chilling the dough helps the butter solidify and prevents your cookies from spreading into flat, sad puddles.
- Too Much Filling: Don’t get greedy with the apple filling! Too much will make the cookies burst open in the oven, creating a gooey (but still delicious) mess. A modest ½ to 1 teaspoon is plenty.
- Not Preheating Your Oven: Rookie mistake! A properly preheated oven ensures your cookies start baking immediately and evenly.
- Overbaking: Cookies continue to cook a little after they come out of the oven. Take them out when the edges are golden and the centers are still slightly soft. Nobody likes a dry cookie.
Alternatives & Substitutions
Feeling adventurous? Here are a few ways to tweak these delightful cookies:
- Other Fruit Fillings: Swap the apple pie filling for cherry, peach, or even blueberry pie filling! Each offers a delicious twist. Just make sure to chop the fruit if the pieces are too large.
- Spice it Up: Add a pinch of nutmeg or a dash of allspice to the apple filling for an even richer “pie” flavor. A tiny pinch of ground cloves could be nice too!
- Dough Variations: You could try adding a ¼ cup of finely chopped pecans or walnuts to the cookie dough for extra crunch and nuttiness. Or, for a different flavor profile, swap some of the all-purpose flour for a bit of whole wheat flour (just a small amount, like ¼ cup, so it doesn’t get too dense).
- Glaze Goodness: Drizzle cooled cookies with a simple powdered sugar glaze (powdered sugar + a tiny bit of milk or water) for an extra touch of sweetness and visual appeal.
FAQ (Frequently Asked Questions)
Got questions? I’ve got answers (and sometimes snarky commentary)!
Can I use margarine instead of butter? Well, technically yes, but why hurt your soul like that? Butter provides superior flavor and texture. If you must, use a high-quality stick margarine, but expect a slight difference in taste and spread.
What if I don’t have apple pie filling? Can I use fresh apples? You absolute rebel! Yes, you can. You’ll need to peel, core, and finely dice about 1-2 medium apples (like Honeycrisp or Granny Smith). Sauté them in a tablespoon of butter with a tablespoon of sugar and ½ teaspoon of cinnamon until softened, then let them cool before using. It adds an extra step, but **FYI**, it’s super delicious.
My cookies spread too much! What did I do wrong? Likely culprits: your butter was too soft (melted, even?), you skipped chilling the dough, or your oven temperature is off (get an oven thermometer!). Also, don’t overcrowd the baking sheet.
How do I store these apple pie cookies? Keep them in an airtight container at room temperature for up to 3-4 days. For longer storage, you can freeze them for up to 2-3 months. Just thaw at room temp, or give them a quick zap in the microwave for that warm, gooey filling effect.
Can I make the dough ahead of time? Absolutely! You can keep the unbaked cookie dough in the fridge for up to 2-3 days. Just make sure it’s tightly wrapped. When ready to bake, let it sit out for 10-15 minutes to soften slightly before shaping.
These taste amazing! Can I send you some? You’re too kind! Just make another batch for yourself; that’s thanks enough!
Final Thoughts
And there you have it, folks! Your new favorite fall (or any season, really) cookie. These Apple Pie Cookies are proof that you don’t need a culinary degree to make something ridiculously delicious. They’re easy, they’re buttery, and they taste like a warm hug from a kindly grandma (who secretly used a shortcut for the filling, shhh!). Now go forth and conquer your cravings. You’ve earned it!


