So you’re craving something warm, sweet, and comforting, but the thought of baking a whole pie or a gigantic crisp for just *you* feels… excessive? And let’s be real, who needs the commitment or the dishes? You’re a person of discerning taste, a solo dessert adventurer, and frankly, a bit too busy (or lazy, no judgment!) to spend forever in the kitchen. Same.
That’s where the magic of “Apple Desserts For One” swoops in like a delicious, personal superhero. Forget grand gestures; we’re talking instant gratification, minimal fuss, and maximum apple-y goodness. Let’s get this party started!
Why This Recipe is Awesome
Okay, let me tell you why this isn’t just *another* recipe. This is THE recipe for when you need a hug in a bowl, fast. First off, it’s ridiculously quick. We’re talking minutes, not hours. Secondly, it’s pretty much **idiot-proof**. I say this with love, having successfully messed up simpler things. If I can nail this, you absolutely can too.
Plus, the cleanup? Practically non-existent. One bowl, one ramekin, one happy you. No sharing required, FYI. This is your personal moment of sweet bliss, and you’ve earned every single bite without having to fend off “just a taste” requests. It’s perfect for a cozy night in, a spontaneous craving, or just celebrating the sheer joy of apples.
Ingredients You’ll Need
Gather your troops, folks! These are simple, everyday heroes:
- **1 medium apple:** The star of our show! Any crisp apple like Gala, Fuji, Honeycrisp, or Granny Smith works wonders. Don’t grab a mealy one; that’s just sad.
- **1 tablespoon all-purpose flour:** The binding agent, the backbone of our topping. Nothing fancy needed.
- **1 tablespoon granulated sugar (plus 1 teaspoon for the apple):** Because life’s too short for unsweetened apples. Adjust to your sweet tooth!
- **1 tablespoon cold butter:** Cut into small cubes. This is the secret to a beautifully crumbly topping. Don’t skimp, your tastebuds will thank you.
- **Pinch of cinnamon:** The apple’s best friend. Seriously, don’t even think about skipping it.
- **Tiny pinch of salt:** Enhances all the other flavors. Trust me on this one.
- **Optional:** A splash of lemon juice (about 1/2 teaspoon) for extra brightness with the apple.
Step-by-Step Instructions
Alright, apron on (or not, we’re informal here!), let’s do this:
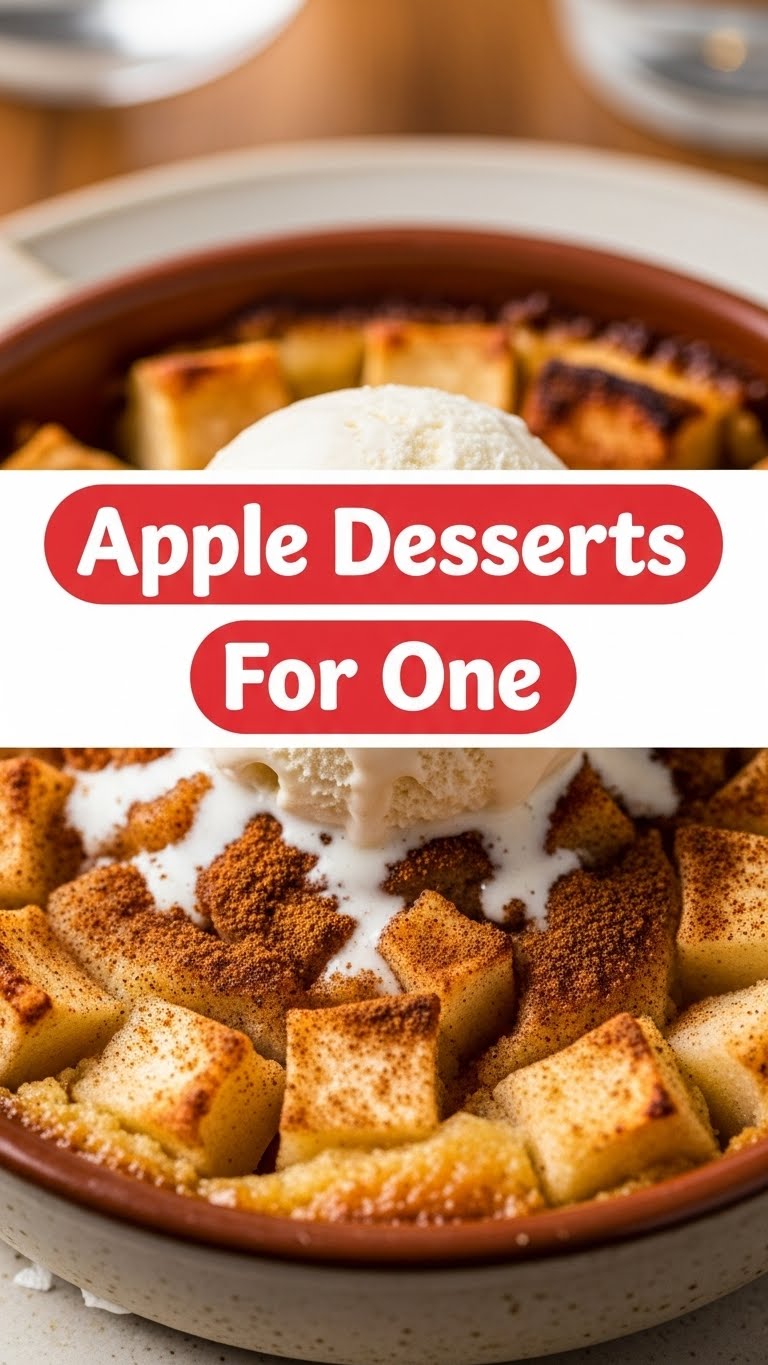
- **Prep Your Apple:** Wash, peel (or don’t, your call!), core, and chop your apple into small, bite-sized pieces. About 1/2-inch cubes are perfect. Toss them into a small, oven-safe ramekin or mug (about 6-8 oz capacity).
- **Season the Apple:** Sprinkle the 1 teaspoon of sugar and a little pinch of cinnamon over the chopped apple. If using, add that splash of lemon juice. Give it a gentle stir so all the apple pieces are coated.
- **Make the Topping:** In a separate small bowl, combine the 1 tablespoon of flour, 1 tablespoon of sugar, the remaining pinch of cinnamon, and the tiny pinch of salt. Mix it up.
- **Add the Butter:** Drop in your cold butter cubes. Now, with your fingertips, a fork, or a pastry blender (if you’re feeling fancy), cut the butter into the dry ingredients until it resembles coarse crumbs. **The key here is not to overmix!** You want little buttery clumps.
- **Assemble and Bake/Microwave:** Sprinkle this glorious crumbly topping evenly over your seasoned apples in the ramekin.
- **Oven Method (for the best crispy topping):** Preheat your oven to 375°F (190°C). Place the ramekin on a small baking sheet (to catch any potential bubbly overflow – better safe than sorry!) and bake for 15-20 minutes, or until the apples are tender and the topping is golden brown and bubbly.
- **Microwave Method (for speedy comfort):** Pop the ramekin into the microwave and cook on high for 1.5 to 3 minutes, depending on your microwave’s power and apple tenderness preference. Keep an eye on it! The topping won’t get crispy, but it will still be delicious and warm.
- **Cool Slightly & Enjoy:** Let it cool for a few minutes (seriously, **don’t burn your tongue**!) before digging in. A scoop of vanilla ice cream or a dollop of whipped cream is highly encouraged.
Common Mistakes to Avoid
We’ve all been there. Learn from my (numerous) dessert misadventures:
- **Forgetting to preheat the oven:** Rookie mistake! That preheat time isn’t just a suggestion; it helps everything bake evenly and get that perfect texture.
- **Using warm butter for the topping:** This is a big no-no. Warm butter melts too quickly and will give you a paste, not those glorious crumbly bits. **Cold butter is your friend.**
- **Overmixing the topping:** Again, paste, not crumbs. Mix just until combined and crumbly. Lumps are good!
- **Skipping the salt:** It sounds weird in a sweet dish, but that tiny pinch of salt truly makes the flavors sing. Don’t be a hero, add the salt.
- **Eating it straight out of the oven:** I know, the smell is intoxicating. But molten apple lava is no fun for your mouth. Give it 5-10 minutes to chill.
Alternatives & Substitutions
Feeling adventurous? Or just working with what you’ve got? Here are some ideas:
- **Different Fruit:** No apples? No problem! Pears, peaches, or even a mix of berries would be fantastic. Adjust cooking time as needed since softer fruits cook faster.
- **Nutty Topping:** Add a tablespoon of finely chopped nuts (pecans, walnuts, almonds) to your topping mixture for extra crunch and flavor. IMO, this takes it up a notch!
- **Oaty Goodness:** Swap half of the flour for rolled oats for a more rustic, chewy crisp topping.
- **Brown Sugar:** Use brown sugar instead of granulated sugar in the topping (and for the apple) for a deeper, caramel-y flavor. So good.
- **Vegan Version:** Swap out the butter for a good quality plant-based butter alternative. Most work beautifully!
- **Spice It Up:** Add a tiny pinch of nutmeg or allspice along with the cinnamon for a more complex spice profile.
FAQ (Frequently Asked Questions)
Got questions? I’ve got answers (and a side of sass, maybe):
- **Can I use any type of apple?** Yes, but for the best texture, go for a crisp apple that holds its shape when baked. Granny Smith gives a nice tart contrast, while Honeycrisp or Gala are sweeter.
- **I don’t have a ramekin! What can I use?** A small, oven-safe mug, a small ceramic bowl, or even a tiny cast-iron skillet (if you’re feeling fancy) will work! Just make sure it’s oven-safe.
- **Can I skip the butter?** Technically yes, but why hurt your soul like that? The butter is what makes the topping rich and delicious. If you’re really avoiding it, you *could* try a tablespoon of coconut oil, but the texture will be different.
- **Microwave or oven – which is better?** Oven, hands down, for that glorious crispy topping. The microwave is fantastic for speed and if you don’t care about the crisp, just the warm apple goodness.
- **Can I make more than one serving?** Absolutely! Just multiply the ingredients accordingly and use a larger baking dish. You might need to adjust baking time slightly.
- **What if my apples aren’t softening?** If using the oven, they might need a few more minutes. If microwaving, give it another 30 seconds to a minute. It varies by apple type and size.
- **Can I store leftovers?** Leftovers? For a dessert for one? My friend, I admire your optimism! But yes, if by some miracle you have any, cover it and refrigerate for up to a day. Reheat gently in the microwave or oven.
Final Thoughts
See? You just whipped up a delicious, warm, apple-y hug without breaking a sweat or dirtying your entire kitchen. You’re basically a culinary genius in miniature! Now go impress someone—or more likely, yourself—with your new dessert-for-one skills. You’ve earned this moment of sweet indulgence. Seriously, enjoy every single bite. And maybe, just maybe, make another one tomorrow. No judgment here!


