
Look, we all know what’s about to happen here. You’re scrolling through recipes at 10 PM with a bunch of apples sitting on your counter that are *this close* to going bad. You want something warm, comforting, and just a little bit fancy—but without the fancy effort. Welcome to your solution: the no-fuss, maximum-deliciousness apple crisp that’s about to make your kitchen smell like heaven and your taste buds throw a party.
Why This Recipe is Awesome
Let’s be honest for a second—apple crisp is basically an excuse to eat dessert and pretend it’s somewhat healthy because, hey, fruit! But this isn’t just any apple crisp. This version hits all the right notes: it’s ridiculously easy (seriously, if you can operate a knife without injuring yourself, you’re qualified), it’s customizable depending on what you have in your pantry, and it comes with homemade whipped cream that will make you question why you ever bought the canned stuff.
The best part? While it bakes, your entire home transforms into that cozy fall candle you paid way too much for last year. Free aromatherapy, people!
Ingredients You’ll Need
For the apple filling:
- 6-7 medium apples (Honeycrisp, Granny Smith, or whatever’s about to go bad in your fruit bowl)
- ¾ cup granulated sugar (or less if you’re “being good”)
- 1 tablespoon ground cinnamon (more if you’re a cinnamon fanatic like me)
- 2 tablespoons lemon juice (to keep those apples from turning into sad brown mush)
- 2 tablespoons flour (to thicken things up)
For the crisp topping (the best part, let’s be real):
- 1 cup old-fashioned oats (not the instant ones—they’ll turn to porridge)
- 1 cup all-purpose flour (the measuring doesn’t need to be perfect, relax)
- 1 cup brown sugar, packed (press it down like you’re squishing your feelings)
- ½ teaspoon salt (to make the sweet stuff taste sweeter—science!)
- ½ cup cold butter, cubed (straight from the fridge, no cheating)
For the whipped cream:
- 1 cup heavy whipping cream (the higher the fat content, the better—this is no time for diets)
- 2 tablespoons powdered sugar (keeps it stable and sweet)
- 1 teaspoon vanilla extract (the real stuff if you’re fancy)
Step-by-Step Instructions
- Preheat your oven to 350°F (175°C). Don’t skip this step! I know you want to, but your future self will thank you.
- Peel, core, and slice those apples into roughly ¼-inch slices. They don’t need to be perfect—this isn’t a cooking competition show.
- Toss the apple slices in a large bowl with sugar, cinnamon, lemon juice, and flour until they’re all coated. It should look like apples dressed for a cinnamon-themed costume party.
- Dump the apple mixture into a 9×13 baking dish. Spread them out like they’re sunbathing.
- In another bowl, mix your oats, flour, brown sugar, and salt. Cut in the cold butter using two forks, a pastry cutter, or your fingers if you don’t mind getting messy. Keep going until it looks like coarse crumbs. Think: delicious sand.
- Sprinkle the topping over the apples. Be generous! This isn’t the time for restraint.
- Bake for 45-50 minutes until the topping is golden brown and the apple filling is bubbling around the edges. Your kitchen should smell ridiculous at this point.
- While it’s baking, pour the heavy cream into a chilled bowl (stick it in the freezer for 10 minutes first). Add powdered sugar and vanilla, then beat with an electric mixer until soft peaks form. Don’t overbeat unless you’re trying to make butter!
- Let the crisp cool for about 15 minutes (I know it’s hard to wait, but burning your tongue is worse).
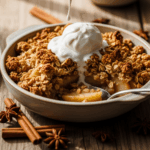
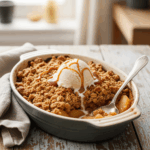
- Serve warm with a generous dollop of that freshly whipped cream. Watch it melt slightly into the warm crisp. Take a picture for Instagram. Eat immediately after.
Common Mistakes to Avoid
Let’s talk about ways to not mess this up:
- Skimping on the topping – This is literally called a “crisp.” The topping is the star. Don’t be stingy.
- Using room temperature butter – Your topping will turn into a sad cookie sheet instead of beautiful crumbles. Cold butter = good crisp.
- Slicing apples too thick – Unless you enjoy biting into raw apple hidden in your dessert, keep those slices reasonably thin.
- Whipping the cream too long – One minute you have gorgeous whipped cream, the next you have sweet butter. Pay attention!
- Not letting it cool slightly – I get it, the smell is driving you wild. But giving it 15 minutes helps the filling set up. Plus, you know, roof-of-mouth burns are no fun.
Alternatives & Substitutions
Life happens. Pantries get empty. Here’s how to adapt:
- Apple types: Any baking apple works. Granny Smith if you like tartness, Honeycrisp for sweetness. Mixing varieties? Now you’re thinking like a pro.
- Make it vegan: Swap butter for coconut oil or vegan butter. Skip the whipped cream or use coconut cream instead. Still delicious, just different.
- Gluten-free version: Use certified gluten-free oats and substitute the all-purpose flour with almond flour or a gluten-free blend. Your GF friends will actually hug you.
- Spice it up: Add nutmeg, cardamom, or ginger to your cinnamon for a more complex flavor. A splash of bourbon in the filling? I won’t tell.
- No brown sugar? White sugar with a teaspoon of molasses works. Or just use all white sugar and accept that your life choices have led to this moment.
FAQ (Frequently Asked Questions)
Can I make this ahead of time?
Absolutely! Assemble everything but hold off on baking. Cover it, refrigerate for up to 24 hours, then bake when you’re ready. Just add 5-10 minutes to the baking time since you’re starting cold.
How long does this stay fresh?
If it lasts more than 24 hours in your house, I’ll be shocked. But technically, it’ll keep in the fridge for about 3-4 days. The topping might lose some crispness, but a quick zap in the microwave (or better yet, a few minutes in a toaster oven) brings it back to life.
Can I freeze this?
Yep! Freeze it either before or after baking. If before, no need to thaw—just add about 20 minutes to the baking time. If after, thaw overnight in the fridge, then warm in a 350°F oven for about 20 minutes.
I don’t have time to make whipped cream. Can I use the canned stuff?
I mean, technically yes, but homemade takes literally 3 minutes and tastes approximately 800% better. But if you must, I won’t judge you too harshly. Much.
My crisp topping isn’t, well, crisp. What went wrong?
You probably used melted or too-soft butter. Or maybe you didn’t bake it long enough. The topping needs time to get golden and crunchy. If the top is browning too fast but the filling isn’t bubbling yet, cover it loosely with foil.
Final Thoughts
There you have it—an apple crisp recipe that delivers maximum comfort with minimum effort. It’s the dessert equivalent of putting on sweatpants after a long day. Make it once and I guarantee it’ll become your go-to when you need something foolproof but impressive.
The best thing about this recipe is how forgiving it is. Had a rough day? Throw in extra cinnamon. Feeling fancy? Add some chopped nuts to the topping. The possibilities are endless, and it’s pretty darn hard to mess up.
So go on, rescue those apples from their slow march toward the compost bin, and transform them into something magical. Your future self—and anyone lucky enough to be in your kitchen—will thank you. FYI, this also counts as having fruit for dinner. Just saying.
