So you’re craving something warm, cozy, and utterly delicious, but the thought of spending hours in the kitchen makes you want to curl up in a ball and cry? Same. My friend, you’ve landed in the right spot! We’re about to whip up an Apple Crisp that tastes like you slaved over it all day, but actually takes less effort than deciding what to binge-watch next. Get ready for some serious comfort food vibes without the drama.
Why This Recipe is Awesome
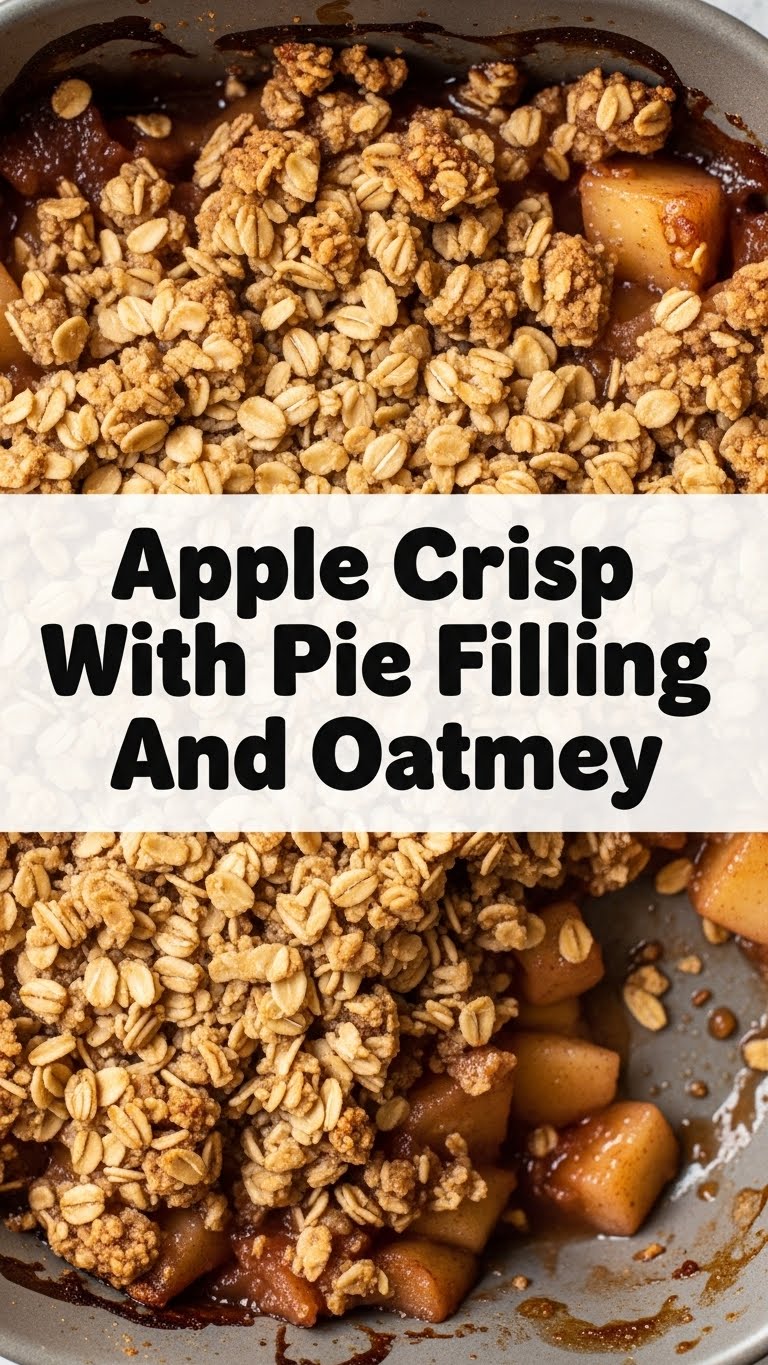
Okay, let’s be real. This recipe is the culinary equivalent of a hug on a bad day, but even better because you can eat it. What makes it so utterly fantastic? First off, it’s ridiculously easy. We’re talking **idiot-proof levels of simplicity** – even I, someone who once mistook baking soda for baking powder (it ended badly), can nail this. The secret? We’re taking a shortcut with canned apple pie filling, which means zero apple peeling. You heard that right. No sticky hands, no wrestling with stubborn peels. Plus, that oat crumble topping? It’s crunchy, sweet, and just begs for a scoop of vanilla ice cream. It’s fast, it’s delicious, and it makes your house smell like a bakery. What’s not to love?
Ingredients You’ll Need
Gather ’round, my fellow kitchen adventurer! Here’s what you’ll need for this masterpiece. Don’t worry, it’s nothing too exotic, promise!
- 1 large (21 oz) can Apple Pie Filling: The star of the show! This is your cheat code to deliciousness.
- 1 cup Rolled Oats (Old-fashioned): The good stuff. **Avoid instant oats**, unless you’re aiming for a sad, mushy topping. We want texture, baby!
- ½ cup All-Purpose Flour: Just plain old flour. No need for fancy stuff here.
- ½ cup Packed Brown Sugar: For that deep, caramel-y sweetness. Light or dark, your call!
- ½ cup (1 stick) Cold Unsalted Butter: Cut into small cubes. **Cold is key** for that perfect crumble texture.
- ½ teaspoon Ground Cinnamon: Because what’s apple crisp without cinnamon?
- ¼ teaspoon Ground Nutmeg: Adds a little extra warmth. Optional, but highly recommended.
- Pinch of Salt: To balance all that sweetness and make everything pop.
Step-by-Step Instructions
Alright, apron on (or not, we don’t judge), let’s get cooking! These steps are so easy, you’ll wonder why you ever bought store-bought crisp.
- Preheat & Prep: Set your oven to **375°F (190°C)**. Grab an 8×8 inch (or similar) baking dish. Give it a light spray with cooking spray, or a quick rub of butter.
- Fill ‘er Up: Open that glorious can of apple pie filling. Dump it into your prepared baking dish and spread it evenly. That’s it! See? Easy peasy.
- Crumble Time: In a medium bowl, combine your rolled oats, flour, brown sugar, cinnamon, nutmeg, and salt. Give it a good whisk to make sure everything’s mixed.
- Butter Up: Add your cold, cubed butter to the dry mixture. Now, get your hands in there! Use your fingertips or a pastry blender to **cut the butter into the dry ingredients**. You want to work it until it resembles coarse crumbs, with some pea-sized butter bits still visible. Don’t overmix!
- Top It Off: Sprinkle that beautiful, crumbly topping evenly over your apple pie filling. Make sure it’s spread out nicely so every bite gets some crispy goodness.
- Bake Away: Pop your dish into the preheated oven. Bake for **30-35 minutes**, or until the topping is golden brown and the filling is bubbly around the edges. Your kitchen will smell divine, FYI.
- Serve & Devour: Let it cool for a few minutes (if you can resist!) before serving. It’s absolutely heavenly warm, especially with a scoop (or three) of vanilla ice cream.
Common Mistakes to Avoid
Even the simplest recipes have their pitfalls. Here are a few things to steer clear of if you want maximum crisp success:
- Forgetting to Preheat the Oven: Rookie mistake! A cold oven means uneven baking and a sad, pale topping. **Always preheat!**
- Using Instant Oatmeal: I warned you! Instant oats absorb liquid too fast and turn into a gummy mess. Stick to **rolled (old-fashioned) oats** for that perfect texture.
- Overmixing the Topping: If you mix too much, your butter will melt, and you’ll end up with a doughy mess instead of a crumbly topping. Just mix until it’s crumbly, then stop!
- Not Using Cold Butter: Warm butter melts into the flour too quickly, creating a pasty texture. **Cold butter creates pockets of steam** during baking, giving you that coveted crispiness.
- Eating it Straight Out of the Oven: I know, it’s tempting. But give it 5-10 minutes to set. The filling is lava-hot, and you don’t want to burn your tongue and miss out on future crisp enjoyment.
Alternatives & Substitutions
Feeling creative? This recipe is super flexible! Here are a few ideas to shake things up:
- Different Fruit Fillings: Not an apple fan? Sacrilege! Just kidding. You can totally use canned cherry pie filling, peach, or even mixed berry. Go wild!
- Gluten-Free Version: Easy-peasy! Just use **certified gluten-free rolled oats** and a 1:1 gluten-free flour blend. The texture will be just as amazing.
- Vegan Twist: Swap out the butter for your favorite **plant-based butter substitute**. Make sure it’s cold!
- Add Some Nuts: Want extra crunch? Fold in about a **½ cup of chopped pecans or walnuts** into your crumble topping. Adds a lovely nutty flavor and texture.
- Spice it Up: Feel free to experiment with other spices in your crumble. A pinch of cardamom or allspice can add a lovely dimension.
FAQ (Frequently Asked Questions)
Got questions? I’ve got answers! (Mostly.)
- Can I use margarine instead of butter? Well, technically yes, but why hurt your soul like that? Butter truly makes this dish sing with flavor. Margarine will work in a pinch, but the richness won’t be quite the same.
- My topping isn’t getting crispy, what gives? Chances are your butter might not have been cold enough, or you might have overmixed it. Also, ensure your oven is at the correct temperature!
- Can I make this ahead of time? Absolutely! You can bake it, let it cool completely, then cover and refrigerate for up to 3 days. Reheat gently in the oven or microwave. The topping might soften a *tad*, but it’ll still be delicious.
- How do I know when it’s done? Look for a beautiful golden-brown topping and a fruit filling that’s visibly bubbling around the edges. Your nose will also tell you it’s ready – the aroma is unmistakable!
- What if I don’t have brown sugar? You can use granulated white sugar, but the crisp might be a little less moist and lack that deep, caramelly flavor brown sugar brings. You could also try adding a tablespoon of molasses to white sugar to mimic brown sugar.
- Can I double the recipe? Of course! Just use a larger baking dish (like a 9×13 inch) and adjust the baking time slightly – it might need an extra 5-10 minutes.
Final Thoughts
See? I told you it was easy! You just created a mouth-watering apple crisp that’s going to impress everyone (or just you, which is totally fine too!). It’s the perfect treat for a cozy night in, a potluck, or just because you deserve something delicious. So go ahead, pat yourself on the back, and enjoy every single bite. Now go impress someone—or yourself—with your new culinary skills. You’ve earned it!


