So, you’re looking for that warm, comforting hug in dessert form, but you’re also eyeing that couch with serious commitment, right? You want something that screams “I tried!” without actually *trying* too hard. Good news, my friend. We’re about to make an Apple Crisp that’s so ridiculously easy, it practically bakes itself. And yes, it comes with ice cream, because what even *is* dessert without its cold, creamy soulmate?
Why This Recipe is Awesome
Let’s be real, some recipes look like they require a culinary degree and a small loan. Not this one. This apple crisp is the superhero of desserts for the rest of us. It’s idiot-proof, I swear, even *I* managed not to burn the house down. It’s got that perfect balance of sweet, tart, and crunchy, and the smell? Oh, the smell alone is worth the minimal effort. Plus, it serves a crowd or just your glorious self for days. No judgment here.
Ingredients You’ll Need
Alright, gather your troops! Don’t worry, nothing too exotic here.
- For the Apple Filling:
- 6-8 medium apples: A mix of tart (like Granny Smith) and sweet (Fuji, Honeycrisp) is chef’s kiss. Peeled, cored, and sliced—not too thin, not too chunky, Goldilocks style.
- 1/4 cup granulated sugar: Just enough to sweeten the deal.
- 1/4 cup packed light brown sugar: For that molasses-y depth. Yum.
- 1 tablespoon all-purpose flour: To help thicken up those apple juices. No one wants watery crisp, right?
- 1 teaspoon ground cinnamon: Because apples and cinnamon are basically BFFs.
- 1/4 teaspoon ground nutmeg: The cinnamon’s slightly spicy cousin. Optional, but highly recommended.
- 1 tablespoon fresh lemon juice: Don’t skip this! It brightens everything up and keeps apples from browning.
- For the Crunchy Topping:
- 1 cup all-purpose flour: The base of our crunchy masterpiece.
- 1/2 cup granulated sugar: Sweetness level: perfect.
- 1/2 cup packed light brown sugar: More brown sugar, more joy.
- 1 cup rolled oats (not instant!): These are key for that classic chewy-crunchy texture.
- 1 teaspoon ground cinnamon: You know the drill.
- 1/2 cup (1 stick) cold unsalted butter: Cut into small cubes. Cold is key for that crumbly perfection!
- Pinch of salt: Enhances all the other flavors. Don’t underestimate salt!
- For Serving:
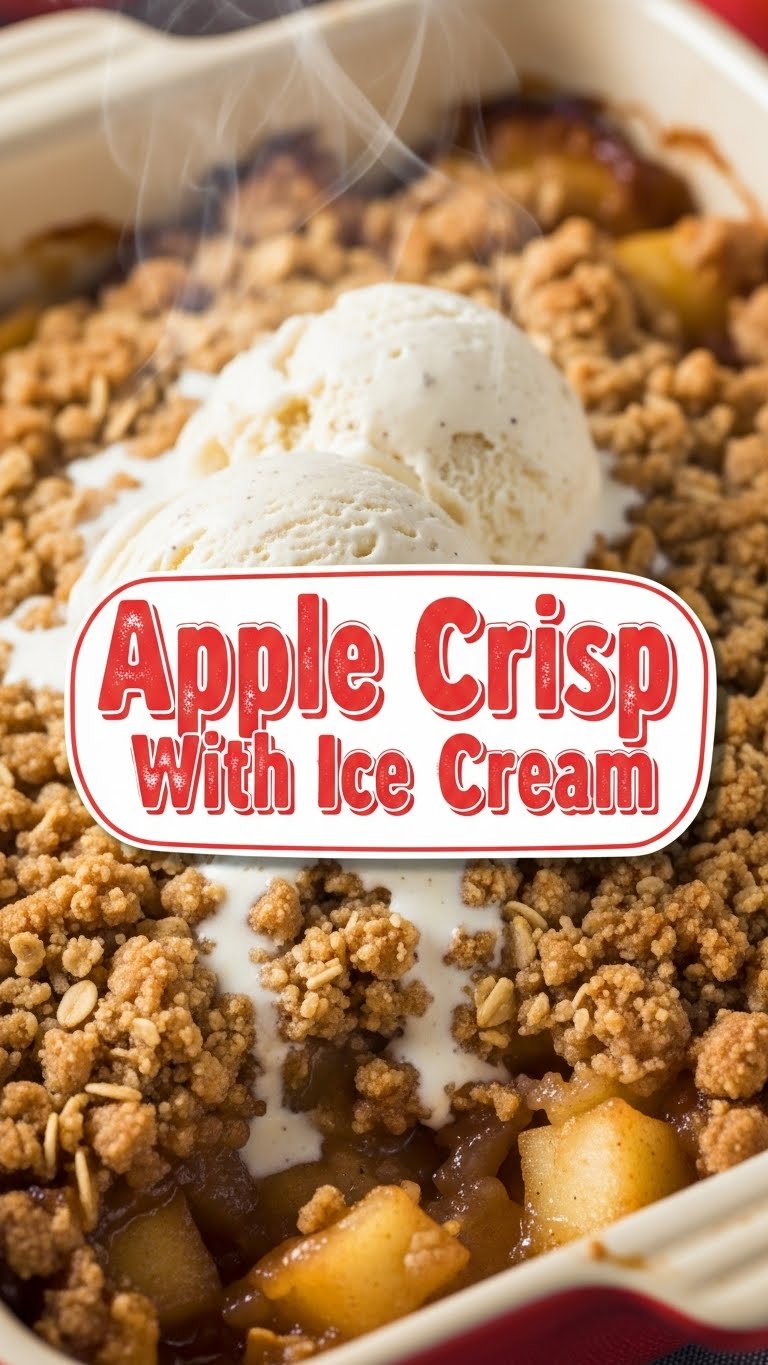
- Vanilla ice cream: A scoop (or three, who’s counting?) of pure bliss. Seriously, essential.
Step-by-Step Instructions
Okay, let’s get cooking! Even if your cooking skills are limited to microwave popcorn, you got this.
- Preheat & Prep: First things first, get that oven screaming hot to 375°F (190°C). Grab a 9×13 inch baking dish and lightly butter it, because we’re fancy like that.
- Apple Party Time: In a large bowl, toss those sliced apples with both sugars, flour, cinnamon, nutmeg, and lemon juice. Mix ’em until every apple slice is coated in that deliciousness. Pour this fruity goodness into your prepared baking dish.
- Topping Tango: Now for the star of the show! In a *separate* medium bowl, whisk together the flour, both sugars, oats, cinnamon, and that pinch of salt.
- Butter Up: Add your cold butter cubes to the dry topping mix. Get your hands in there and use your fingertips to cut the butter into the flour mixture. You’re aiming for coarse crumbs, like wet sand. Don’t overmix; some small butter chunks are good!
- Assemble the Masterpiece: Evenly sprinkle that crumbly, buttery topping over your apple mixture in the baking dish. Cover every last bit of those apples.
- Bake It ‘Til Golden: Pop it in the preheated oven and bake for 40-50 minutes. You’ll know it’s ready when the topping is golden brown and the apples underneath are bubbly and tender. A little tip: if the topping browns too fast, loosely tent it with foil.
- Rest & Relish: Let it cool for about 10-15 minutes. This gives the filling a chance to set up a bit. Then, scoop warm apple crisp into bowls.
- The Grand Finale: Top generously with that glorious vanilla ice cream. Watch it melt slightly into the warm crisp—pure magic, IMO.
Common Mistakes to Avoid
We’ve all been there. Learn from my (many) culinary misadventures!
- Forgetting to preheat the oven: Rookie move! Your crisp won’t bake evenly, and you’ll just stare at it impatiently.
- Using warm butter for the topping: This is a big no-no. Warm butter melts into the flour too quickly, giving you a tough, dense topping instead of light and crumbly. Cold butter is non-negotiable!
- Cutting apples inconsistently: Some slices will be mush, others still crunchy. Aim for roughly the same thickness so they cook evenly.
- Skipping the lemon juice: It’s not just for preventing browning; it actually enhances the apple flavor and balances the sweetness. Don’t be a hero, use the lemon.
- Serving without ice cream: Honestly, is this even a mistake or just a tragic life choice? The warm crisp and cold ice cream combo is sacred.
Alternatives & Substitutions
Feeling adventurous? Or just out of an ingredient? No stress!
- Other Fruits: This recipe is super adaptable. Try pears, peaches (fresh or frozen!), berries, or a mix! Adjust sugar slightly depending on the fruit’s sweetness.
- Gluten-Free Flour: You can totally swap regular flour for a 1:1 gluten-free baking blend in both the filling and topping. Works like a charm!
- Spice It Up: Add a pinch of allspice or cardamom to the apple mixture for an extra cozy flavor. Feeling festive? A tiny bit of ginger would be amazing.
- Nutty Topping: Throw in a handful of chopped pecans or walnuts to the oat topping for extra crunch and flavor. Because who doesn’t love nuts? (No, not *those* nuts. The edible kind.)
- Dairy-Free: Use a good quality plant-based butter (like Miyoko’s Kitchen or Earth Balance sticks) and dairy-free ice cream. Easy peasy!
FAQ (Frequently Asked Questions)
Got questions? I’ve got (casual) answers!
- Can I use old, slightly wrinkly apples? Well, technically yes, but why? Fresher, crisper apples give you the best texture. Save the wrinkly ones for applesauce, maybe?
- Can I make this ahead of time? Absolutely! You can prep the apple mixture and the topping separately and store them in the fridge for a day. Assemble and bake when ready. Or bake it completely and reheat gently.
- How long does apple crisp last? Covered tightly in the fridge, it’s usually good for 3-4 days. But let’s be real, it rarely lasts that long!
- What if I don’t have rolled oats? Can I use instant? Please, for the love of all that is crispy, no instant oats! They’ll turn to mush. If you don’t have rolled oats, you can just omit them, and increase the flour slightly, but the texture won’t be quite the same.
- Can I use oil instead of butter in the topping? You could, but it really changes the texture and flavor of the topping. Butter gives you that rich, crumbly, irresistible crisp. IMO, stick to butter for the best results.
- Is apple crisp healthy? *chuckles awkwardly* Define “healthy.” It’s got fruit! And oats! So… yes? In moderation? Let’s just say it’s good for the soul.
- My topping isn’t crunchy enough! What did I do wrong? You probably didn’t bake it long enough, or maybe your oven temperature was a bit off. Next time, give it a few extra minutes, and ensure that butter was super cold!
Final Thoughts
See? That wasn’t so scary, was it? You just whipped up a dessert that smells like autumn, tastes like pure comfort, and looks like you spent hours slaving away. Now go impress someone—or yourself—with your new culinary skills. You’ve earned that extra scoop of ice cream. Seriously, you rock! Go forth and crisp!


