Ever had one of those days when you want something homemade and delicious but aren’t in the mood for anything complicated? Enter the Apple Crisp With Crust – the dessert that screams “I totally planned this” when in reality, you just threw some apples and butter together while wearing pajamas. It’s basically the superhero of lazy-day desserts, only with more cinnamon and less spandex.
Why This Recipe is Awesome
Let me count the ways this apple crisp with crust deserves your immediate attention. First, unlike your standard apple crisp (which is already pretty fantastic), this one has a proper bottom crust that takes it from “nice dessert” to “where has this been all my life?” territory. Second, it’s ridiculously adaptable – got some pears lying around? Throw ’em in! Third, the smell alone will make your home feel like you’ve been baking for days, even though you’ve spent maybe 20 minutes of actual effort. And finally, it’s the perfect dessert for people who can’t decide between pie and crisp. Decision anxiety solved!
Ingredients You’ll Need
For the crust (yes, you’re making a crust, don’t panic):
- 1½ cups all-purpose flour (the regular stuff, nothing fancy)
- ½ cup cold unsalted butter, cubed (emphasis on COLD – warm butter = sad crust)
- 3 tablespoons ice water (actual ice water, not just cold tap water – trust me)
- 2 tablespoons granulated sugar (the white stuff)
- ¼ teaspoon salt (to make the sweet stuff taste sweeter – science!)
For the apple filling:
- 6 medium apples, peeled and sliced (Granny Smith for tartness or Honeycrisp if you’re feeling fancy)
- ¾ cup granulated sugar (adjust if your sweet tooth is more or less demanding)
- 2 tablespoons all-purpose flour (to thicken things up)
- 1 teaspoon ground cinnamon (or more, I don’t judge)
- ¼ teaspoon nutmeg (optional, but why wouldn’t you?)
- 1 tablespoon lemon juice (keeps the apples from looking sad and brown)
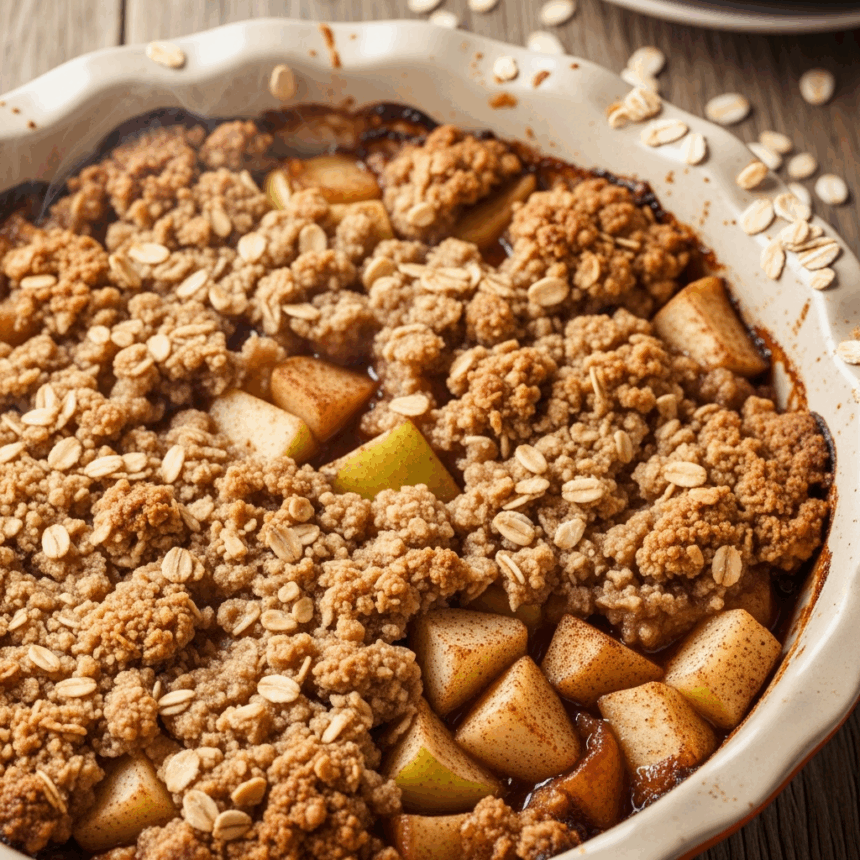
For the crisp topping (the best part, let’s be honest):
- 1 cup old-fashioned oats (not the instant kind, please and thank you)
- ½ cup all-purpose flour
- ½ cup brown sugar, packed (really get in there and pack it)
- ½ teaspoon cinnamon (because there’s no such thing as too much cinnamon)
- ½ cup cold butter, cubed (again, COLD is key)
Step-by-Step Instructions
- Preheat your oven to 375°F (190°C). This is not optional, people. While you’re at it, grab a 9×13 inch baking dish and set it aside.
- Make the crust: In a large bowl, mix the flour, sugar, and salt. Add the cold butter cubes and use a pastry cutter (or two forks if you’re not that fancy) to cut it in until the mixture resembles coarse crumbs. Sprinkle with ice water, one tablespoon at a time, and stir until the dough forms a ball. Don’t overwork it – we’re making crust, not bread.
- Press the dough into the bottom of your baking dish. Don’t worry about making it look perfect – we’re going for “rustic charm” here. Pop it in the fridge while you prep the filling.
- For the filling: Toss the sliced apples with sugar, flour, cinnamon, nutmeg, and lemon juice in a bowl. Make sure all apple slices are coated – this is where the magic happens.
- Arrange the apple mixture evenly over your chilled crust. Try to resist eating the apple slices as you go – I know they’re good, but stay strong.
- Make the crisp topping: In a medium bowl, mix the oats, flour, brown sugar, and cinnamon. Cut in the cold butter until the mixture looks like coarse crumbs. This is your moment to take out any frustrations – get in there!
- Sprinkle the topping evenly over the apple layer. Be generous – more topping equals more happiness.
- Bake for 40-45 minutes or until the top is golden brown and the filling is bubbly. If the top starts getting too brown too quickly, cover loosely with foil.
- Let it cool for at least 15 minutes before serving. I know waiting is torture, but your taste buds (and the roof of your mouth) will thank you.
Common Mistakes to Avoid
Even the best of us sometimes mess up. Here’s how not to:
- Using warm or room-temperature butter – Cold butter creates those beautiful flaky layers. Room temperature butter creates sad, dense disappointment.
- Skipping the lemon juice – Unless you want brown, mushy apples (you don’t), use the lemon juice.
- Overthinking the crust – This isn’t the Great British Bake Off. Your crust doesn’t need to be perfect, just present.
- Not giving it time to cool – I get it, the smell is intoxicating. But molten apple filling is basically culinary napalm. Let it cool.
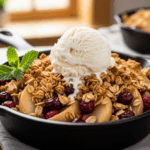
- Forgetting the ice cream – OK, this isn’t technically part of the recipe, but serving warm apple crisp without vanilla ice cream should be a crime in at least 48 states.
Alternatives & Substitutions
Life happens. Ingredients go missing. Here’s how to roll with it:
- No oats? Make a streusel topping with just flour, sugar, and butter. It won’t have the same texture, but it’ll still be delicious.
- Gluten-free needs? Swap in your favorite cup-for-cup gluten-free flour blend. The texture might be slightly different, but it’ll work.
- Vegan version? Use a plant-based butter substitute (the solid stick kind, not the tub stuff) and maybe add an extra pinch of salt.
- Different fruits? Pears work beautifully here. So do peaches in summer. Or go wild and do a mix of berries and apples. Your kitchen, your rules.
- Spice it up: Cardamom, ginger, or even a pinch of cloves can take this from “mmm” to “MMMM!” If you’re feeling adventurous, add a splash of bourbon to the filling. I won’t tell.
FAQ (Frequently Asked Questions)
Can I make this ahead of time?
Absolutely! You can assemble the whole thing up to a day in advance, keep it covered in the fridge, and bake it when you’re ready. You might need to add a few minutes to the baking time if it’s coming straight from the fridge.
How do I store leftovers? (As if there will be any…)
Cover and refrigerate for up to 4 days. Reheat individual portions in the microwave for about 30 seconds, or pop the whole dish in a 350°F oven until warmed through.
Can I freeze this?
Yes, but… The texture of the crisp topping might change slightly after freezing. If you’re planning to freeze it, I’d suggest freezing it unbaked, then baking from frozen (adding about 15-20 minutes to the bake time).
Do I really need to peel the apples?
Technically no. But unless you enjoy the texture of random apple skin in your otherwise perfect dessert, I’d take the 5 minutes to peel them. Future you will appreciate it.
Can I reduce the sugar?
Sure thing! Start by reducing by about ¼ cup in the filling. The crisp topping is pretty forgiving too – you could go down to ⅓ cup brown sugar and still be in business.
What if I don’t have a pastry cutter?
Two forks work fine, or even your fingertips (just work quickly so your body heat doesn’t warm the butter). Some people even use a box grater to grate in cold butter!
Final Thoughts
There you have it – a dessert that’s impressive enough for company but easy enough for a random Tuesday when you’re craving something sweet. This apple crisp with crust hits that perfect sweet spot between “I put in effort” and “but not too much effort because I have a life.”
The beauty of this recipe is its flexibility – make it your own, tweak it to your taste, and don’t stress about perfection. The homemade crust takes it up a notch, but the overall process is still forgiving enough that you can watch Netflix while making it. And really, isn’t that the dream?
Now go forth and bake! Your house is about to smell amazing, and you’re about to become the dessert hero we all need. Don’t forget that scoop of ice cream on top – you deserve it for reading this entire recipe. Happy baking!
