
Ever looked at that can of apple pie filling in your pantry and thought, “What the heck am I supposed to do with this if I don’t want to make an entire pie?” Well, friend, I’m about to rock your dessert world with the laziest (yet most delicious) apple crisp recipe known to humankind. It’s like apple pie’s cooler, less high-maintenance cousin who still gets invited to all the family gatherings.
Why This Recipe is Awesome
Let me count the ways this apple crisp recipe deserves a standing ovation:
First, it uses canned apple pie filling, which means no peeling, coring, or slicing actual apples (who has time for that?). Second, the ingredient list is shorter than my attention span. And third, it’s virtually impossible to mess up—I once made this while on a conference call AND helping my kid with homework, and it still turned out Instagram-worthy.
Plus, it’s the perfect dessert for when you want people to think you put in way more effort than you actually did. That’s what we call a culinary power move.
Ingredients You’ll Need
For the filling:
- 2 cans (21 oz each) of apple pie filling (because fresh apples require effort we’re not willing to expend today)
- 1 teaspoon cinnamon (more if you’re a cinnamon fiend, I don’t judge)
- 1/4 teaspoon nutmeg (optional, but it makes you seem fancy)
- 1 tablespoon lemon juice (to wake those canned apples up from their syrupy slumber)
For the crisp topping (the real MVP here):
- 1 cup old-fashioned oats (not the instant kind, have some standards)
- 1 cup all-purpose flour (the “purpose” here being deliciousness)
- 3/4 cup brown sugar, packed (like how you’ll pack this into your mouth)
- 1/2 cup cold butter, cubed (and I mean COLD—warm butter ruins everything)
- 1/2 teaspoon cinnamon (because we’re not monsters)
- 1/4 teaspoon salt (to make the sweet sweeter, it’s science)
Step-by-Step Instructions
- Preheat your oven to 375°F (190°C). Don’t skip this step unless you enjoy waiting around while your oven heats up and your crisp doesn’t.
- Grab a 9×9-inch baking dish (or something similar—this recipe isn’t picky) and give it a quick spray with cooking oil. Or don’t, and enjoy scrubbing later. Your choice.
- In a bowl, mix the apple pie filling with cinnamon, nutmeg, and lemon juice. The lemon juice cuts through the sweetness and makes the filling taste less like it came from a can. You’re welcome.
- Dump the filling into your baking dish and spread it evenly. Try not to eat too much of it at this stage—I speak from experience.
- In another bowl, combine the oats, flour, brown sugar, cinnamon, and salt. Mix it up like you know what you’re doing.
- Add the cold butter cubes and use a pastry cutter, two forks, or your fingers (clean ones, please) to work it in until you get pea-sized crumbles. This should look like delicious gravel.
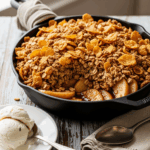
- Sprinkle the topping over the filling like you’re making it rain at a dessert club. Cover all the filling—that crumbly topping is gold.
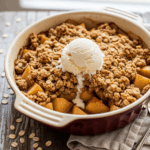
- Bake for 30-35 minutes or until the topping is golden brown and the filling is bubbling at the edges like a happy little volcano.
- Let it cool for at least 15 minutes before serving, or risk burning the roof of your mouth. I won’t tell you what to do, but molten apple filling is basically napalm.
Common Mistakes to Avoid
Even a recipe this simple has pitfalls. Don’t be that person who:
- Uses warm or melted butter in the topping. This isn’t a cookie dough situation—cold butter creates those perfect crumbles.
- Skips the lemon juice. Then complains the dessert is too sweet. The lemon juice is there for a reason, folks!
- Doesn’t let it cool before digging in. Unless you enjoy the sensation of molten lava on your tongue. No judgment.
- Forgets to put a baking sheet under the dish. The filling might bubble over, and cleaning burnt sugar from the bottom of your oven is a special kind of torture.
Alternatives & Substitutions
Because we all know you’re going to ask “but what if I don’t have…”:
Gluten-free? Swap the all-purpose flour for a gluten-free blend and make sure your oats are certified GF.
No brown sugar? White sugar + a tablespoon of molasses works in a pinch. Or just use white sugar and accept that your life is slightly less rich.
Different pie filling? Go wild! Cherry, peach, or blueberry pie fillings all work with this basic formula. Mix and match like you’re creating a dessert playlist.
Want to fancy it up? Add a handful of chopped nuts to the topping, or throw in some dried cranberries with the apple filling. Look at you being all creative!
FAQ (Frequently Asked Questions)
Can I make this ahead of time?
Absolutely! Assemble it, cover it, refrigerate it, then bake it when you’re ready to impress. Just add about 10 minutes to the baking time if it’s coming straight from the fridge. Planning ahead? Who are you, and what have you done with my reader?
How long will this keep?
In the refrigerator, about 3-4 days. In real life? About 24 hours before someone demolishes the leftovers at midnight.
Can I freeze this?
Yes! Freeze it unbaked for up to 3 months. Thaw in the fridge overnight before baking. Or bake it from frozen and add about 15-20 minutes to the baking time. Future You will thank Present You for this gift.
Do I really need a pastry cutter for the topping?
Nope! Two forks work fine, or just get in there with your hands. Consider it stress therapy—squishing butter into sugar and flour is oddly satisfying.
What can I serve with this?
Vanilla ice cream is the obvious choice (and who doesn’t want to watch it melt into all those crevices?). But whipped cream, caramel sauce, or just a cold glass of milk also work wonders. Or eat it straight from the pan while standing over the sink. I won’t tell.
Final Thoughts
This apple crisp recipe is basically dessert with training wheels—it’s nearly impossible to mess up and guaranteed to impress. It’s perfect for those nights when you want something homemade but also can’t be bothered to do anything complicated. Basically, it’s the sweatpants of desserts: comfortable, reliable, and secretly everyone’s favorite.
So go ahead, whip this up and pretend you slaved away for hours. Your secret’s safe with me. And when someone asks for the recipe, you can decide whether to share your shortcut or maintain the illusion of being a kitchen wizard. Either way, you win!
