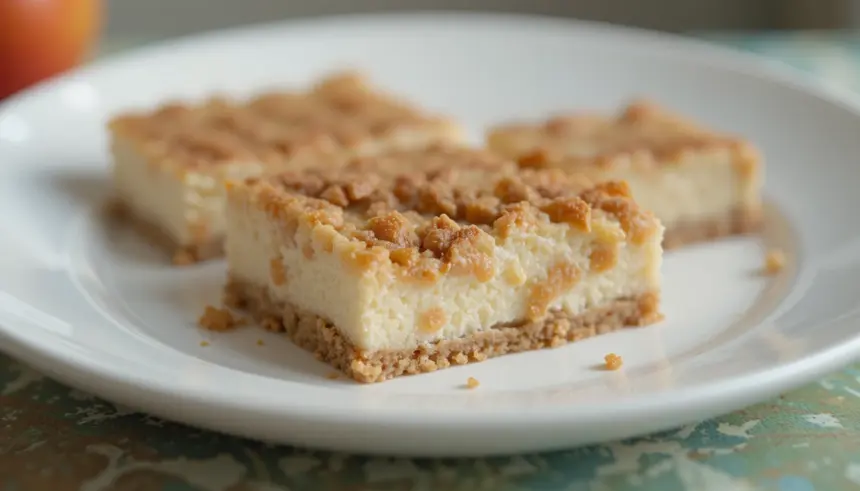
Look, I know what you’re thinking: “Cheesecake? Apple crisp? In BAR form? This sounds like too much work.” But hear me out—these Apple Crisp Cheesecake Bars are basically three desserts having a party in your mouth, and somehow you only have to clean one pan. That’s called efficiency, my friend. Plus, you get to feel fancy serving these at your next gathering while secretly knowing they took less effort than explaining cryptocurrency to your parents.
Why This Recipe is Awesome
First off, these bars are what happens when apple pie, cheesecake, and a crumbly oat topping decide to ditch their drama and just get along. They’re portable, which means you can eat them with your hands like a civilized barbarian—no fork required.
They’re also ridiculously forgiving. Mess up the crust a little? Nobody will know once you pile that creamy cheesecake layer on top. The apple filling hiding your crimes? Even better. And that streusel topping? It’s literally designed to look “rustic,” which is code for “imperfect is the goal.” This recipe practically covers for your mistakes.
Oh, and they taste like fall had a baby with a fancy dessert table. Whether you’re bringing them to a potluck or stress-eating them at midnight, they’ll make you look like you have your life together. Spoiler: you don’t have to actually have your life together to make these.
Ingredients You’ll Need
For the Crust:
- 2 cups graham cracker crumbs (or about 16 crackers if you’re smashing them yourself—therapeutic, honestly)
- 1/2 cup melted butter (real butter, not that fake stuff)
- 1/4 cup granulated sugar
For the Cheesecake Layer:
- 16 oz cream cheese, softened (leave it out for an hour or you’ll be there forever with your mixer)
- 1/2 cup granulated sugar
- 2 large eggs
- 1 teaspoon vanilla extract
- 2 tablespoons all-purpose flour
For the Apple Layer:
- 3 medium apples, peeled and diced (Granny Smith or Honeycrisp work great—your call)
- 2 tablespoons granulated sugar
- 1 teaspoon ground cinnamon
- 1/4 teaspoon nutmeg (optional, but it adds that “wow, what IS that?” factor)
- 1 tablespoon lemon juice (keeps the apples from going brown and sad)
For the Crumb Topping:
- 1 cup old-fashioned oats
- 1/2 cup all-purpose flour
- 1/2 cup packed brown sugar
- 1/2 cup cold butter, cubed
- 1/2 teaspoon cinnamon
Step-by-Step Instructions
1. Preheat and Prep: Heat your oven to 350°F (175°C). Line a 9×13-inch baking pan with parchment paper, leaving some overhang on the sides—this is your escape plan for getting the bars out later without a meltdown.
2. Make the Crust: Mix graham cracker crumbs, melted butter, and sugar in a bowl. Press this mixture firmly into the bottom of your prepared pan. Like, really press it down. Pretend you’re angry at it. Bake for 10 minutes, then let it cool while you move on.
3. Whip Up the Cheesecake Layer: Beat the softened cream cheese and sugar together until smooth and fluffy—about 2-3 minutes. Add eggs one at a time, then mix in vanilla and flour. Don’t overmix or you’ll end up with a weirdly dense layer. Pour this creamy goodness over your cooled crust.
4. Prepare the Apples: Toss your diced apples with sugar, cinnamon, nutmeg, and lemon juice in a bowl. Spread these evenly over the cheesecake layer. Try not to eat half of them in the process—I believe in you.
5. Create the Crumb Topping: Combine oats, flour, brown sugar, and cinnamon in a bowl. Cut in the cold butter using a fork or pastry cutter until the mixture looks like, well, crumbs. Sprinkle this generously over the apples.
6. Bake: Pop the whole thing in the oven for 45-50 minutes. You’re looking for the cheesecake to be set (it shouldn’t jiggle like crazy) and the topping to be golden brown. Your kitchen will smell incredible—prepare for visitors.
7. Cool and Chill: Let the bars cool to room temperature, then refrigerate for at least 2 hours. This step is non-negotiable. I know waiting is hard, but warm cheesecake bars will fall apart when you cut them. Be patient, young grasshopper.
8. Slice and Serve: Use the parchment paper overhang to lift the whole thing out of the pan, then cut into squares. Serve as is or with a dollop of whipped cream if you’re feeling extra.
Common Mistakes to Avoid
Using cold cream cheese: This is the #1 way to end up with lumpy cheesecake filling. Just don’t. Leave it out for an hour before you start, or give it a few seconds in the microwave if you’re truly impatient.
Skipping the parchment paper: Sure, you could grease the pan instead, but good luck getting those bars out in one piece. The parchment paper is your friend. Use it.
Not pressing the crust down firmly enough: A loose crust will crumble apart when you try to eat these. Channel your inner rage and press that crust like you mean it.
Cutting the bars while they’re warm: I get it, you’re excited. But warm cheesecake = messy, falling-apart bars. Wait for them to chill. Go watch an episode of something while they set up in the fridge.
Using mealy apples: Red Delicious apples are lies. They’re not delicious, and they’ll turn to mush in this recipe. Stick with firm apples like Granny Smith, Honeycrisp, or Fuji.
Alternatives & Substitutions
Crust Options: Not into graham crackers? Use crushed vanilla wafers, digestive biscuits, or even gingersnaps for a spicier base. Gluten-free graham crackers work great too if that’s your thing.
Dairy-Free Version: Swap the cream cheese for dairy-free cream cheese (Kite Hill or Miyoko’s are solid options), and use plant-based butter. Just know the texture might be slightly different, but still delicious.
Apple Alternatives: No apples? Try pears instead—they work surprisingly well with the cinnamon vibe. You could even do a mixed berry situation if you’re feeling rebellious, though you might want to add a tablespoon of cornstarch to the fruit to prevent it from getting too liquidy.
Topping Variations: Add chopped pecans or walnuts to the crumb topping for extra crunch. Or toss in some dried cranberries with the apples for a tart twist. IMO, the nuts are a game-changer.
Sugar Substitutes: You can use coconut sugar or a 1:1 baking sugar substitute in most of this recipe. The texture might vary slightly, but it’ll still work.
FAQ (Frequently Asked Questions)
Can I make these ahead of time?
Absolutely! These bars actually taste better the next day after all the flavors have gotten cozy with each other. Make them up to 2 days in advance and store them covered in the fridge. Your future self will thank you.
How long do these last?
In the fridge, covered, they’ll stay fresh for about 5 days. In reality? They’ll probably disappear in 2 days because people can’t stop eating them. If you somehow have leftovers, you can freeze them for up to 3 months.
Can I use a different size pan?
Sure, but the baking time will change. A 9×9-inch pan will give you thicker bars (bake for 55-60 minutes), while a larger pan means thinner bars that bake faster. Just keep an eye on them.
Do I have to peel the apples?
Technically no, but apple peels can be a bit chewy and distracting in the creamy cheesecake situation. Peeling is worth the extra 5 minutes, trust me on this one.
Can I use margarine instead of butter?
Well, technically yes, but why hurt your soul like that? Butter makes everything better, and this recipe deserves the good stuff. If you must for dietary reasons, go for it—but real butter is where it’s at.
My cheesecake layer cracked. Did I ruin it?
Nope! First of all, you’re covering it with apples and crumble, so nobody will see it. Second, cracks happen—usually from overbaking or rapid temperature changes. It’s purely cosmetic and doesn’t affect taste. You’re good.
Can I skip the lemon juice in the apples?
You can, but the apples might brown a bit while you’re assembling everything. The lemon juice also adds a subtle brightness that balances the sweetness. It’s a small thing that makes a big difference, so I’d keep it.
Final Thoughts
Alright, you’ve got everything you need to nail these Apple Crisp Cheesecake Bars. They’re sweet, creamy, crunchy, and fruity all at once—basically the overachiever of the dessert world. And the best part? You made them. With your own two hands. Sure, your kitchen might look like a flour bomb went off, but that’s what sponges are for.
Whether you’re bringing these to impress your in-laws, bribing your coworkers, or just treating yourself because you deserve nice things, these bars have your back. They taste like you spent hours fussing in the kitchen, but we both know you were mostly just waiting for timers to go off.
Now go forth and bake! And when people ask for the recipe, you can either share it generously or tell them it’s a “family secret.” Your call. You’ve earned the right to be a little mysterious. Enjoy every delicious, crumbly, cheesecake-y bite!
