So, you’ve got that craving, right? That deep-seated, soul-warming, ‘I need something sweet and cozy RIGHT NOW’ kind of craving? But also, you’re not exactly looking to spend your entire afternoon wrestling with a fussy pie crust or a million steps. Been there, friend. And guess what? I’ve got your back with this Apple Cobbler with Pie Crust recipe that’s basically a hug in a baking dish, and it won’t demand your firstborn as payment (just a little bit of effort, promise!).
Why This Recipe is Awesome
Okay, let’s be real. We love pie, but sometimes, who has the time (or the patience) for all that rolling, crimping, and general fussiness? That’s where this glorious apple cobbler swoops in like a dessert superhero. Here’s why it’s about to become your new best friend:
- It’s quicker than a full pie, but still gives you that satisfying, flaky crust. It’s the best of both worlds, truly!
- We’re using store-bought pie crusts, and there’s absolutely **no shame in that game**. We’re all about convenience, people!
- **It’s practically fail-proof.** Seriously, if I can pull this off without setting off the smoke detector, you, my friend, are golden.
- The smell alone will make your entire house smell like pure autumn magic. Fair warning: your neighbors might just “accidentally” drop by.
- Perfect for impressing guests or just, you know, devouring by yourself with a spoon while binge-watching your favorite show. No judgment here!
Ingredients You’ll Need
Time to gather your edible arsenal! Don’t worry, it’s nothing too exotic. Just the good stuff.
- 6-8 Medium Apples: The stars of the show! Granny Smiths are awesome for a tart kick, but feel free to mix it up with Honeycrisp or Fuji for sweetness. Just make sure they’re firm apples.
- ½ cup Granulated Sugar: Sweetness level: adjustable to your apple type and personal preference.
- ¼ cup Brown Sugar (packed): Adds a lovely caramel note and depth. Yum!
- 1 tsp Ground Cinnamon: Essential cozy spice. Don’t skip it!
- ¼ tsp Ground Nutmeg: Just a pinch, it really brings out the apple flavor.
- Pinch of Allspice or Cloves (optional): For that extra “oomph” if you’re feeling adventurous.
- 1 tbsp Lemon Juice: Brightens the apples and keeps them from turning all brown and sad.
- 2 tbsp All-Purpose Flour (or Cornstarch): Our trusty thickening agent. Nobody wants a soupy cobbler, right?
- ¼ cup Unsalted Butter: Cut into small pieces. Because everything is better with butter. **Seriously, don’t skimp!**
- 2 Pre-made Pie Crusts: (from the refrigerated section). Your secret weapon for efficiency (ahem, laziness!).
- 1 Large Egg Yolk + 1 tsp Water: (for egg wash, optional but makes it look fancy!)
Step-by-Step Instructions
Alright, apron on, game face ready! Let’s get this cobbler party started.
- Prep Those Apples: First things first, peel, core, and slice your apples into roughly ¼-inch thick pieces. Try to keep them even so they cook uniformly.
- Whip Up the Filling: Grab a large bowl. Toss your sliced apples with the granulated sugar, brown sugar, cinnamon, nutmeg, any optional spices, lemon juice, and flour (or cornstarch). Give it a really good stir until all the apples are nicely coated. This is where the magic starts!
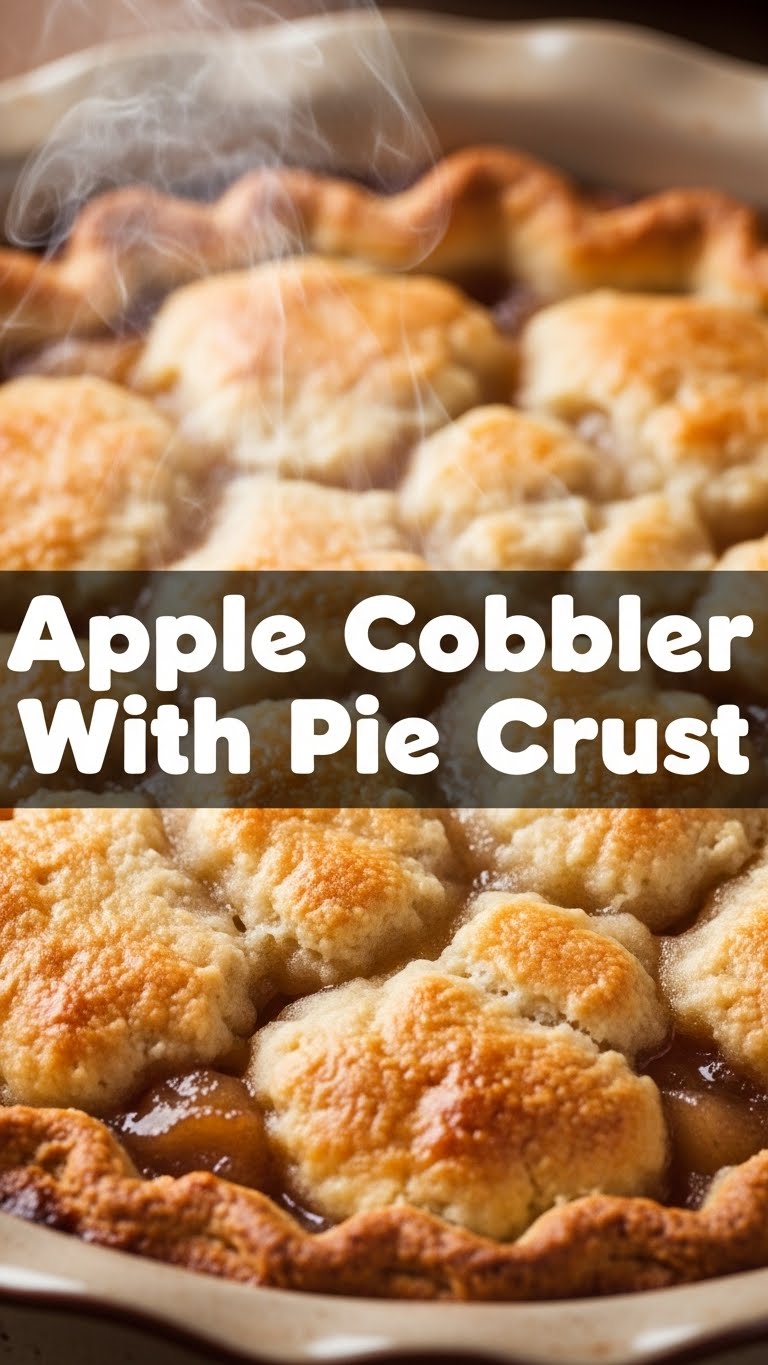
- Crust Me On This One: Unroll one of your pre-made pie crusts and gently press it into the bottom of a 9-inch pie plate or an 8×8 inch square baking dish. Trim any huge overhangs, but leave a little edge for crimping later.
- Fill ‘Er Up!: Spoon that glorious apple mixture into your crust-lined dish. Spread it out evenly. Then, dot the top of the apples with those small pieces of butter. This is where the flavor party really kicks off!
- Top It Off: Now for the second pie crust. You can totally get fancy here: cut it into strips for a rustic lattice top (if you’re feeling ambitious and have five extra minutes), or simply lay it whole right over the apples. If you lay it whole, cut a few slits in the top to let steam escape. **Important: Seal the edges** by crimping the top and bottom crusts together.
- Time to Bake!: If you’re using an egg wash, whisk the egg yolk and water together and brush it lightly over the top crust for a beautiful golden sheen. Pop your cobbler into a preheated oven at **375°F (190°C)**. Bake for about 45-60 minutes, or until the top crust is beautifully golden brown and the filling is bubbly and tender (you can poke an apple with a knife to check).
- Patience, Young Padawan: I know, I know, it smells divine. But **let it cool** for at least 15-20 minutes before diving in. This gives the filling time to set up and prevents epic tongue burns. Trust me, it’ll be worth the wait!
Common Mistakes to Avoid
Nobody’s perfect, and baking can be tricky. Here are a few common blunders to dodge on your path to cobbler glory:
- Undercooked Apples: The horror! There’s nothing worse than crunchy apples in a soft cobbler. Make sure they’re fork-tender before you pull it out of the oven.
- Overfilling Your Dish: Looks like a good idea, right? Wrong. It’ll bubble over, create a sticky, burnt mess in your oven, and probably set off the smoke detector. Don’t push it.
- Skipping the Preheat: Thinking you can just shove it in a cold oven and let it “warm up with the oven”? Rookie mistake. **Always preheat!** Your crust will thank you.
- Soggy Bottom Crust: This is a sad state of affairs. It usually happens if your filling is too wet (didn’t use enough thickener) or if you didn’t bake it long enough. Make sure that thickener does its job!
- Not Letting it Rest: Cutting into that beautiful cobbler too soon will result in a runny, messy filling. Give it those crucial 15-20 minutes to set.
Alternatives & Substitutions
Feeling creative? Or just missing an ingredient? No worries, we’ve got options!
- Fruit Swap: Not feeling apples today? No problem! Try peaches, berries, or a glorious mix of both! Just adjust the sugar content based on the sweetness of your chosen fruit. FYI, **peach cobbler is pure bliss**.
- Spice It Up: Go beyond cinnamon and nutmeg! Add a pinch of ground ginger, cardamom, or even a tiny bit of black pepper for an unexpected kick. Don’t be afraid to experiment a little!
- Crust Variations: Craving something different? You could totally do a biscuit topping instead of pie crust for a more traditional cobbler vibe. Or even a streusel crumble topping for extra crunch. Your kitchen, your rules!
- Sweeteners: Maple syrup or honey can totally replace some of the granulated sugar for a different flavor profile. Just remember they add liquid, so you might need a tiny bit more thickener.
FAQ (Frequently Asked Questions)
Got questions? I’ve got (casual, humorous) answers!
- “Do I have to peel the apples? Ugh.” Technically, no, but the texture might be a bit chewier with the skins on. IMO, peeling is worth the extra 5 minutes for that perfectly smooth, tender apple experience.
- “My cobbler top is browning too fast! Help!” Don’t panic! Just loosely tent a piece of aluminum foil over it for the remaining bake time. Easy peasy lemon squeezy.
- “Can I use frozen apples?” You can! But make sure to thaw and drain them really, really well first. Otherwise, your cobbler will be super watery and sad. **Press out all that excess moisture!**
- “Is cornstarch better than flour for thickening?” Both work great! Cornstarch generally gives a clearer, glossier filling, while flour can make it a bit cloudier. Pick your poison, they both get the job done.
- “Can I make this ahead of time?” You bet! You can assemble the whole thing, cover it tightly with plastic wrap, and refrigerate it for up to 24 hours before baking. Just add about 10-15 minutes to the baking time if it’s going into the oven cold.
- “What about serving suggestions? I’m starving!” Vanilla bean ice cream is a non-negotiable, my friend. Or a generous dollop of freshly whipped cream. Or both. Live a little!
Final Thoughts
See? That wasn’t so scary, was it? You just whipped up a glorious Apple Cobbler, practically with one hand tied behind your back (and a pre-made crust doing all the heavy lifting, shhh!). You, my friend, are a culinary genius. Now go impress someone—or more importantly, yourself—with your new baking skills. You’ve earned that warm, bubbly slice of deliciousness. And remember, burnt edges just add character, right? 😉 Happy baking, superstar!


