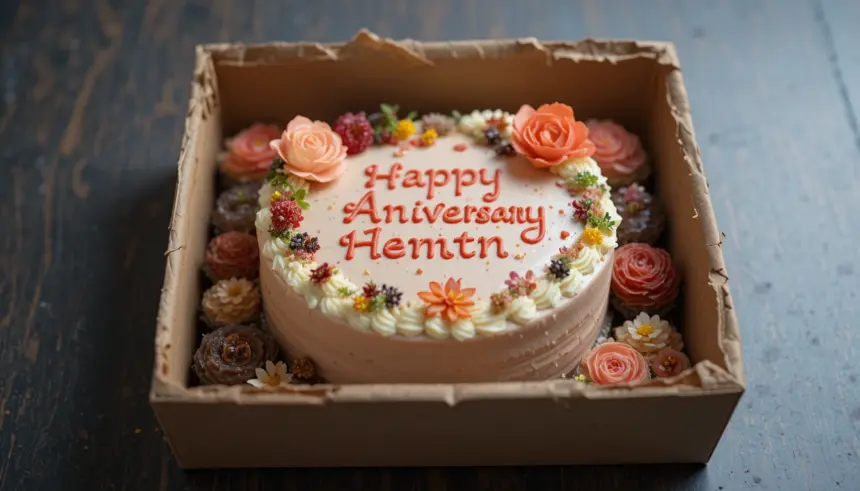
Anniversary on the horizon and you’re thinking, “Hmm, how can I do something super sweet, super special, but also, like, not make a mess the size of a small car in my kitchen?” Girl, I hear you! We’re celebrating love, not a pastry chef marathon, right? So, forget the towering, intimidating wedding-style cakes. Today, we’re diving into the delightful, utterly adorable, and surprisingly easy world of the **Anniversary Cake in a Bento Box**.
Why This Recipe is Awesome
Okay, let’s be real. Anniversaries are for romance, not stress. This recipe is your secret weapon for looking like a domestic goddess (or god!) without breaking a sweat. Why is it awesome, you ask? Well:
- It’s **perfectly portioned for two**. No giant leftovers tempting you for days (unless you *want* them, no judgment here!).
- It’s ridiculously **cute**. The bento box presentation makes it instantly Instagrammable and feels super thoughtful.
- It’s actually **foolproof**. Seriously, even if your baking track record is more “Nailed It!” than “Great British Bake Off,” you can do this.
- It tastes like a fancy bakery treat, but it’s homemade, meaning it’s packed with extra love and zero mystery ingredients. Win-win!
- And the best part? It’s **quick**. You’ll spend more time picking out what to watch for your anniversary movie night than on this cake.
Ingredients You’ll Need
Gather your troops, folks! These are the essential players for your tiny masterpiece. Keep it simple, keep it sweet.
- For the Cake:
- 1/2 cup (113g) unsalted butter, softened (your baking BFF)
- 1/2 cup (100g) granulated sugar (because life’s sweet, duh)
- 1 large egg (the binder, not the kind you break promises with)
- 1 teaspoon vanilla extract (don’t skip this, it’s the soul of the cake!)
- 1 cup (120g) all-purpose flour (the hero of basically everything)
- 1 teaspoon baking powder (to make things rise, like your spirits!)
- 1/4 teaspoon salt (because balance, baby)
- 1/2 cup (120ml) milk (any kind, we’re not picky)
- For the Cream Cheese Frosting:
- 4 oz (113g) cream cheese, softened (full-fat, because it’s an anniversary, not a diet)
- 1/4 cup (56g) unsalted butter, softened (see above re: BFF)
- 2 cups (240g) powdered sugar (sifted, if you’re feeling fancy)
- 1/2 teaspoon vanilla extract (more soul!)
- A tiny pinch of salt (to cut the sweetness, trust me)
- For Decoration (Optional, but encouraged!):
- Fresh berries (strawberries, raspberries – make it pop!)
- Sprinkles (because why not?)
- Edible glitter (hello, sparkle!)
- Small candles (if you want to make a wish!)
Step-by-Step Instructions
Alright, apron on, good vibes only! Let’s get baking!
- Get Prepped: Preheat your oven to 350°F (175°C). Lightly grease and flour your bento box (if oven-safe, check it!) or two small, oven-safe ramekins. If using a bento box, line the sections you’ll be baking in with parchment paper for easy removal.
- Cream It Up: In a medium bowl, cream together the softened butter and granulated sugar until it’s light and fluffy. This usually takes about 2-3 minutes with an electric mixer. Don’t rush this step!
- Egg-cellent Addition: Beat in the egg and vanilla extract until well combined. Scrape down the sides of the bowl to make sure everything is incorporated.
- Dry Mix Magic: In a separate bowl, whisk together the flour, baking powder, and salt. This ensures even distribution, so your cake rises beautifully.
- Combine & Conquer: Now for the fun part! Gradually add the dry ingredients to the wet ingredients, alternating with the milk, starting and ending with the dry. Mix on low speed until *just* combined. **Seriously, do not overmix!** Overmixing develops the gluten too much, making your cake tough.
- Bake Time Bliss: Divide the batter evenly between your prepared bento box sections or ramekins. Bake for 20-25 minutes, or until a wooden skewer inserted into the center comes out clean. The tops should be lightly golden.
- Chill Out: Let the cakes cool in their containers for about 10-15 minutes before carefully transferring them to a wire rack to cool completely. This part is **crucial for good frosting!**
- Frosting Frenzy: While the cakes are chilling, make your frosting. In a bowl, beat the softened cream cheese and butter together until smooth. Gradually add the powdered sugar, one cup at a time, beating until smooth after each addition. Mix in the vanilla extract and a pinch of salt.
- Decorate Your Masterpiece: Once the cakes are *completely* cool, frost them generously. Now’s your chance to get creative! Arrange them back in the bento box, add your fresh berries, sprinkles, or whatever makes your heart sing.
Common Mistakes to Avoid
Look, we all make mistakes. But with these tips, you can avoid the most common baking blunders that could turn your anniversary cake into a “meh-niversary” cake.
- Overmixing the Batter: I said it once, I’ll say it again: **DO NOT OVERMIX!** Mix until *just* combined. If you see lumps, it’s fine! Better lumpy than tough.
- Not Cooling the Cakes Completely: Frosting a warm cake is a one-way ticket to a molten, sugary disaster. Trust me on this. **Patience is a virtue here.**
- Using Cold Ingredients for Frosting: If your cream cheese or butter is cold, your frosting will be lumpy and sad. Take them out of the fridge about an hour before you plan to bake.
- Opening the Oven Door Too Much: Every time you peek, you let out heat, which can make your cake sink. Resist the urge! Use the oven light!
- Eyeballing Ingredients: Baking is a science, not an art (mostly). Use proper measuring cups and spoons. Your cake will thank you.
Alternatives & Substitutions
Feeling adventurous? Or just realized you’re missing an ingredient? No worries, we’ve got options!
- No Bento Box? No Problem! Use small ramekins, a muffin tin (just adjust baking time, usually less!), or even a small loaf pan (then slice it into squares). It’s the thought that counts!
- Gluten-Free Swap: You can absolutely use a 1:1 gluten-free flour blend. The texture might be slightly different, but still delicious.
- Flavor Frenzy: Want to switch up the cake flavor? Add some lemon zest for a zippy kick, or a tablespoon of cocoa powder for a subtle chocolate vibe. Almond extract instead of vanilla? Go for it!
- Frosting Fun: Not a cream cheese fan? Whipped cream, a simple buttercream, or even a store-bought frosting (shhh, I won’t tell!) works just fine. You could also make a quick ganache!
- Dairy-Free? Use plant-based milk and butter substitutes. For the frosting, look for dairy-free cream cheese and butter.
FAQ (Frequently Asked Questions)
Got questions? I’ve got (casual and humorous) answers!
Can I make this cake ahead of time? Absolutely! You can bake the cakes a day or two in advance and store them in an airtight container at room temperature. The frosting can also be made ahead and stored in the fridge. Just whip it up again before frosting!
What if my cakes stick to the bento box? Rookie mistake, my friend! Make sure you really grease and flour those corners. Lining with parchment paper (especially on the bottom) is your best bet for easy release.
My cake is dry! What did I do wrong? Most likely, it was overbaked. Keep an eye on the oven, and remember to test with a skewer. Also, overmixing can lead to a dry, tough cake. (Are you tired of me saying “don’t overmix” yet?)
Can I use a different type of sugar? Granulated sugar is best for this recipe’s texture. Brown sugar might make it a bit denser and moister, which isn’t necessarily bad, just different!
How do I get a perfectly flat top on my cake? Baking in smaller portions naturally helps. But if you’re a perfectionist, you can always use a serrated knife to carefully trim the domed top once it’s completely cool. Or, embrace the rustic charm!
What are the best decorations for an anniversary bento cake? Fresh berries are a classic for a reason – they’re beautiful and taste great. Edible flowers look super elegant, or a few artfully placed sprinkles for a playful touch. A chocolate drizzle always elevates things!
Final Thoughts
See? That wasn’t so bad, was it? You just whipped up a custom, adorable, and super thoughtful anniversary cake that’s pretty much guaranteed to impress your special someone (or just yourself, because you deserve it!). Now, go light those candles, snuggle up, and enjoy your delicious creation. You’ve earned it, superstar!

