So, you want something light, fluffy, and just enough for you (and maybe a significant other, or just you again tomorrow, no judgment!). You’re craving a little sweetness, but the thought of baking a whole, giant angel food cake that’ll stare at you from the counter for a week (or, let’s be real, get inhaled by you in 2 days) is just… a lot. Enter our hero: **Angel Food Cake For Two**. It’s like a tiny cloud, perfect for a cozy night in, and won’t leave you with enough leftovers to feed a small army.
Why This Recipe is Awesome
Because sometimes, you just want a damn cake without the commitment of a full-sized dessert. This recipe is your secret weapon for looking fancy AF without actually breaking a sweat. It’s basically magic in a small pan, transforming a few humble egg whites into an ethereal cloud of deliciousness. Plus, there are no massive leftovers judging your life choices from the fridge. It’s the perfect portion for a date night, a solo treat, or, you know, just a Tuesday.
And honestly? It’s pretty idiot-proof. Even I didn’t mess it up, and my kitchen adventures often end with a smoke detector concert. You got this, chef!
Ingredients You’ll Need
Get ready for simplicity. The fewer ingredients, the less chance of things going wrong, right?
- 4 Large Egg Whites: The absolute stars of our show! Make sure they’re at room temperature—they whip up better that way. No yolks allowed, seriously.
- 1/4 cup + 2 tablespoons Granulated Sugar: Divided. One part for the flour mix, the other for making those egg whites super glossy and stable.
- 1/4 cup Cake Flour: Key for that delicate, airy texture. **Don’t even *think* about all-purpose flour here**, unless you want a dense, sad cake. Your soul deserves better.
- 1/2 teaspoon Cream of Tartar: This is your egg whites’ best friend. It helps them get super voluminous and keeps them stable. Think of it as their emotional support animal.
- 1/2 teaspoon Vanilla Extract: Because blandness is a crime. Adds that classic warm, sweet aroma.
- Pinch of Salt: Just a tiny bit to make all the other flavors sing. It’s a flavor enhancer, not a salty cake maker.
Step-by-Step Instructions
- Prep Your Stage: Preheat your oven to 325°F (160°C). This is non-negotiable. Grab a 6-inch tube pan (or two smaller ramekins, if you’re feeling fancy and want individual cakes). **DO NOT GREASE IT!** Seriously, don’t. Angel food cake needs to climb the sides of the pan.
- Sift the Dry Squad: In a small bowl, sift together the cake flour and 2 tablespoons of the granulated sugar. Sifting is crucial for an airy cake, so don’t skip this step! Set it aside.
- Whip It Good (Egg Whites, That Is): In a super clean, grease-free bowl (seriously, any grease will kill your meringue dreams), add your room-temp egg whites, cream of tartar, and salt. Beat on medium speed until soft peaks form (when you lift the whisk, the peaks gently flop over).
- Sugar Rush (Slowly!): Now, gradually add the remaining 1/4 cup of granulated sugar, one tablespoon at a time, while continuing to beat. Increase the speed to medium-high. Keep beating until you have stiff, glossy peaks. When you lift the whisk, the peaks should stand straight up. This takes a few minutes, so be patient, future cake master.
- Fold with Grace: Gently, oh-so-gently, fold in your sifted flour-sugar mixture into the egg whites, about a third at a time. Use a spatula and a light hand. Overmixing here is a one-way ticket to deflated cake town, and we don’t want to go there. Your goal is to just combine it, keeping all that glorious air.
- Into the Pan They Go: Spoon the batter into your ungreased tube pan. Smooth the top gently.
- Bake That Cloud: Pop it into your preheated oven and bake for 20-25 minutes, or until the top springs back lightly when touched and is golden brown.
- The Crucial Cool Down: This part is vital! As soon as it comes out of the oven, **immediately invert the pan** (if it has little feet, use those; otherwise, hang it over a bottle neck or funnel). Let it cool completely upside down for at least an hour. This prevents your beautiful cake from collapsing. Patience, grasshopper.
- Release and Devour: Once fully cooled, run a thin knife around the edges to release the cake from the pan. Serve it up with your favorite toppings and bask in the glory of your mini-masterpiece!
Common Mistakes to Avoid
- Greasing the Pan: I know, it’s ingrained in our baking brains. But for angel food cake, it’s a hard NO. The batter needs to cling to the sides to rise properly. Greasing it means it’ll slide down and deflate, turning your angelic creation into a sad pancake.
- Overmixing the Batter: Once you’ve got those stiff egg whites, be super gentle. Folding is key; aggressive stirring will knock all the air out, and you’ll end up with a dense brick instead of a fluffy cloud.
- Not Sifting the Dry Ingredients: Lumpy flour in your delicate meringue? No thank you. Sifting ensures a smooth, even texture.
- Opening the Oven Door Early: Resist the urge to peek! Especially during the first 15 minutes. A sudden change in temperature can cause the cake to fall.
- Not Cooling Upside Down: This is probably the most common mistake. If you don’t cool it upside down, gravity will take its toll, and your cake will shrink faster than my patience on a Monday morning.
Alternatives & Substitutions
While angel food cake is pretty pure, you can totally tweak it a little to suit your mood!
- Flavor It Up: Swap out half of the vanilla extract for almond extract for a marzipan-y vibe. Or add a teaspoon of citrus zest (lemon, orange, or lime) to the dry ingredients for a zippy kick.
- Flour Emergency? Okay, okay, if you absolutely, positively do not have cake flour, you *can* try using all-purpose flour mixed with a bit of cornstarch (for every 1 cup of AP flour, remove 2 tablespoons and replace with 2 tablespoons of cornstarch). But FYI, it won’t be quite as tender. Don’t say I didn’t warn you!
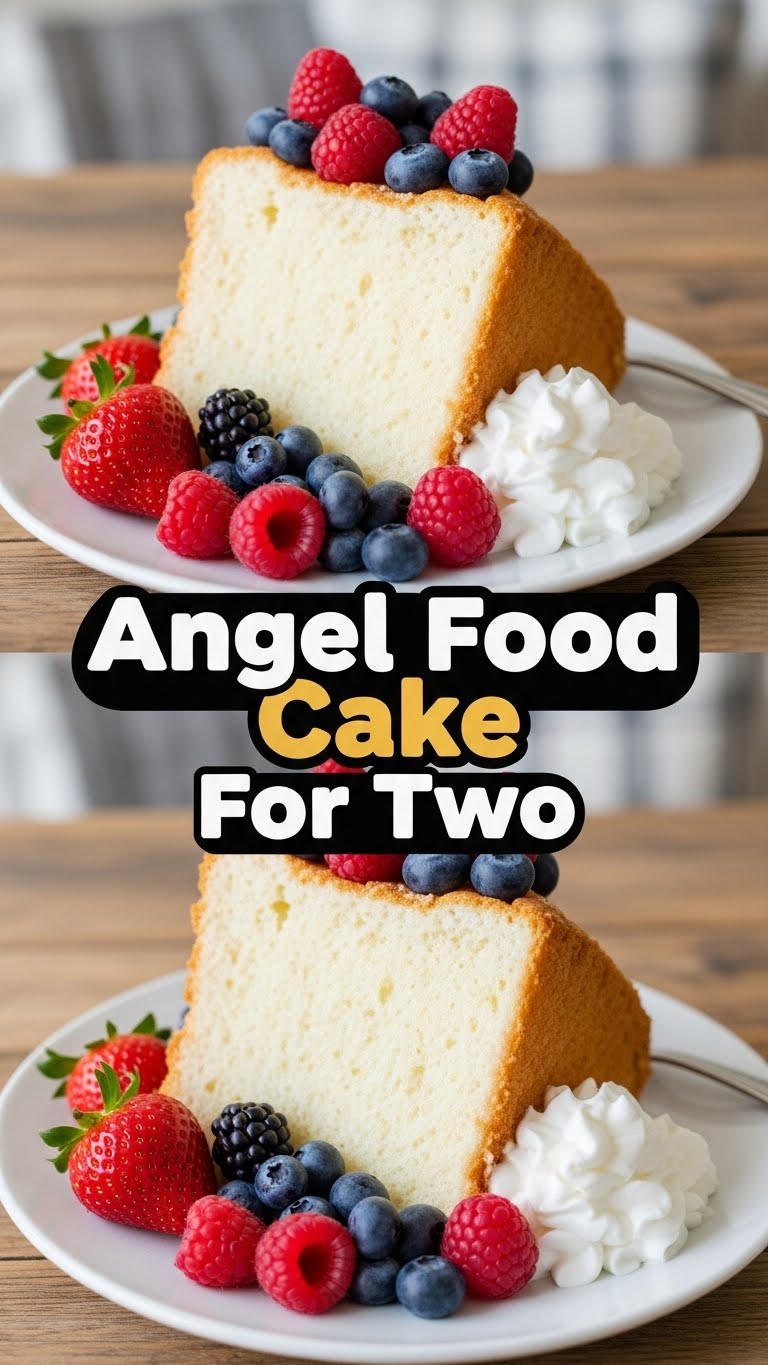
- Topping Adventures: This is where you can go wild! Fresh berries and a dollop of whipped cream are classic for a reason. But consider a simple fruit compote, chocolate sauce drizzle, or even a sprinkle of powdered sugar. Sometimes, simple is best, IMO.
FAQ (Frequently Asked Questions)
- Why can’t I use regular all-purpose flour?
Because regular flour has a higher gluten content. Gluten is great for chewy bread, but not so great for ethereal, melt-in-your-mouth angel food cake. Cake flour has less protein, leading to that super fine, tender crumb we’re chasing.
- What if I don’t have cream of tartar? Can I skip it?
You can substitute 1/2 teaspoon of cream of tartar with 1 teaspoon of fresh lemon juice or white vinegar. It serves the same purpose: stabilizing those egg whites to help them reach maximum fluffiness!
- My cake deflated after cooling. What went wrong?
Ah, the classic angel food heartbreak! Most likely culprits: you either overmixed the batter (knocking out all the air) or, more commonly, didn’t cool it upside down long enough. It needs to be fully cool before flipping!
- Can I make this ahead of time?
Absolutely! Angel food cake actually holds up quite well. Store it tightly wrapped at room temperature for up to two days, or in the fridge for a few days more. It freezes well too, wrapped tightly, for up to a month.
- What kind of pan is best for a “for two” cake?
A 6-inch tube pan is ideal for this recipe. If you don’t have one, you can use two small (6-8 ounce) ramekins. Just adjust the baking time down a bit and watch them closely!
Final Thoughts
See? That wasn’t so scary, was it? You just whipped up a tiny, elegant, and seriously delicious angel food cake. This little beauty is proof that you don’t need a huge production to create something special. Now go impress someone—or yourself—with your new culinary skills. You’ve earned it! Grab a fork, your favorite topping, and enjoy every single airy, sweet bite. Happy baking!


