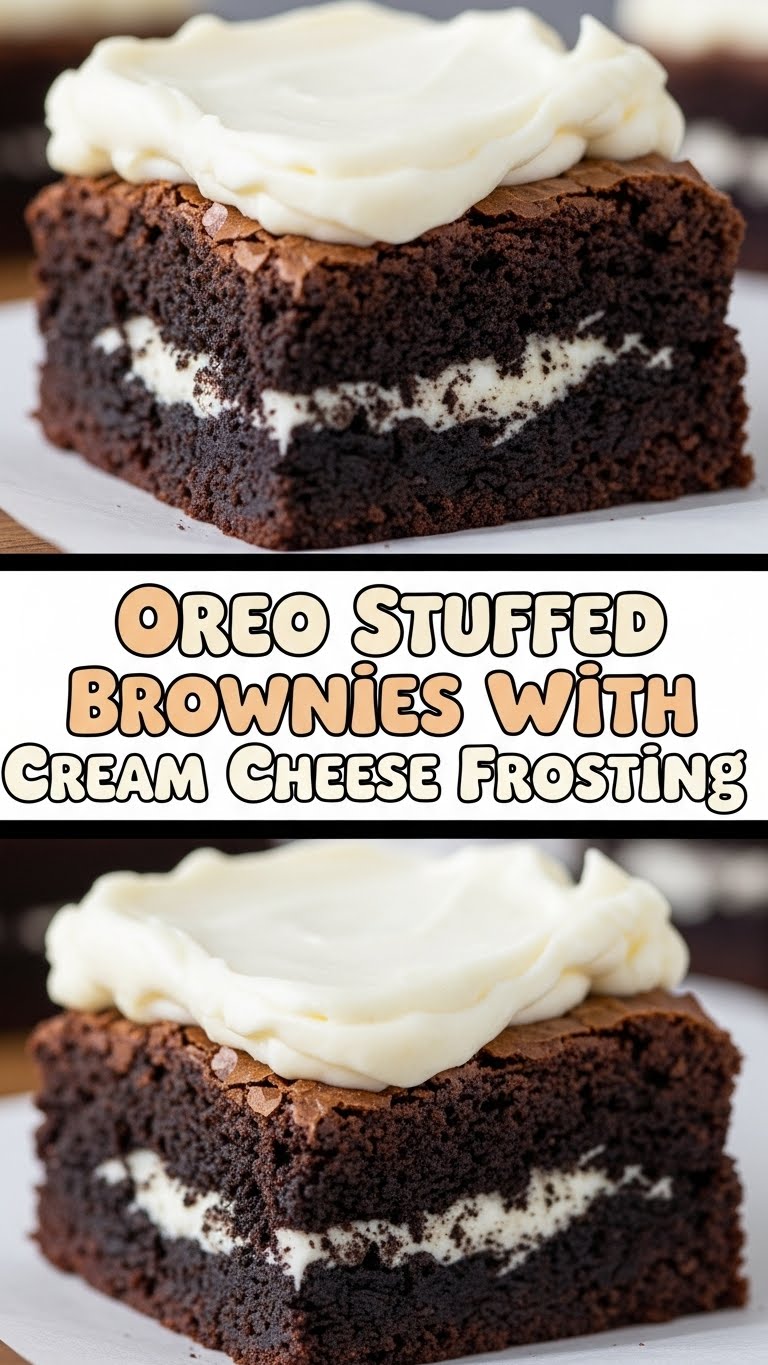
Oreo Stuffed Brownies with Cream Cheese Frosting: Because Life Needs More Chocolate (and Oreos!)
So, you’ve hit that glorious point in your day where only something ridiculously decadent will do, right? You’re not looking for a salad; you’re looking for pure, unadulterated joy in edible form. Well, my friend, you’ve come to the right place. Prepare yourself, because we’re about to make magic happen with Oreos, brownies, and a whole lotta cream cheese. Get ready for your tastebuds to throw a party.
Why This Recipe is Awesome (Seriously!)
Let’s be real. Brownies are great. Oreos are great. Cream cheese frosting is… well, it’s heaven. Combine all three? That’s not just baking; that’s a culinary intervention. This recipe is ridiculously easy, meaning even if your idea of cooking is microwaving leftovers, you can nail this. Plus, who doesn’t love a surprise inside? It’s like a delicious treasure hunt for your mouth. And the frosting? It’s so good, you’ll be tempted to eat it with a spoon. No judgment here.
Ingredients You’ll Need
Here’s what you’ll be wrangling for this masterpiece:
* For the Brownies:
* 1/2 cup (1 stick) unsalted butter, melted (because who has time to soften butter? Not us.)
* 1 cup granulated sugar (the sweet stuff, obviously)
* 2 large eggs (room temperature is cool, but hey, whatever works)
* 1 teaspoon vanilla extract (the secret weapon of flavor)
* 1/3 cup unsweetened cocoa powder (for that deep, dark chocolatey goodness)
* 1/2 cup all-purpose flour (the structure of our dreams)
* 1/4 teaspoon baking powder (just a pinch for lift, not a skyscraper)
* 1/4 teaspoon salt (to make the sweet things even sweeter)
* About 12-15 whole Oreos (the stars of the show, obviously)
* For the Cream Cheese Frosting:
* 4 oz cream cheese, softened (leave it out on the counter for a bit, or nuke it *carefully*)
* 1/4 cup unsalted butter, softened (same deal as the cream cheese)
* 1 cup powdered sugar (AKA confectioners’ sugar, AKA fairy dust)
* 1/2 teaspoon vanilla extract (more flavor, always!)
* 1-2 tablespoons milk or cream (to get that perfect drizzling consistency)
Step-by-Step Instructions
Alright, let’s get our hands dirty (metaphorically, of course, unless you’re also cleaning up a kitchen tornado).
1. **Preheat and Prep:** Preheat your oven to 350°F (175°C). Grease and flour an 8×8 inch baking pan, or line it with parchment paper for easy cleanup. Trust me, future you will thank you.
2. **Brownie Batter Base:** In a medium bowl, whisk together the melted butter and granulated sugar. Then, beat in the eggs one at a time, followed by the vanilla extract.
3. **Dry Ingredients Unite:** In a separate small bowl, whisk together the cocoa powder, flour, baking powder, and salt.
4. **Combine and Conquer:** Gradually add the dry ingredients to the wet ingredients, mixing until just combined. **Don’t overmix!** We’re not building a brick wall here.
5. **Oreo Layer:** Spread about half of the brownie batter evenly into the bottom of your prepared pan. Now, arrange your whole Oreos on top of the batter, like little chocolatey islands.
6. **Top it Off:** Carefully dollop and spread the remaining brownie batter over the Oreos, making sure to cover them as much as possible.
7. **Bake ‘Em Up:** Bake for 25-30 minutes, or until a toothpick inserted near the center (avoiding an Oreo, if you can) comes out with moist crumbs attached. A little moistness is good; a raw batter puddle is not.
8. **Cool Down:** Let the brownies cool completely in the pan on a wire rack. Patience, grasshopper. This is crucial for clean slicing.
9. **Frosting Time:** While the brownies are cooling, make the frosting! In a bowl, beat together the softened cream cheese and butter until smooth and creamy. Beat in the powdered sugar and vanilla extract until well combined. Add milk or cream, a tablespoon at a time, until you reach your desired drizzling consistency.
10. **Decorate & Devour:** Once the brownies are completely cool, spread or drizzle the cream cheese frosting over the top. Slice into squares and prepare for pure bliss.
Common Mistakes to Avoid
Listen, we all have our off days in the kitchen. Here are a few common pitfalls to sidestep:
* **Oven Not Hot Enough:** Thinking you can skip preheating? **Big no-no.** Your brownies will be sad, dense, and possibly still gooey in the middle.
* **Overmixing the Batter:** Seriously, stop mixing when it’s *just* combined. Overmixing develops gluten, leading to tough brownies. We want fudgy, not chewy like an old shoe.
* **Cutting Too Soon:** The hardest part? Waiting for them to cool. If you cut warm brownies, they’ll crumble into a chocolatey mess. Unless you like that, then you do you.
* **Ignoring the “Moist Crumb” Rule:** A toothpick that comes out totally clean means you’ve likely overbaked and created brownie pucks. Aim for those lovely moist crumbs!
Alternatives & Substitutions
Feeling a little adventurous? Or maybe you’re missing a key ingredient? No stress!
* **Oreo Swap:** Don’t have Oreos? Use other chocolate sandwich cookies, or even some chopped chocolate chunks if you’re feeling minimalist.
* **Gluten-Free?** Look for a good gluten-free brownie mix or a reliable GF flour blend. Just be aware that textures can sometimes vary.
* **Dairy-Free?** This is trickier, especially with the frosting. You could try a vegan cream cheese and vegan butter, but the texture might be a little different. For the brownies, ensure your butter substitute is suitable for baking.
* **No Cocoa Powder?** Melted chocolate is your friend! Reduce the butter slightly and add melted unsweetened or semi-sweet chocolate to the batter.
FAQ (Frequently Asked Questions)
* **Can I make these ahead of time?** Absolutely! They’re even better the next day after the flavors have melded. Just store them in an airtight container at room temperature.
* **What’s the best way to store leftovers?** Airtight container, my friend. At room temperature is fine for a few days, but if it’s super hot, the fridge might be a good idea (though the frosting might firm up a bit).
* **Do I *really* need to use cream cheese in the frosting?** Well, technically no, but IMO, that’s where the magic happens. A simple buttercream is fine, but the cream cheese adds that irresistible tang.
* **Can I add anything *else* to these?** Go nuts! Mini chocolate chips in the brownie batter, a swirl of caramel on top of the frosting, sprinkles… the sky’s the limit.
* **My frosting is too thin/thick. Help!** Too thin? Add more powdered sugar, a tablespoon at a time, until it reaches your desired consistency. Too thick? Add a tiny splash of milk or cream. Go slow; you can always add more.
* **Can I bake these in a different-sized pan?** A smaller pan will likely result in thicker brownies (which might need a slightly longer bake time), and a larger pan will make them thinner (shorter bake time). Keep an eye on them!
Final Thoughts
And there you have it! You’ve just created a masterpiece of chocolatey, cookie-filled, cream-cheese-frosted deliciousness. You didn’t just bake; you performed an act of pure edible happiness. Now go impress someone—or yourself (highly recommended)—with your new culinary skills. You’ve earned it! Enjoy every single bite!


