
“`html
So you’re craving something ridiculously decadent, something that whispers sweet nothings of chocolatey goodness while simultaneously giving your taste buds a standing ovation? But, like, you also don’t want to spend your entire Saturday wrestling with a whisk and feeling like a contestant on a particularly stressful baking show? Meee too. That’s where these Raspberry-Topped Brownies come in. They’re the perfect blend of “I totally made this from scratch, look at me!” and “I actually just followed a few simple steps and now I’m a dessert magician.”
Why This Recipe is Awesome (Like, Really Awesome)
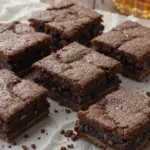
Let’s be real. Brownies are already life. They’re the comfort food equivalent of a warm hug on a cold day. But we’re not just talking about *any* brownies here. We’re talking about brownies that have gone to culinary finishing school and decided to add a pop of bright, tart raspberries. It’s like a party in your mouth, and everyone’s invited – even your slightly judgmental Aunt Carol. Plus, they look fancy enough for a dinner party but are secretly so easy even your dog could *almost* make them (don’t try that, though).
Ingredients You’ll Need (The Fun Stuff)
- 1 cup (2 sticks) unsalted butter, melted (Because life’s too short for margarine, just saying.)
- 2 cups granulated sugar (The sweeter the better, right?)
- 4 large eggs (Freshness is key, unless you’re feeling adventurous, which I don’t recommend.)
- 1 teaspoon vanilla extract (The magical elixir that makes everything taste better.)
- 1 cup all-purpose flour (The backbone of our brownie dreams.)
- 3/4 cup unsweetened cocoa powder (The star of the show, duh.)
- 1/2 teaspoon baking powder (Just a little lift, not trying to make cake here.)
- 1/4 teaspoon salt (To balance out all that sweetness.)
- 1 cup fresh raspberries (The pretty, tangy jewels of joy.)
- Optional: A sprinkle of flaky sea salt for that extra pizzazz. Because why not?
Step-by-Step Instructions (You Got This!)
- First things first, preheat your oven to 350°F (175°C). And seriously, **don’t forget this step**. It’s not optional. Grease and flour a 9×13 inch baking pan.
- In a big ol’ bowl, whisk together that melted butter and sugar until it looks smooth and slightly glossy. Think of it as giving your brownie batter a spa treatment.
- Crack in those eggs, one by one, and whisk like your life depends on it. Stir in the vanilla extract. Smell that? That’s pure happiness in liquid form.
- Now for the dry stuff: In a separate bowl, whisk together the flour, cocoa powder, baking powder, and salt. Get all those lumps out; we’re aiming for smooth sailing here.
- Gradually add the dry ingredients to the wet ingredients, mixing until *just* combined. Overmixing is the enemy of fudgy brownies, so be gentle!
- Pour that glorious batter into your prepared pan and spread it out evenly. It should look like a dark, rich chocolatey puddle of dreams.
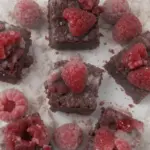
- Gently scatter those beautiful raspberries over the top. Don’t push them in too much; we want them to nestle on top like little ruby crowns.
- Bake for 25-30 minutes, or until a toothpick inserted into the center comes out with moist crumbs attached (not wet batter!). We want fudgy, not cakey!
- Let them cool completely before slicing. This is the hardest part, I know. But patience, my friend, patience!
Common Mistakes to Avoid (Don’t Be That Person)
- Overbaking: This is the cardinal sin of brownie making. Remember, moist crumbs, not clean! Dry brownies are sad brownies.
- Not Measuring Accurately: Especially the flour and cocoa. Too much flour and you’ll get a tough brownie. Too little cocoa and… well, it’s just not a brownie.
- Using Cold Butter: Melted butter is key for that fudgy texture. Unless you’re going for a cakier brownie, then by all means, be weird.
- Skipping the Cooling Step: I know, I know, the temptation is overwhelming. But cutting into hot brownies is a recipe for a messy disaster.
Alternatives & Substitutions (Get Creative!)
Feeling a little experimental? Go for it!
- Chocolate Chips: If you’re not a raspberry person (who are you?), you can absolutely fold in some chocolate chips with your raspberries. Dark, milk, white – the choice is yours!
- Other Berries: Blackberries or even a mix of berries would be divine. Just make sure they’re fresh and not too mushy.
- Citrus Zest: A little lemon or orange zest in the batter can be a surprisingly delightful addition, especially with the raspberries.
FAQ (Your Burning Questions, Answered Casually)
Can I use frozen raspberries?
Sure, but they might release more liquid and make your brownies a bit soggier. If you go this route, try to thaw and pat them dry first. No guarantees, though!
My brownies look a little cracked on top. Is that bad?
Nope! A little cracking is actually a sign of a good brownie. It means you achieved that perfect balance of ingredients and baking time.
Can I add nuts?
Absolutely! Chop up some walnuts or pecans and sprinkle them in with the raspberries. Just make sure you warn anyone with nut allergies, FYI.
What if I don’t have cocoa powder?
You could use melted unsweetened baking chocolate instead, but the ratios will be different. For this specific recipe, stick to cocoa powder if you can. It’s what makes these babies taste like pure chocolate bliss.
How do I store these?
Once they’re completely cool, store them in an airtight container at room temperature for up to 3 days. If you’re feeling super organized, you can pop them in the fridge, but they’re best enjoyed at room temp.
Can I freeze brownies?
Yes! They freeze surprisingly well. Wrap them tightly in plastic wrap, then foil, and pop them in a freezer bag. They should last for about 2-3 months. Thaw them on the counter.
Final Thoughts
There you have it! Ridiculously delicious brownies that are almost as fun to make as they are to eat. So go forth, bake with abandon, and don’t be afraid to lick the spoon (or the bowl, we won’t judge). Now go impress someone—or yourself—with your new culinary skills. You’ve earned it!
“`
