So, you’re craving something fudgy, chocolatey, and ridiculously easy? Me too.
Let’s be real, sometimes the urge for a brownie hits harder than a rogue wave at a beach party. And who has the energy for complicated recipes that require artisanal ingredients you can’t pronounce? Not me, friend. Not today. We’re diving headfirst into the glorious, no-fuss world of stackable chocolate brownies with frosting. Get ready for pure bliss, with minimal brainpower required.
Why This Recipe is Basically Magic (and Totally Idiot-Proof)
This recipe is awesome because it’s *almost* impossible to mess up. Like, I-could-be-distracted-by-a-puppy-and-still-pull-this-off awesome. The brownies themselves are intensely chocolatey without being dry, and the frosting? Oh, the frosting is the cherry on top of this delicious, chocolatey sundae. Plus, it’s super adaptable, so you can totally make it your own. It’s the perfect balance of effort and reward, and who doesn’t love a good win?
Ingredients You’ll Need (The Usual Suspects + a Few Heroes)
* All-Purpose Flour: Just your regular, run-of-the-mill flour. No need for fancy bread flour here.
* Granulated Sugar: The sweet stuff. Makes everything better.
* Unsweetened Cocoa Powder: The star of the show! Don’t skimp on quality here if you can help it.
* Salt: Just a pinch to bring out all those chocolatey flavors.
* Eggs: For binding and that perfect fudgy texture.
* Melted Butter: Because butter is life. Use the good stuff.
* Vanilla Extract: The secret weapon for enhancing chocolatey goodness.
* For the Frosting:
* Powdered Sugar (Icing Sugar): The base of all amazing frostings. Sift it if you want to be extra fancy.
* Melted Butter: More butter? Always.
* Milk (or Cream): To get that dreamy, spreadable consistency.
* Cocoa Powder: For chocolate frosting, duh!
* Vanilla Extract: Because frosting needs love too.
Step-by-Step Instructions (Prepare for Deliciousness!)
1. Preheat & Prep: Preheat your oven to a cozy 350°F (175°C). Grease and flour an 8×8 inch baking pan. Think of it as tucking your brownies into a comfy bed.
2. Dry Stuff First: In a medium bowl, whisk together your flour, sugar, cocoa powder, and salt. Give it a good mix so everything’s friends.
3. Wet Stuff in the Middle: Make a well in the center of your dry ingredients. Pour in your melted butter, eggs, and vanilla. Whisk everything together until *just* combined. Don’t go crazy here; overmixing is the enemy of fudgy.
4. Bake It Up: Pour that glorious batter into your prepared pan and spread it evenly. Bake for 25-30 minutes, or until a toothpick inserted into the center comes out with a few moist crumbs attached (not totally clean, that’s overdone!).
5. Cool Down: Let those beauties cool COMPLETELY in the pan. This is crucial, folks! Impatience is a brownie killer.
6. Frosting Time: While they’re chilling, whip up your frosting. In a bowl, mix melted butter and cocoa powder. Gradually add powdered sugar and milk (a tablespoon at a time) until you reach your desired consistency. Stir in vanilla.
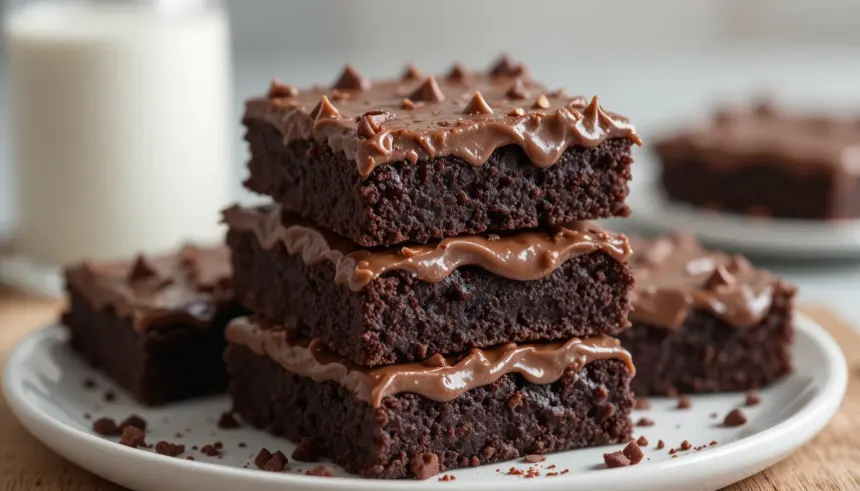
7. Frost & Stack: Once the brownies are totally cool, spread that luscious frosting over the top. Cut into squares. For the “stack” effect, just, well, stack them! It’s a visual masterpiece.
Common Mistakes to Avoid (Don’t Be That Person)
- Underbaking: Gooey is good, but raw batter is… not. Trust the toothpick test!
- Overbaking: Sad, dry brownies are a tragedy. Keep an eye on them in the last 10 minutes.
- Cutting Too Soon: Seriously, let them cool. You’ll thank me later.
- Forgetting the Salt: It’s a flavor enhancer, not just for savory dishes! Don’t skip it.
- Skipping the Frosting: This is a personal opinion, but why would you EVER do that?
Alternatives & Substitutions (Get Creative!)
* **Chocolate Chips:** Toss in a handful of chocolate chips into the batter for extra melty goodness. Milk, dark, white – whatever floats your boat!
* **Nuts:** Pecans or walnuts are classic additions if you’re feeling nutty.
* **Different Frostings:** Feeling adventurous? Try a cream cheese frosting, a peanut butter frosting, or even a caramel drizzle on top.
* **Gluten-Free?** Use a good quality gluten-free flour blend. I find the ones with xanthan gum work best.
FAQ (Your Burning Questions, Answered Casually)
- Can I make these vegan? Yup! Use a vegan butter substitute and an egg replacer (like applesauce or a flax egg) in the brownies. For the frosting, ensure your butter substitute and milk are vegan.
- Why are my brownies cakey? You probably overmixed the batter or used too much flour. Stick to the “just combined” rule!
- Can I double the recipe? Absolutely! Just use a larger baking pan (like a 9×13 inch) and adjust the baking time accordingly. Keep an eye on it!
- How long do these last? In an airtight container at room temperature, they’re usually good for 3-4 days. But let’s be real, they won’t last that long.
- Can I use baking powder instead of baking soda? This recipe doesn’t call for baking soda. If you were to substitute, it would change the texture. Stick to the recipe for best results!
- My frosting is too thick/thin, help! Too thick? Add milk, a teaspoon at a time. Too thin? Add more powdered sugar, a tablespoon at a time. Easy peasy.
Final Thoughts (Go Forth and Bake!)
And there you have it! A foolproof path to brownie nirvana. These aren’t just desserts; they’re edible hugs, mood boosters, and excellent excuses to indulge. Now go impress someone—or yourself—with your new culinary skills. You’ve earned it! Happy baking, you magnificent brownie wizard!
