Brownies, But Make Them Better: Enter the Reese’s Pieces Edition!
So, you’re staring into the abyss of your pantry, a rumble in your tummy, and the thought of a complicated baking project feels… well, a bit much. Been there, friend. Especially when the craving hits hard for something chocolatey and utterly, ridiculously delicious. That’s where these glorious Reese’s Pieces brownies come swooping in like a superhero in a cape made of pure joy (and probably a bit of flour). Prepare yourselves, people. This is not just a recipe; it’s an experience.
Why This Recipe is Basically a Hug in Edible Form
Let’s be real. What’s better than a fudgy, decadent brownie? NOTHING. Unless, of course, you embed it with those little pockets of peanut butter perfection that are Reese’s Pieces. This recipe is awesome because it takes something already amazing and kicks it up several notches. It’s ridiculously easy (seriously, if I can do it, you can too), and the payoff is HUGE. You’re basically a baking genius with minimal effort. Plus, who doesn’t love a pop of candy color in their life? It’s like a party in every bite.
Ingredients You’ll Need (No Fancy Stuff Required, Promise!)
Here’s the lowdown on what you’ll be grabbing:
- 1/2 cup (1 stick) unsalted butter: Melted, because we’re going for fudgy, not cakey.
- 1 cup granulated sugar: To keep things sweet and lovely.
- 2 large eggs: The binder of dreams.
- 1 teaspoon vanilla extract: The magical essence of deliciousness.
- 1/3 cup unsweetened cocoa powder: The darker, the better, IMO.
- 1/2 cup all-purpose flour: Just enough to hold it all together.
- 1/4 teaspoon baking powder: A tiny puff for texture, but not too much!
- 1/4 teaspoon salt: To balance out all that sweetness.
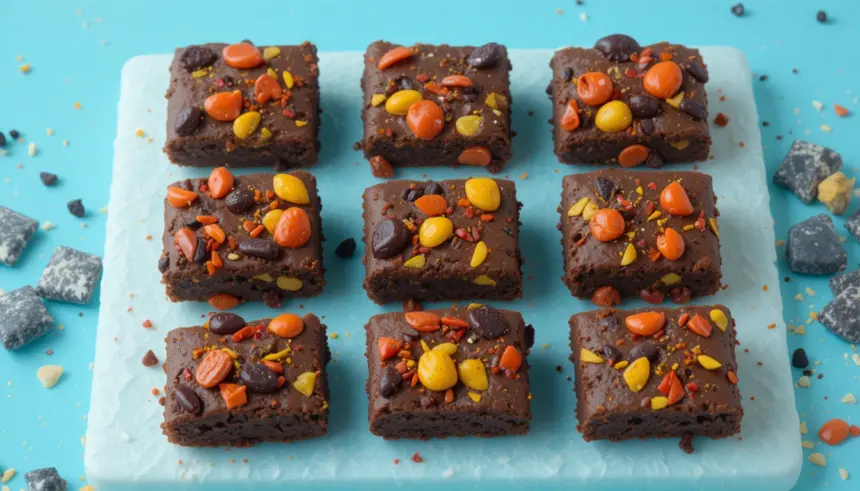
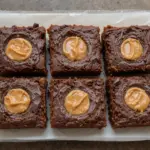
- 1 cup Reese’s Pieces candy: The star of the show! Don’t skimp here.
Step-by-Step Instructions: Let’s Get This Party Started!
- Preheat your oven to 350°F (175°C). Grease and flour an 8×8 inch baking pan. Nobody likes stuck brownies, am I right?
- In a medium bowl, whisk together the melted butter and sugar until combined. It should look like a happy, slightly glossy mess.
- Beat in the eggs one at a time, then stir in the vanilla extract. Don’t overmix; we’re not trying to make meringue here.
- In a separate small bowl, whisk together the cocoa powder, flour, baking powder, and salt. This is your dry goodness.
- Gradually add the dry ingredients to the wet ingredients, stirring until just combined. Again, **don’t overmix!** Lumps are fine, even good.
- Gently fold in about 3/4 cup of the Reese’s Pieces. Save the rest for topping – we’re all about that visual appeal.
- Pour the batter into your prepared pan and spread it evenly. Sprinkle the remaining Reese’s Pieces over the top. Some will sink, and that’s totally okay.
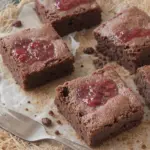
- Bake for 20-25 minutes, or until a toothpick inserted into the center comes out with moist crumbs (not wet batter). **This is crucial for fudgy brownies!**
- Let them cool completely on a wire rack before cutting. Patience, grasshopper. It’s worth it.
Common Mistakes to Avoid (Don’t Be That Person!)
- Overbaking: The number one brownie sin. They’ll turn into dry hockey pucks. Remember: moist crumbs!
- Overmixing the batter: Seriously, just stop when the flour disappears. Overworking gluten = tough brownies.
- Not preheating the oven: rookie mistake. Your brownies will be sad and undercooked.
- Cutting them too soon: The urge is strong, I know. But they’ll fall apart if you try to cut them while they’re still warm and jiggly.
Alternatives & Substitutions (Because We’re Flexible Like That)
* Chocolate Chips: If Reese’s Pieces are a no-go (what?!), you can totally mix in some semi-sweet or milk chocolate chips. Or both! No judgment here.
* Nut Butter Swirl: Feeling fancy? Melt a few spoonfuls of peanut butter and swirl it into the batter before baking. It adds an extra layer of peanut buttery goodness.
* Different Candy: M&Ms would work in a pinch, but they just aren’t the same as those delightful Reese’s. Just saying.
* Gluten-Free Flour: If you need to go GF, use a good quality 1-to-1 gluten-free baking blend. It should work like a charm.
FAQ (Your Burning Questions Answered!)
Q: Can I use margarine instead of butter?
A: Well, technically yes, but why would you want to hurt your soul like that? Butter gives you the best flavor and texture. Stick with the good stuff if you can!
Q: Do I *really* need to let them cool completely?
A: Look, I get it. The smell is intoxicating. But if you want clean cuts and a perfect fudgy interior, then yes, friend, you need to exercise some self-control. Your future self will thank you.
Q: My brownies look a little… sad. What did I do wrong?
A: Could be overbaking, underbaking, or maybe your oven is just having a bad day. Or perhaps you didn’t use enough cocoa? Either way, they’re probably still edible. Embrace the imperfection!
Q: Can I freeze these?
A: Absolutely! Wrap them well and they’ll last for a good month or two. Perfect for future emergency brownie situations.
Q: I don’t have an 8×8 pan. What now?
A: A 9×9 inch pan will work, but your brownies will be a bit thinner. An 8×11 inch pan is also an option, and they’ll bake faster. Just keep an eye on them!
Q: Are these *really* easy? Like, “I’ve never baked before” easy?
A: Yup! If you can stir and measure, you can make these. It’s pretty straightforward. Think of it as a delicious experiment.
Final Thoughts (Go Forth and Bake!)
And there you have it – the legendary Reese’s Pieces brownies! They’re the perfect blend of classic chocolatey goodness and that irresistible peanut butter crunch. They’re great for sharing, even better for hoarding, and always a crowd-pleaser. So, what are you waiting for? Get in that kitchen and whip up some magic. Now go impress someone—or yourself—with your new culinary skills. You’ve earned it! Happy baking!
