
So, you’re staring into the abyss of your pantry, a vague craving for something warm, gooey, and vaguely autumnal whispering sweet nothings in your ear. But the thought of embarking on a culinary odyssey that involves a dozen complex steps? Yeah, nah. Good news, my friend! I’ve got your back with a recipe that’s basically a hug in brownie form, with a fancy maple kiss on top.
Why This Recipe is Pure Genius (and You’ll Love It)
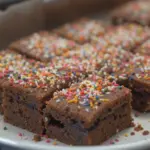
Let’s be real. Sometimes, you just need a brownie. But not just *any* brownie. You need one that’s a little bit extra, a little bit sophisticated, but still ridiculously easy. Enter Apple Brownies with Maple Glaze. This bad boy is:
- Fudgy, chewie perfection: We’re talking brownie nirvana.
- Packed with apple goodness: Because we’re pretending this is *slightly* healthier. Shhh.
- Drizzled with maple magic: The glaze is basically liquid gold, no exaggeration.
- Basically foolproof: Seriously, if I can make these without setting off the smoke alarm, you absolutely can. It’s a low-stakes win for everyone.
Ingredients You’ll Need (Don’t Panic!)
- 1 cup (2 sticks) unsalted butter, melted (Because life’s too short for cold butter.)
- 2 cups granulated sugar (The sweet stuff, obviously.)
- 4 large eggs (The binding magic makers.)
- 1 teaspoon vanilla extract (Our secret weapon for deliciousness.)
- 1 cup all-purpose flour (The backbone of the brownie.)
- 1/2 cup unsweetened cocoa powder (For that deep, dark chocolatey goodness. Don’t skimp!)
- 1/2 teaspoon baking powder (Just a little lift, nothing crazy.)
- 1/4 teaspoon salt (To balance all the sweetness.)
- 1.5 cups chopped apples (Honeycrisp or Gala are my faves, but use what you’ve got! Think small, bite-sized pieces.)
- For the Maple Glaze:
- 1 cup powdered sugar (The smoother the better.)
- 2-3 tablespoons pure maple syrup (This is the star, so use the good stuff!)
- 1-2 tablespoons milk or cream (Just enough to get the right consistency.)
Step-by-Step Instructions (Let’s Do This!)
- Preheat and prep: Crank your oven to 350°F (175°C). Line a 9×13 inch baking pan with parchment paper, leaving some overhang. This is your cheat sheet for easy cleanup. Trust me.
- Wet stuff first: In a big bowl, whisk together that melted butter and sugar until it’s looking smooth and dreamy.
- Eggs-cellent addition: Beat in the eggs one at a time, then stir in the vanilla. It’s gonna look a little glossy, that’s a good sign!
- Dry ingredients symphony: In a separate bowl, whisk together the flour, cocoa powder, baking powder, and salt. No lumps allowed!
- Combine and conquer: Gradually add the dry ingredients to the wet ingredients. Mix until *just* combined. Overmixing is the enemy of fudgy brownies, so resist the urge!
- Apple infusion: Gently fold in those chopped apples. You want them evenly distributed, like little surprises waiting to be discovered.
- Bake your heart out: Pour the batter into your prepared pan and spread it out evenly. Bake for 25-35 minutes, or until a toothpick inserted into the center comes out with moist crumbs attached (not wet batter!).
- Cool down: Let them cool in the pan for at least 15-20 minutes before you even THINK about glazing. Patience, young grasshopper.
- Glaze it up: While they’re cooling, whisk together the powdered sugar and 2 tablespoons of maple syrup. Add milk or cream, a tablespoon at a time, until you get a drizzle-able consistency. If it’s too thick, add more liquid. Too thin? More powdered sugar. You got this.
- The grand finale: Drizzle that glorious maple glaze all over the cooled brownies. Let it set for a few minutes, then slice and devour!
Common Mistakes to Avoid (So You Don’t Cry)
- Under-baking: Nobody wants a raw brownie. Use the toothpick test, people!
- Over-baking: This leads to dry, crumbly sadness. Aim for those moist crumbs.
- Overmixing the batter: Seriously, just mix until it’s combined. It’s not a boxing match.
- Skipping the parchment paper: Trying to pry stuck brownies out of a pan is a special kind of torture.
- Using watery apples: Pat your chopped apples dry if they seem particularly juicy to avoid a soggy bottom.
Alternatives & Substitutions (Because Life Happens)
No apples? No problem! You can totally skip them. Or, try throwing in a handful of chocolate chips for extra decadence. Or maybe some chopped nuts if you’re feeling wild. IMO, the apples add a lovely little texture and tang, but it’s your brownie destiny!
Vegan? You can try a flax egg (1 tbsp flaxseed meal + 3 tbsp water, let it sit for 5 mins) for each egg, and use vegan butter and a dairy-free milk for the glaze. The texture might be a *little* different, but it should still be delicious!
FAQ (Your Burning Questions, Answered Casually)
Q: Can I use store-bought apple sauce instead of chopped apples?
A: You *could*, but it might make your brownies a bit too cakey. The chopped apples give you those delightful little bursts of flavor and texture. Stick to the chopped if you can!
Q: My glaze is too runny! What do I do?
A: No sweat! Just whisk in a tablespoon of powdered sugar at a time until it thickens up. Easy peasy.
Q: Can I make these ahead of time?
A: Absolutely! They’re often even better the next day, once the flavors have melded. Store them in an airtight container at room temp.
Q: Do I *really* need cocoa powder? I only have chocolate chips.
A: While chocolate chips are fantastic for eating straight from the bag, cocoa powder is what gives brownies that deep, rich chocolate flavor. It’s worth the trip to the store, promise!
Q: What’s the best way to cut them without making a mess?
A: A sharp knife is your best friend. Wiping it clean between cuts helps too! And remember, “rustic” is a perfectly acceptable cutting style.
Final Thoughts (You Got This!)
There you have it! Your new go-to recipe for when you need a little chocolatey, appley, maple-y comfort. Don’t stress about perfection; embrace the delicious mess. Bake them, share them (or don’t, I won’t judge), and enjoy every single fudgy bite. Now go impress someone—or yourself—with your new culinary skills. You’ve earned it!

