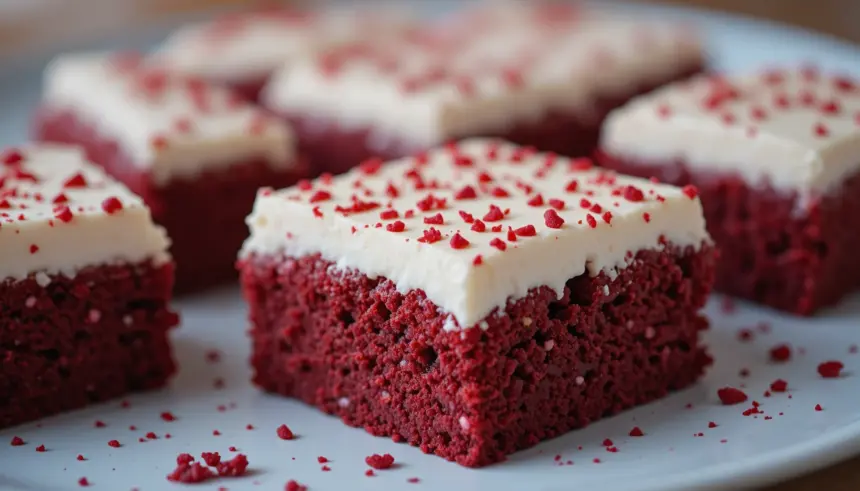
Red Velvet Brownies: Because Your Life Needs More Fudgy, Velvety Goodness.
So, you’re staring into the abyss of your snack cupboard, and it’s staring back, empty and uninspiring. Been there. But what if I told you there’s a way to banish blandness and embrace pure, unadulterated deliciousness with minimal fuss? Enter: Red Velvet Brownies with Cream Cheese. It’s basically a hug in dessert form, and trust me, you deserve one. Or several.
Why This Recipe is Awesome
Honestly, what’s not to love? We’re talking rich, fudgy brownies with that classic red velvet swirl and a tangy cream cheese ribbon running through it. It’s the love child of a brownie and a cheesecake, and it’s *good*. Plus, it’s ridiculously forgiving. I’ve accidentally skipped a step or two (don’t tell anyone) and they still turned out amazing. So, if you’re prone to kitchen chaos, this is your jam. It’s practically foolproof.
Ingredients You’ll Need
Gather ’round, folks! Here’s what you’ll need to conjure this magic:
- 1 cup (2 sticks) unsalted butter, melted. Because butter makes everything better, duh.
- 2 cups granulated sugar. Sweetness is key, my friends.
- 4 large eggs. They hold it all together, like a good friend.
- 1 teaspoon vanilla extract. The unsung hero of baked goods.
- 1 cup all-purpose flour. Just enough to give it structure, not too much to make it cakey.
- ⅓ cup unsweetened cocoa powder. For that deep, chocolatey goodness.
- 1 teaspoon red food coloring. Essential for the VIVA RED! vibe. Don’t skimp here.
- ½ teaspoon salt. To balance out all that sweet.
- For the Cream Cheese Swirl:
- 8 ounces cream cheese, softened. Make sure it’s soft, like your heart after a rom-com.
- ⅓ cup granulated sugar. A little sweetness for the tang.
- 1 large egg. To bind the swirl together.
- ½ teaspoon vanilla extract. More vanilla? Always.
Step-by-Step Instructions
Let’s do this!
- Preheat your oven to 350°F (175°C). Grease and flour an 8×8 inch baking pan. Pro tip: line it with parchment paper with overhang for easy lifting.
- In a large bowl, whisk together the melted butter and sugar until well combined. It should look glossy and inviting.
- Beat in the eggs one at a time, followed by the vanilla extract. Don’t overmix, we’re not making meringue here.
- In a separate medium bowl, whisk together the flour, cocoa powder, red food coloring, and salt. Yes, add the food coloring to the dry ingredients – it helps distribute evenly.
- Gradually add the dry ingredients to the wet ingredients, mixing until *just* combined. Seriously, *just* combined. Lumps are okay!
- Now for the swirl! In a small bowl, beat the softened cream cheese and sugar until smooth. Then, beat in the egg and vanilla extract until everything is creamy and dreamy.
- Pour about two-thirds of the brownie batter into your prepared pan. Dollop spoonfuls of the cream cheese mixture over the top. Then, spread the remaining brownie batter over the cream cheese.
- Grab a knife or a skewer and gently swirl the batters together. Don’t go crazy; we want distinct ribbons, not a muddy mess.
- Bake for 25-30 minutes, or until a toothpick inserted into the center comes out with moist crumbs (not wet batter). Overbaking is the enemy of fudgy brownies!
- Let them cool completely before cutting. This is the hardest part, I know. Patience, grasshopper.
Common Mistakes to Avoid
Don’t let these little oopsies ruin your masterpiece:
- Overmixing the batter. Seriously, stop when it’s *just* combined. Overmixing = tough brownies. No one wants that.
- Not softening the cream cheese. Lumpy cream cheese swirl? No thank you. Give it time to get nice and mellow.
- Baking them for too long. This is probably the most common brownie sin. Remember, moist crumbs are the goal, not a dry, sad cake.
- Cutting them while they’re still hot. I know the temptation is real, but you’ll end up with gooey, messy squares that look like they lost a fight. Let them cool!
Alternatives & Substitutions
Feeling a little adventurous? Or just missing an ingredient? Here are some ideas:
- No Red Food Coloring? You can technically skip it, but it won’t be *red* velvet. It’ll just be a really good chocolate brownie with a cream cheese swirl. Still delicious, just… less iconic.
- Want a White Chocolate Swirl? Melt some white chocolate and swirl it in instead of cream cheese. YOLO!
- Nutty Brownies? Toss in a handful of chopped walnuts or pecans into the batter. They add a nice crunch.
- Gluten-Free? You can try using a good quality gluten-free all-purpose flour blend. Results may vary, but it’s worth a shot!
FAQ (Frequently Asked Questions)
Got questions? I’ve got (mostly) sensible answers.
- Can I make these ahead of time? Absolutely! They actually taste even better the next day, once the flavors have melded. Store them in an airtight container at room temperature.
- Can I use margarine instead of butter? Well, technically yes, but why hurt your soul like that? Butter provides the best flavor and texture. IMO, stick with butter for this one.
- My brownies are cakey. What did I do wrong? You probably overmixed the batter or overbaked them. Resist the urge to stir too much, and keep an eye on the bake time!
- Can I freeze these? Sure! Wrap them well in plastic wrap and then in foil. They should last in the freezer for a couple of months. Thaw them at room temperature.
- Is it okay if there are streaks of cream cheese and brownie batter in the swirls? That’s exactly what you want! That’s the *point* of the swirl. Just don’t mix it all together into one color.
- What size pan is best? An 8×8 inch pan is perfect for these. If you use a larger pan, they’ll be too thin and will bake faster.
Final Thoughts
There you have it! A recipe that’s as fun to make as it is to devour. Red velvet brownies with cream cheese are a crowd-pleaser, a personal indulgence, and frankly, a delicious way to solve most of life’s minor (and some major) problems. Now go impress someone—or yourself—with your new culinary skills. You’ve earned it! Happy baking!
