“`html
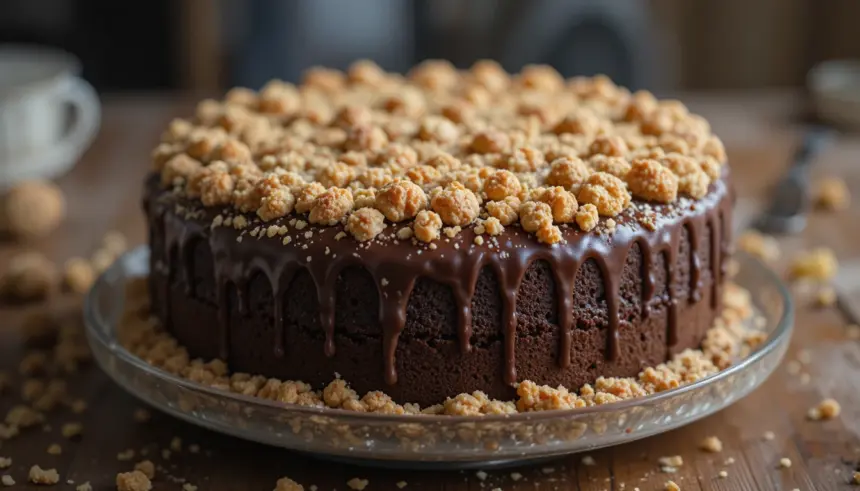
So, You’re Craving Cake (But, Like, Now)?
Alright, let’s be real. Sometimes that sweet tooth hits like a tiny, sugar-fueled meteor, and you need cake. Fast. But who has the time (or the energy) to whip up a five-layer masterpiece when Netflix is calling and that pile of laundry is judging you? Enter: This Chocolate Cake with Cookie Crumb Topping. It’s your new best friend for those “I need chocolate, and I need it yesterday” moments. Trust me on this one.
Why This Recipe is Practically Genius (And Totally Idiot-Proof)
Look, I’m not going to lie. I’m not exactly a Michelin-star chef. My kitchen often looks like a flour bomb went off. BUT, this cake? Even *I* managed to make it without setting off the smoke alarm. It’s ridiculously easy, requires minimal fancy equipment (a bowl and a whisk will do, folks!), and the payoff is HUGE. Plus, who doesn’t love cookies AND cake? It’s basically two desserts for the price of one. Talk about a win-win. And the cookie crumb topping? It’s like edible confetti for your taste buds. You’re welcome.
Ingredients You’ll Need (Don’t Panic, It’s Not Rocket Science)
- For the Cake:
- 1 ½ cups all-purpose flour (the regular kind, no need to be fancy)
- 1 cup granulated sugar (because, duh, cake)
- ¼ cup unsweetened cocoa powder (the darker, the more dramatic the flavor)
- 1 teaspoon baking soda (the magic puff ingredient)
- ½ teaspoon salt (to balance all that sweetness, obviously)
- 1 cup warm water (or coffee if you’re feeling adventurous and need a caffeine kick)
- ½ cup vegetable oil (or any neutral oil you have lurking in the pantry)
- 1 tablespoon white vinegar (don’t ask, just trust the science!)
- 1 teaspoon vanilla extract (the hug in a bottle)
- For the Cookie Crumb Topping:
- 1 cup crushed chocolate chip cookies (store-bought is totally fine, no judgment here)
- 2 tablespoons melted butter (the glue that holds our crunchy dreams together)
- Optional: A sprinkle of flaky sea salt (because everything tastes better with a little crunch and salt, IMO)
Step-by-Step Instructions (Let’s Do This Thing!)
- Preheat & Prep: Preheat your oven to 350°F (175°C). Grease and flour an 8×8 inch baking pan. This is crucial, folks, so your beautiful cake doesn’t become one with the pan.
- Dry Ingredients Unite: In a large bowl, whisk together the flour, sugar, cocoa powder, baking soda, and salt. Give it a good mix so everything’s friends.
- Wet Ingredients Dive In: In a separate bowl (or just make a well in your dry ingredients – we’re efficient here!), whisk together the warm water (or coffee!), vegetable oil, vinegar, and vanilla extract.
- Combine Forces: Pour the wet ingredients into the dry ingredients. Stir until *just* combined. Seriously, don’t overmix! A few little lumps are totally fine and add character.
- Bake it Up: Pour the batter into your prepared pan and spread it evenly. Bake for 30-35 minutes, or until a toothpick inserted into the center comes out clean.
- Cookie Magic: While the cake is baking, crush your cookies. Then, in a small bowl, mix the cookie crumbs with the melted butter until everything is nicely coated.
- Top It Off: Once the cake is out of the oven and still warm, generously sprinkle the cookie crumb mixture all over the top. Press down gently so it sticks.
- Cool Down & Devour: Let the cake cool in the pan for at least 10 minutes before slicing and devouring. Or, you know, eat it straight from the pan with a fork. No one’s watching.
Common Mistakes to Avoid (Or, How Not to Ruin Everything)
- Overmixing the batter: This is like giving your cake a stress-induced workout. It’ll make it tough, and nobody wants a tough cake.
- Not preheating the oven: Seriously, this is the culinary equivalent of wearing socks with sandals. Just don’t.
- Forgetting the vinegar: I know, it sounds weird. But it’s the secret to that lovely, moist texture. Don’t skip it!
- Underbaking or overbaking: A gooey center can be good, but a raw batter center is a no-go. And a dry, crumbly cake is just sad. Use that toothpick test!
- Skipping the cookie crumb topping: What are you even doing? That’s the best part!
Alternatives & Substitutions (Because We’re All About Flexibility)
- Coffee vs. Water: If you’re a coffee fiend, using warm coffee instead of water in the batter will give your chocolate cake an extra depth of flavor. It’s subtle, but it’s there, and I’m here for it.
- Cookie Choice: Don’t have chocolate chip cookies? No problem! Oreos (minus the cream, unless you’re feeling wild), shortbread, or even graham crackers will work for the topping. Just make sure they’re crumbly!
- Oil-Free (Kind Of): If you’re really committed to cutting down on oil, you *could* try applesauce, but honestly, the oil makes it so moist. Your call, but I’m sticking with oil.
FAQ (Your Burning Questions, Answered Casually)
Q: Can I make this cake in a round pan?
A: You sure can! Just adjust the baking time. Start checking around 25 minutes. You want that toothpick to come out clean, remember?
Q: My cookie crumbs are too dry, what gives?
A: Did you mix in enough butter? You want them to be clumpy and moist, like slightly damp sand. Add a tiny bit more melted butter if needed.
Q: Can I add frosting to this?
A: Oh, honey, you *can* add frosting. But I think the cookie crumb topping is pretty darn perfect on its own. It’s like a built-in crunchy, chocolatey hug. But hey, you do you!
Q: What if I don’t have vinegar? Can I use lemon juice?
A: Technically, yes, lemon juice can work in a pinch as an acid. But the flavor might be a little… zesty. Stick to vinegar if you can.
Q: How long will this cake last?
A: In my house? About 10 minutes. Realistically, it’s best eaten within 2-3 days. Store it covered at room temperature.
Q: Can I make cupcakes with this batter?
A: Yup! Fill your cupcake liners about two-thirds full and bake for 18-22 minutes. Top with cookie crumbs after they’ve cooled slightly. Easy peasy!
Final Thoughts (Go Forth and Bake!)
There you have it! A ridiculously easy, ridiculously delicious chocolate cake that’s perfect for any occasion (or just Tuesday). It’s proof that you don’t need to be a master chef to whip up something amazing. So go ahead, get your bake on. Now go impress someone—or yourself—with your new culinary skills. You’ve earned it! Happy baking!
“`
