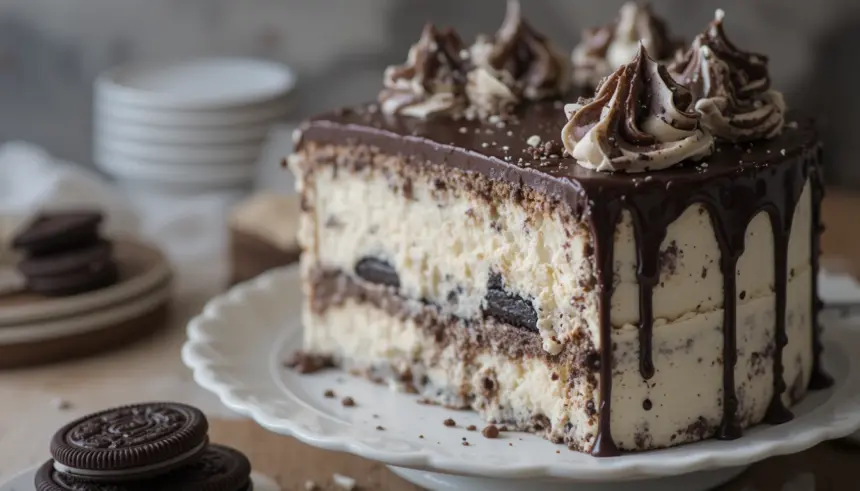
So, you’ve got that undeniable craving for something utterly decadent, something that screams “treat yourself!” but your motivation level is currently hovering somewhere between “nap” and “staring blankly at the wall,” right? Yeah, I get it. But guess what? You can totally conquer that craving without breaking a sweat. We’re talking about an Oreo Ice Cream Cake with Chocolate Ganache, and trust me, it’s ridiculously easy and ridiculously good. Prepare for deliciousness to happen.
Why This Recipe is Awesome
Okay, let’s be real. This isn’t rocket science. This is better than rocket science. It’s basically a cheat code to dessert heaven. You get the crunch of Oreos, the creamy coolness of ice cream, and the rich, glossy hug of chocolate ganache all in one glorious bite. Plus, it looks super fancy, so you can totally take credit for being a culinary genius. It’s a win-win-win. And FYI, it’s pretty forgiving, so even if you’re a little… uh… creative with measurements, it’ll probably still turn out amazing. No pressure!
Ingredients You’ll Need
- 1 pint (about 2 cups) of your favorite vanilla ice cream (or cookies ‘n cream if you’re feeling extra.)
- 1 sleeve of Oreos (about 14-16 cookies), crushed into fine crumbs. Think dust, not chunks.
- 2 tablespoons unsalted butter, melted. Don’t use that weird margarine stuff, please.
- 8 ounces good quality semi-sweet or dark chocolate chips. The better the chocolate, the better the ganache, just saying.
- 1/2 cup heavy cream. Full fat, no cheating here.
- Optional: A few extra Oreos for topping, because more is more, right?
Step-by-Step Instructions
- First things first, let your ice cream hang out on the counter for about 10-15 minutes. You want it soft enough to stir, but not a complete puddle. Think “perfectly scoopable.”
- While that’s softening, get your Oreo crumbs ready. Throw those bad boys in a zip-top bag and go to town with a rolling pin. Or just, you know, smash them. Whatever works.
- Now, mix those glorious crumbs with your melted butter. Stir it all up until it looks like wet sand.
- Press this mixture into the bottom of a 6-inch springform pan. Use the bottom of a glass or your hands to pack it down firmly. This is your crust, people!
- Pop that crust into the freezer for about 15 minutes to firm up. This is crucial for a clean slice later.
- Gently fold your softened ice cream into the bowl. Mix until it’s smooth and swirly. Don’t overmix, or it’ll get melty and sad.
- Spread that ice cream mixture evenly over your chilled Oreo crust. Smooth out the top with a spatula.
- Cover the whole thing tightly with plastic wrap and then foil. Now, it’s time for the freezer for at least 4 hours, or until rock solid. We’re talking ice-block solid.
- When the cake is frozen solid, let’s make that ganache. Microwave the heavy cream in a microwave-safe bowl for about 1 minute, or until it’s hot but not boiling.
- Pour the hot cream over your chocolate chips in a separate bowl. Let it sit for 5 minutes without stirring. This lets the chocolate melt gently.
- Now, whisk it all together until it’s super smooth and glossy. This is your magic potion.
- Let the ganache cool slightly on the counter for about 10-15 minutes. You want it pourable but not so hot it melts your ice cream.
- Remove the springform pan from the freezer. Carefully run a knife around the edge to loosen it. Release the sides of the pan.
- Pour that luscious ganache over the top of your frozen cake, letting it drip down the sides. If you’re feeling fancy, add those extra Oreos on top before the ganache sets.
- Return the cake to the freezer for at least another 30 minutes to let the ganache set.
Common Mistakes to Avoid
- Using ice cream that’s too soft: This will result in a melty mess and a soggy crust. Patience, young grasshopper.
- Not packing the crust firmly: A crumbly crust is a sad crust. Take the time to press it down good and proper.
- Pouring hot ganache on a frozen cake: Unless you want a melted disaster, let that ganache cool down a bit.
- Trying to slice it immediately after adding ganache: It needs time to set! Resist the urge.
Alternatives & Substitutions
Not a huge fan of vanilla? Swap it for mint chocolate chip, coffee, or literally any other ice cream that makes your heart sing. Feeling adventurous? Use chocolate ice cream for an extra chocolatey punch. Don’t have a springform pan? A regular 8-inch cake pan lined with plastic wrap will work, but it’s a bit more fiddly to get out. For the Oreos, any sandwich cookie will do the trick. Golden Oreos? Go for it! Even those fancy limited-edition ones. Why not?
FAQ (Frequently Asked Questions)
- Can I make this ahead of time? Absolutely! In fact, you *should*. This cake needs time to freeze properly, so it’s perfect for making a day or two in advance.
- How long will it last in the freezer? It’ll be good for about 1-2 weeks, but honestly, it’ll probably disappear much faster than that.
- What if I don’t have a food processor for the Oreos? No stress! A zip-top bag and a rolling pin (or a sturdy mug) are your best friends here.
- Can I use milk chocolate chips for the ganache? You *can*, but it might be a bit too sweet. Stick with semi-sweet or dark for that perfect balance.
- My ganache looks lumpy, what happened? Oops! Probably didn’t let the cream sit long enough, or you stirred it too soon. Try whisking it gently, and if all else fails, a little extra whisking sometimes fixes it.
- What if I don’t have a springform pan? As mentioned, a regular cake pan lined with plastic wrap (leaving overhang for lifting) works. Just be extra careful when removing it.
Final Thoughts
There you have it! An impossibly easy, ridiculously delicious Oreo Ice Cream Cake that’s guaranteed to impress. Whether you’re serving it at a party, for a birthday, or just because it’s Tuesday, it’s a guaranteed crowd-pleaser. Now go forth and conquer that dessert craving. You’ve got this! And remember, the most important ingredient is always a little bit of fun. Happy baking… or, well, assembling!

