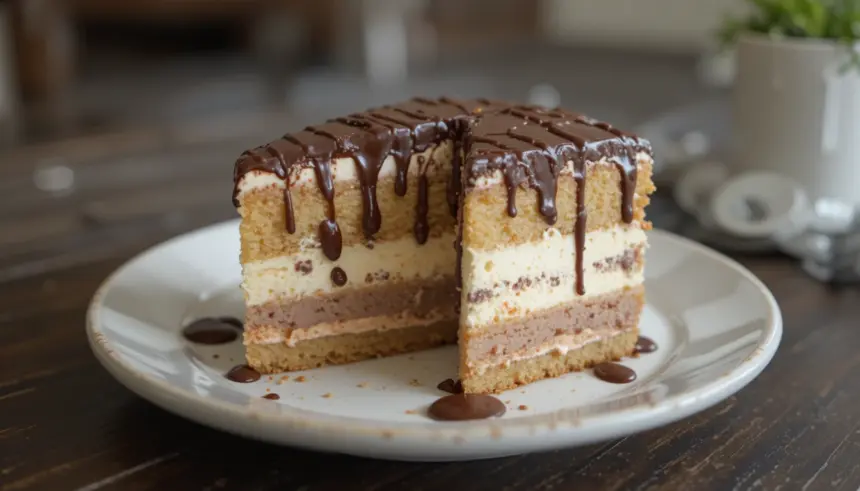
So, you’re looking to whip up something ridiculously delicious but also incredibly low-effort, huh? You’ve come to the right place, my friend! Forget those fancy, multi-day dessert projects. Today, we’re diving headfirst into the glorious world of a Layered Ice Cream Cake with a ridiculously decadent Chocolate Drizzle. Think of it as edible happiness, served in frosty, layered perfection. And yes, it’s as easy as it sounds (and then some).
Why This Recipe is Awesome
Let’s be honest, life’s too short for complicated desserts. This ice cream cake is basically a superhero in disguise. It requires minimal culinary wizardry, tastes like a million bucks, and looks way more impressive than the effort you’ll actually put in. It’s also incredibly versatile – a blank canvas for your wildest ice cream dreams! Plus, who doesn’t love ice cream cake? It’s a universal joy-bringer, IMO.
Ingredients You’ll Need
* Two (or three!) cartons of your favorite ice cream. Mix and match those flavors, people! Vanilla, chocolate, cookie dough, mint chip – go wild! Just make sure it’s softened slightly so it’s spreadable but not a soupy mess.
* About 2 cups of crushed cookies or graham crackers. Oreos are a classic, but digestives or even shortbread work wonders. We’re making a base, not performing surgery.
* 1/4 cup melted butter. This is the glue that holds our cookie dreams together.
* Chocolate syrup or melted chocolate for drizzling. The fancier, the better, but the good ol’ Hershey’s works too.
* Optional awesomeness: Sprinkles, chopped nuts, chocolate chips, whipped cream. Because why not?
Step-by-Step Instructions
1. **Get your pan ready.** Grab a springform pan (the kind with the removable sides, a lifesaver for cakes!). Line the bottom with parchment paper. This prevents a sticky situation later.
2. **Cookie crust creation.** In a bowl, mix your crushed cookies and melted butter. Press this glorious mixture firmly into the bottom of your prepared pan. Think of it as building a delicious foundation.
3. **Ice cream layer one.** Spread about half of your first ice cream flavor evenly over the cookie base. Work quickly! You want it semi-firm.
4. **More ice cream, please!** Add your second (and third, if you’re feeling decadent) ice cream flavor on top of the first. Gently spread it out. Make sure to smooth out the top as best you can.
5. **Freeze it like a polar bear.** Pop that bad boy in the freezer for at least 4-6 hours, or until rock solid. Patience is a virtue, especially when dessert is involved.
6. **The grand reveal.** Once frozen solid, carefully remove the sides of the springform pan. Place your masterpiece on a serving plate.
7. **Chocolate drizzle time!** Now for the pièce de résistance. Drizzle that melted chocolate or syrup all over the top. Go crazy with it! Add any other toppings you fancy.
8. **Serve and conquer.** Slice it up with a sharp knife (warm it under hot water for cleaner slices, FYI) and watch the smiles appear.
Common Mistakes to Avoid
* **Using ice cream that’s too soft.** If it’s melty and sad, your layers will get all muddled. You want it firm enough to scoop and spread.
* **Not freezing long enough.** Seriously, **don’t rush the freezing process**. A half-frozen cake is just a drippy mess. Patience, grasshopper!
* **Forgetting the parchment paper.** You’ll thank me later when you’re not wrestling a frozen slab out of the pan.
* **Skipping the chocolate drizzle.** Why would you do that to yourself? It’s the crowning glory!
Alternatives & Substitutions
* **Crust alternatives?** Feeling fancy? Try crumbled brownies or even a crushed pretzel base for a salty-sweet kick. A no-bake cookie crust is also a brilliant idea!
* **Ice cream flavors?** Sky’s the limit! I’m a big fan of pairing a fruity sorbet with a rich chocolate ice cream for a refreshing twist.
* **Chocolate drizzle options?** Melted dark chocolate, milk chocolate, white chocolate, caramel sauce, hot fudge… the world is your oyster (or, you know, ice cream cake). You could even make your own ganache if you’re feeling ambitious.
FAQ (Frequently Asked Questions)
* **”Can I make this ahead of time?”** Duh! This is the perfect make-ahead dessert. Just keep it frozen until you’re ready to serve.
* **”What if I don’t have a springform pan?”** No worries! A regular cake pan lined with plastic wrap (leave plenty of overhang for easy lifting) will work. Just be a bit more careful when removing it.
* **”Can I use store-bought cookie crumbs?”** Absolutely! It’s even easier.
* **”My ice cream is too hard to spread!”** Let it sit at room temperature for a few minutes, but keep a close eye on it. You want it spreadable, not a melted puddle.
* **”How do I cut this thing cleanly?”** Like I said, run your knife under hot water, wipe it dry, and slice. Repeat as needed. It’s the secret to a pretty slice.
* **”Can I add fruit to this?”** Sure! Fold some berries into your softened ice cream layers, but make sure they’re not too watery.
Final Thoughts
And there you have it! A show-stopping, jaw-dropping (but totally achievable) ice cream cake. It’s the perfect dessert for birthdays, celebrations, or just a Tuesday when you deserve something awesome. Now go forth and create some frosty magic. You’ve got this!
