“`html
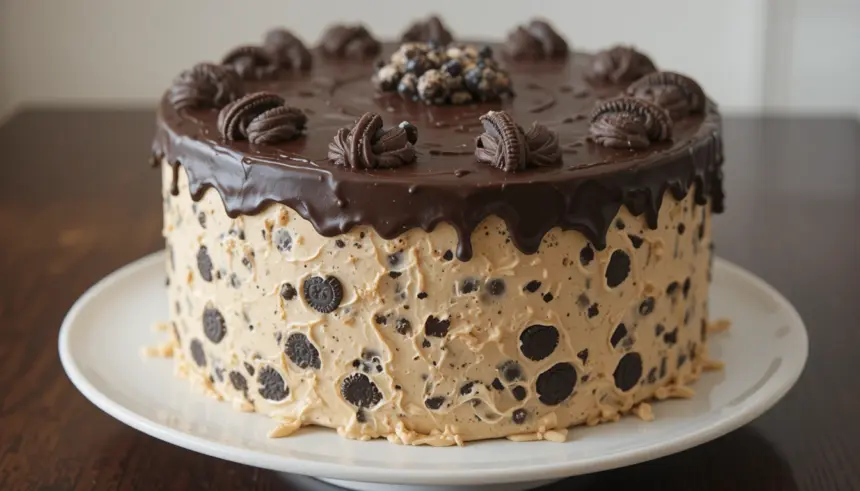
So you’re craving something ridiculously delicious but also, let’s be honest, a little bit lazy, huh? Well, friend, you’ve come to the right place! Forget those fancy, multi-step desserts that require a degree in culinary arts and a full day of your life. We’re talking about an Oreo Cookie Cake with Chocolate Frosting. It’s basically heaven in cake form, and guess what? Even *I* can make it without setting off the smoke alarm.
Why This Recipe is Awesome
Seriously, why is this recipe awesome? Because it’s practically magic. It takes minimal effort, tastes like a dream, and will have people singing your praises (or at least begging for the recipe). It’s the perfect solution for when you want to impress without the actual *stress*. Plus, it involves Oreos. Need I say more? It’s also a great way to use up that emergency stash of Oreos you’ve been hiding from yourself. You know the one.
Ingredients You’ll Need
- 1 ¼ cups all-purpose flour (the regular kind, don’t overthink it)
- ½ cup granulated sugar (for that little bit of sweet magic)
- ¼ cup unsweetened cocoa powder (this is where the chocolate goodness begins!)
- 1 teaspoon baking soda (to give it a little lift, like a good motivational speech)
- ½ teaspoon salt (because even dessert needs a touch of balance)
- ½ cup (1 stick) unsalted butter, softened (make sure it’s soft, like a cloud that’s seen better days)
- ¼ cup milk (any kind will do, but whole milk gives it a richer hug)
- 1 large egg (the binder of dreams)
- 1 teaspoon vanilla extract (the secret weapon of deliciousness)
- About 20-25 Oreos, roughly crushed (leave some chunky bits, for texture, obvi)
- For the Frosting:
- ½ cup (1 stick) unsalted butter, softened (again, soft butter is your friend)
- ⅓ cup unsweetened cocoa powder (more chocolate, because duh)
- 2 cups powdered sugar (this makes it fluffy and sweet)
- ¼ cup milk (adjust for desired consistency)
- 1 teaspoon vanilla extract (yes, again! Vanilla is a superhero)
- A handful of crushed Oreos for topping (because you can never have too many Oreos)
Step-by-Step Instructions
- Preheat your oven to 350°F (175°C). Grease and flour a 9-inch round cake pan. This is your foundation for awesomeness.
- In a large bowl, whisk together the flour, sugar, cocoa powder, baking soda, and salt. Give it a good stir, like you’re mixing up a potion of pure joy.
- Add the softened butter, milk, egg, and vanilla extract to the dry ingredients. Beat with an electric mixer on medium speed until just combined and smooth. Don’t go crazy; we’re not making meringue here.
- Gently fold in the crushed Oreos. You want to see those lovely cookie bits scattered throughout the batter. It’s like finding treasure!
- Pour the batter into your prepared cake pan and spread it evenly. Tap the pan gently on the counter a couple of times to release any air bubbles.
- Bake for 30-35 minutes, or until a wooden skewer inserted into the center comes out with moist crumbs attached (not wet batter). Let the cake cool in the pan for 10 minutes before inverting it onto a wire rack to cool completely. Patience, my friend, is key here.
- While the cake cools, whip up that frosting! In a bowl, beat the softened butter until creamy. Gradually beat in the cocoa powder and powdered sugar, alternating with the milk, until you have a smooth, spreadable frosting. Stir in the vanilla. Adjust milk as needed for that perfect consistency.
- Once your cake is completely cool (seriously, wait until it’s cool!), frost away! Slather that chocolate goodness all over the top. Then, sprinkle those extra crushed Oreos on top for that signature Oreo flair.
Common Mistakes to Avoid
- Thinking you don’t need to preheat the oven. Rookie mistake! Your cake will be sad and dense.
- Using melted butter instead of softened. This will make your batter oily and sad. Softened butter is your friend for a fluffy cake.
- Overmixing the batter. We’re not trying to develop gluten here, just create a delicious cake. Stop when it’s combined!
- Frosting a warm cake. Unless you want a chocolate puddle instead of frosting, let it cool *completely*. Trust me on this one.
- Not crushing enough Oreos. This is a crime against dessert. Go for it!
Alternatives & Substitutions
Feeling adventurous? Or maybe you’re missing a key ingredient? No worries!
- No Oreos? Any chocolate sandwich cookie will work! Or if you’re feeling *really* wild, chop up some chocolate chips and fold them in.
- Don’t have cocoa powder? You can use a chocolate cake mix as a base if you’re in a pinch, but where’s the fun in that? (Just kidding… mostly).
- Dairy-free? Use a dairy-free milk and a vegan butter alternative. Easy peasy!
- Frosting too thick? Add a tiny bit more milk, a teaspoon at a time. Too thin? Add a little more powdered sugar.
FAQ (Frequently Asked Questions)
Got questions? I’ve got (somewhat) casual answers!
- Can I make this in a different pan? Sure thing! A 8×8 inch square pan will work, but you might need to adjust the baking time slightly (check it a few minutes earlier).
- Can I use margarine instead of butter? Well, technically yes, but why hurt your soul like that? Butter gives you the best flavor and texture. IMO, it’s worth the splurge.
- How long will this cake last? In an airtight container at room temperature, it’ll be good for about 3-4 days. But let’s be real, it probably won’t last that long.
- Can I add anything to the batter? Absolutely! A handful of chocolate chips, some chopped nuts, or even a swirl of caramel would be delicious. Just don’t go overboard.
- My frosting is lumpy! What did I do wrong? Make sure your butter is truly softened and you’re not adding the powdered sugar too fast. Sometimes sifting the powdered sugar helps too!
- Can I make this gluten-free? You sure can! Just swap out the all-purpose flour for a good quality gluten-free all-purpose blend.
Final Thoughts
And there you have it! A ridiculously easy, incredibly delicious Oreo Cookie Cake that’s perfect for birthdays, Tuesdays, or just because you deserve a treat. It’s proof that you don’t need to be a master chef to make something truly spectacular. So go forth, bake with joy (and maybe a little bit of glee), and enjoy every single chocolatey, Oreo-studded bite. Now go impress someone—or yourself—with your new culinary skills. You’ve earned it!
“`
