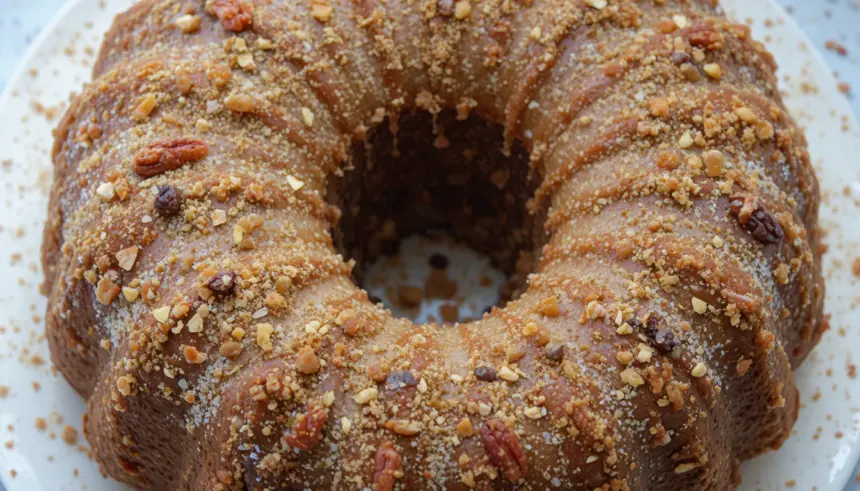
So, you’ve got that undeniable craving for something sweet, something comforting, something that screams “I’m the boss of this kitchen” without actually having to yell? And you *also* want it to be ridiculously easy because, let’s be honest, who has the energy for a culinary marathon on a Tuesday? Well, my friend, you’ve come to the right place. Get ready to whip up a Brown Sugar Pound Cake with Nuts that’s so good, it’ll make your taste buds do a happy dance.
Why This Recipe is Awesome
Honestly, this recipe is my superhero in cake form. It’s ridiculously forgiving, which means even if your oven temperature is a bit of a wild child, or you accidentally sprinkle in a smidgen too much flour, it’ll likely still turn out spectacularly. Plus, the brown sugar gives it this deep, caramel-y flavor that plain old white sugar just can’t compete with. And nuts? They add that perfect little crunch, turning a humble pound cake into a fancy-pants dessert. It’s basically elegance in a loaf pan, and you’re the one making it happen. Boom.
Ingredients You’ll Need
* **1 cup (2 sticks) unsalted butter**, softened to the point where it’s practically begging to be creamed.
* **2 cups packed light brown sugar** (because dark brown sugar might make it a *tad* too molasses-y for some).
* **4 large eggs**, room temperature. Cold eggs are like grumpy guests – they don’t mix well.
* **1 teaspoon vanilla extract**, the good stuff, not the imitation stuff that tastes like regret.
* **3 cups all-purpose flour**, spooned and leveled. Don’t just scoop it like you’re digging for buried treasure; that leads to dense cakes.
* **1/2 teaspoon salt**, to make all those sweet flavors sing.
* **1/2 cup sour cream** (or plain Greek yogurt if you’re feeling fancy/health-conscious-ish). This is the secret to moisture, FYI.
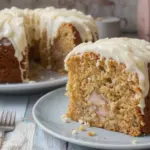
* **1 cup chopped nuts**, your choice! Pecans, walnuts, almonds – go wild! Lightly toasting them first? Chef’s kiss.
Step-by-Step Instructions
1. **Preheat your oven to 325°F (160°C).** Butter and flour a 9×5 inch loaf pan. You want your cake to slide out like it’s on a slip ‘n’ slide, not cling like a desperate ex.
2. **Cream the butter and brown sugar** in a large bowl with an electric mixer until light and fluffy. We’re talking at least 3-5 minutes. Patience, grasshopper.
3. **Beat in the eggs one at a time**, making sure each one is fully incorporated before adding the next. Then, stir in the vanilla extract.
4. **In a separate bowl, whisk together the flour and salt.** This ensures your salt is evenly distributed, so you don’t get any surprise salty bites.
5. **Add about half of the dry ingredients to the butter mixture**, mixing on low speed until just combined. Then, mix in the sour cream.
6. **Gradually add the remaining dry ingredients**, mixing until just combined. **Don’t overmix!** Seriously, resist the urge. Overmixing gluten is like overthinking a good joke – it ruins it.
7. **Gently fold in the chopped nuts.** Think of it as tucking them into bed for a delicious bake.
8. **Pour the batter into your prepared loaf pan** and smooth the top.
9. **Bake for 60-75 minutes**, or until a wooden skewer inserted into the center comes out clean. Ovens vary, so keep an eye on it!
10. **Let the cake cool in the pan for 15 minutes** before inverting it onto a wire rack to cool completely. This is the hardest part, I know.
Common Mistakes to Avoid
* **Using cold butter or eggs:** Seriously, they’re like stubborn mules when cold. Let them hang out at room temp for a bit!
* **Overmixing the batter:** This is the express train to a tough, rubbery cake. Mix until *just* combined.
* **Not preheating the oven:** This is like showing up to a party late and naked. Disaster.
* **Opening the oven door too early:** Resist the temptation! You’ll cause the cake to sink faster than a politician’s approval rating.
* **Not cooling it enough before slicing:** Impatience is a virtue that does *not* apply here. Let it cool, or you’ll have a crumbly mess.
Alternatives & Substitutions
* **Nuts:** Feeling nutty? Go for it! Almonds, pistachios, or even a mix of your favorites work wonders. No nuts? No stress! You can omit them entirely or toss in some chocolate chips – because who doesn’t love chocolate?
* **Sour Cream:** If sour cream isn’t your jam, Greek yogurt is a fantastic substitute. It adds that essential moisture and tang.
* **Brown Sugar:** While I’m obsessed with the depth of flavor brown sugar brings, you *could* use granulated sugar if you’re in a pinch. It just won’t have that same rich, caramel undertone. Your call, but I highly recommend sticking to brown sugar.
FAQ (Frequently Asked Questions)
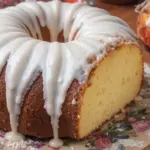
* **Can I make this in a bundt pan?** Oh, absolutely! Just adjust your baking time. Bundt cakes usually take a bit longer, so start checking around 70 minutes and go from there.
* **My cake looks a little lopsided. Is it ruined?** Nah, probably not! Unless it looks like the Leaning Tower of Pisa, a little wonkiness is totally fine. It’ll still taste amazing.
* **How long will this cake last?** Properly stored (wrapped tightly), it can last for a good 3-4 days at room temperature. If it’s super hot out, the fridge is your friend.
* **Can I add frosting?** Of course! A simple cream cheese frosting or a dusting of powdered sugar is divine. Or, keep it naked; it’s already a stunner on its own.
* **Why is my pound cake so dense?** Most likely culprit: overmixing! Or, you might have scooped your flour instead of spooning and leveling it. Rookie mistakes happen to the best of us!
* **Can I use margarine instead of butter?** Well, technically yes, but why hurt your soul like that? Butter gives pound cake its signature richness and texture. Margarine can lead to a different, often less desirable, outcome. IMO, butter is non-negotiable for pound cake perfection.
Final Thoughts
See? You totally did that! You’ve just created a masterpiece of comforting, nutty, brown-sugary goodness. Now, the most important step: devour it. Share it if you’re feeling generous, but don’t feel guilty if you keep most of it for yourself. You earned this moment of delicious victory. Now go impress someone – or yourself – with your new culinary skills. You’ve earned it!
