So you’re craving something tasty but too lazy to spend forever in the kitchen, huh? Same. We’ve all been there – staring into the fridge, dreaming of golden, crispy fries, but then remembering that whole “keto” thing and feeling a bit deflated. Well, buckle up, buttercup, because I’m about to drop some knowledge that will change your low-carb life for the better. Say hello to your new best friend: Keto Fries!
Why This Recipe is Awesome
Okay, let’s be real. Nobody wants a complicated recipe when the craving monster is roaring. This isn’t one of those “27 ingredients, three hours of prep, and a unicorn tear for seasoning” kind of deals. Nope, this bad boy is **idiot-proof**. Seriously, even I, a person who once set off the smoke detector making toast, can nail these. Here’s why you’ll be obsessed:
- They actually taste like *real* fries. No sad, soggy veggie sticks here, folks.
- Minimal ingredients, maximum flavor. We’re talking basic pantry staples.
- **Super low carb**, so you can munch without the guilt trip. Your macros will thank you.
- Quick and easy. From prep to plate, you’re looking at less time than it takes to decide what to watch on Netflix.
- Your non-keto friends will probably steal them. Consider yourself warned.
Ingredients You’ll Need
Gather ’round, my aspiring fry-makers! Here’s your shopping list. Don’t worry, it’s short and sweet.
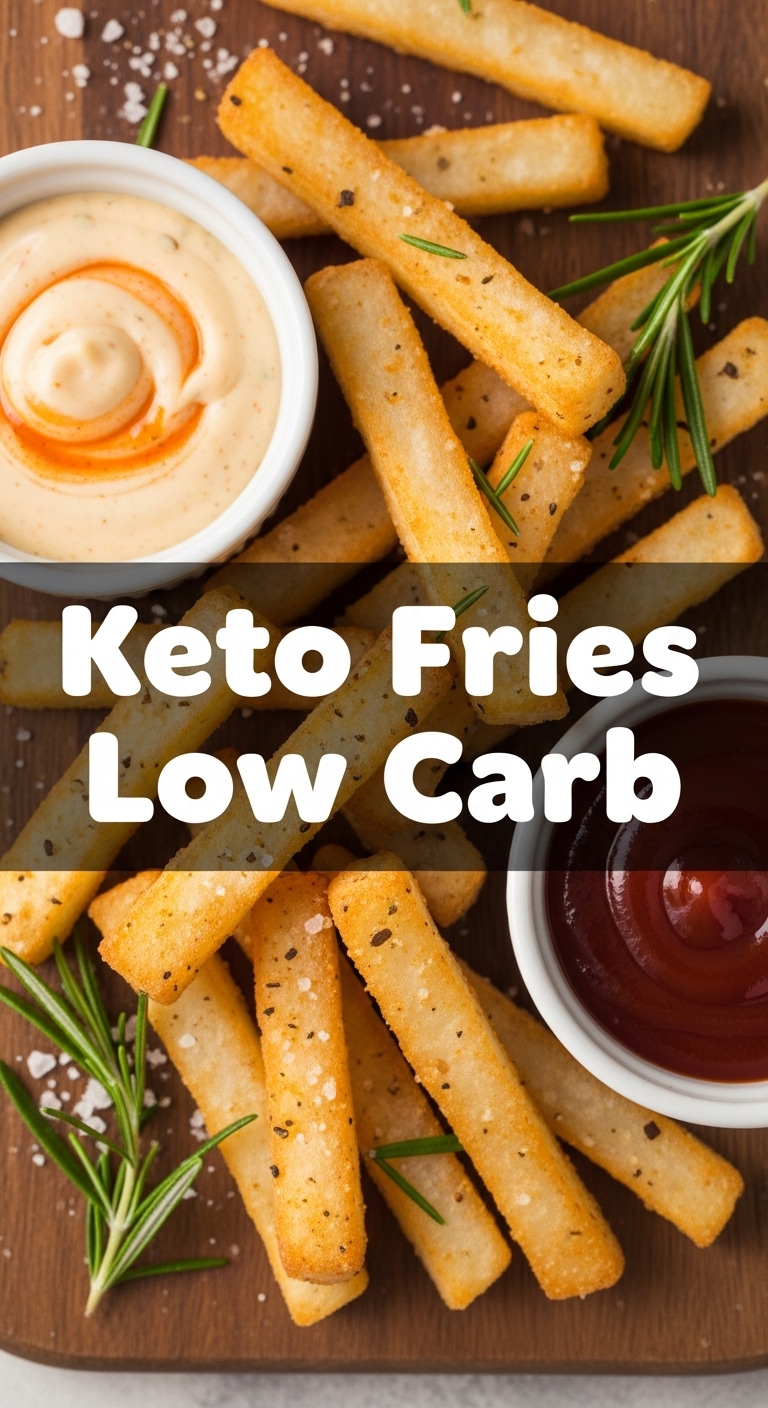
- 1 large Jicama or Rutabaga: This is our star, our undercover potato agent, our low-carb hero! Pick one that feels heavy for its size and has firm skin.
- 2 tablespoons Olive Oil or Avocado Oil: Your choice of healthy fat to get that gorgeous crisp.
- 1 teaspoon Salt: Because fries without salt are just sad, bland sticks.
- ½ teaspoon Black Pepper: A classic for a reason.
- 1 teaspoon Garlic Powder: Adds that irresistible savory punch.
- ½ teaspoon Paprika (Smoked or Regular): For a little color and a hint of smoky goodness.
- Optional: ¼ teaspoon Cayenne Pepper: If you like a little kick in your crunch.
Step-by-Step Instructions
Ready to get your hands a little dirty? (Just a little, I promise!) Follow these steps and prepare to be amazed.
- First things first: **preheat your oven to 400°F (200°C)**. Don’t skip this, it’s crucial for crispiness! While it’s heating, line a large baking sheet with parchment paper. Trust me, future-you will thank past-you for avoiding stuck-on messes.
- Now for the main event: Peel your jicama or rutabaga. It might take a bit of elbow grease, especially with rutabaga. Once peeled, **cut it into fry-like sticks**. Aim for roughly ¼-inch thick and 2-3 inches long. Try to make them as uniform as possible so they cook evenly.
- In a large bowl, toss your freshly cut “fries” with the olive or avocado oil. Make sure every single stick is lightly coated. Then, sprinkle in the salt, pepper, garlic powder, and paprika (and cayenne, if you’re feeling spicy). Toss again until all the seasonings are distributed.
- Spread your seasoned fries in a **single layer** on your prepared baking sheet. This is super important! If they’re crowded, they’ll steam instead of roast, leading to sad, floppy fries. Give them space!
- Bake for 20 minutes. Then, flip the fries over with a spatula and bake for another 15-20 minutes, or until they’re golden brown and wonderfully crispy. Keep an eye on them during the last few minutes, as oven temperatures can vary.
- Once they’re perfect, pull them out, let them cool for just a minute (they’ll crisp up even more!), and then dive in. Serve immediately with your favorite keto-friendly dipping sauce.
Common Mistakes to Avoid
We’ve all been there, messing up a simple recipe. Don’t be that person. Learn from my past culinary misadventures:
- Not Preheating the Oven: Rookie mistake! A cold oven equals soggy fries. **Always preheat!**
- Overcrowding the Baking Sheet: As mentioned, this is a one-way ticket to Steamyville, population: mushy fries. Use two baking sheets if you need to, but give those fries some room to breathe!
- Uneven Cuts: If some fries are thick and some are thin, you’ll end up with a mix of burnt and undercooked. **Strive for uniformity!**
- Under-Seasoning: Bland food is a crime. Don’t be shy with the salt and spices. Taste before you bake, if you dare.
- Pulling Them Out Too Soon: Patience, young padawan! They might look done, but give them those extra few minutes for maximum crisp factor.
Alternatives & Substitutions
Feeling adventurous or just missing an ingredient? No stress, we’ve got options!
- Other Veggies: If jicama or rutabaga isn’t your jam, you could try celeriac (celery root) for a similar texture, or even daikon radish. Zucchini can work, but it tends to be softer and needs a heavier hand with patting dry to avoid sogginess. Experiment!
- Oil Choices: Avocado oil is fantastic for high heat and neutral flavor. Coconut oil would add a slight tropical note, which could be interesting depending on your spice blend. Olive oil is always a reliable go-to.
- Seasonings Galore: Feel free to customize! Onion powder, smoked paprika, chili powder, Italian seasoning, or even a sprinkle of grated Parmesan cheese in the last few minutes for a cheesy crust are all amazing additions. Get creative!
- Air Fryer Method: Got an air fryer? You’re in luck! Toss the fries with oil and seasoning, then air fry at 375°F (190°C) for 15-20 minutes, shaking the basket every 5 minutes, until crispy. This often yields extra-crispy results!
FAQ (Frequently Asked Questions)
Got burning questions? I probably already thought of them. You’re welcome.
- Can I deep fry these instead? You *could*, but honestly, the oven or air fryer method usually gives a better, less oily result with jicama/rutabaga. Plus, less mess! Why hurt your soul with that oil splatter?
- How do I make them extra crispy? Two main tips: **don’t overcrowd the pan** (seriously, I’m not kidding!) and make sure your oven is properly preheated. Also, patting the raw veggie sticks dry before oiling can help remove excess moisture.
- Can I prepare them ahead of time? You can cut and season the jicama/rutabaga sticks and store them in an airtight container in the fridge for up to a day. But for best crispiness, I’d recommend baking them fresh. Reheated fries are rarely as good, IMO.
- What kind of dipping sauces work well? Oh, the possibilities! Sugar-free ketchup, homemade ranch, a spicy aioli, or even just a squeeze of lime juice with a sprinkle of Tajín. Your imagination is the limit!
- Are they *really* like regular potato fries? Look, they’re not potatoes. Let’s manage expectations here. BUT, they are darn close in texture and incredibly satisfying. For a keto alternative, they’re a revelation. You won’t feel deprived, I promise.
- Can I use frozen jicama/rutabaga? While technically possible, I’d advise against it for fries. Freezing changes the texture of these veggies, often making them softer and harder to crisp up properly. Stick to fresh for optimal results.
Final Thoughts
And there you have it, folks! Your new go-to recipe for when the fry cravings hit but you’re sticking to your low-carb guns. These Keto Fries are ridiculously easy, surprisingly delicious, and seriously satisfying. You’re basically a kitchen wizard now, transforming humble roots into golden, crispy perfection!
So, what are you waiting for? Go forth, impress yourself (and maybe your skeptical friends), and enjoy every single crunchy bite. You’ve earned this deliciousness!

