So you’re craving something warm, comforting, and utterly delicious, but the thought of all those carbs is making your keto-aligned brain do a little sad dance, huh? Same, friend, same. But what if I told you we could have our pie and eat it too, without the carb-guilt hangover? Today, we’re diving headfirst into the glorious world of Low Carb Shepherd’s Pie!
Why This Recipe is Awesome
Because it’s basically a warm hug in a bowl, but instead of the usual carb-fest, we’re swapping out the potatoes for our cruciferous hero: cauliflower! This dish is so shockingly easy, it tastes like you slaved all day (you didn’t, don’t worry, your secret’s safe with me), and even your pickiest non-keto friends might actually ask for seconds. Plus, it’s a brilliant way to sneak in some extra veggies without anyone noticing. **It’s practically magic, I tell ya!** And let’s be real, it’s totally idiot-proof, even I didn’t mess it up.
Ingredients You’ll Need
- The Meat of the Matter: 1.5 lbs ground beef or lamb (go for 80/20 for flavor, live a little!)
- Aromatics Assembly: 1 medium onion, chopped; 2-3 cloves garlic, minced (because vampires are real, folks)
- The Sneaky Veggies (Optional but Recommended): 1-2 stalks celery, diced; maybe 1/2 cup sliced mushrooms for extra earthiness (skip if you’re not a fung-uy)
- Liquid Gold: 1 cup beef broth (low sodium, obvs)
- Flavor Boosters: 2 tbsp tomato paste; 1 tbsp Worcestershire sauce (the umami fairy dust)
- Herby Goodness: 1 tsp dried thyme; 1/2 tsp dried rosemary (or fresh if you’re feeling fancy)
- Salt & Pepper: To taste (don’t be shy, season like you mean it!)
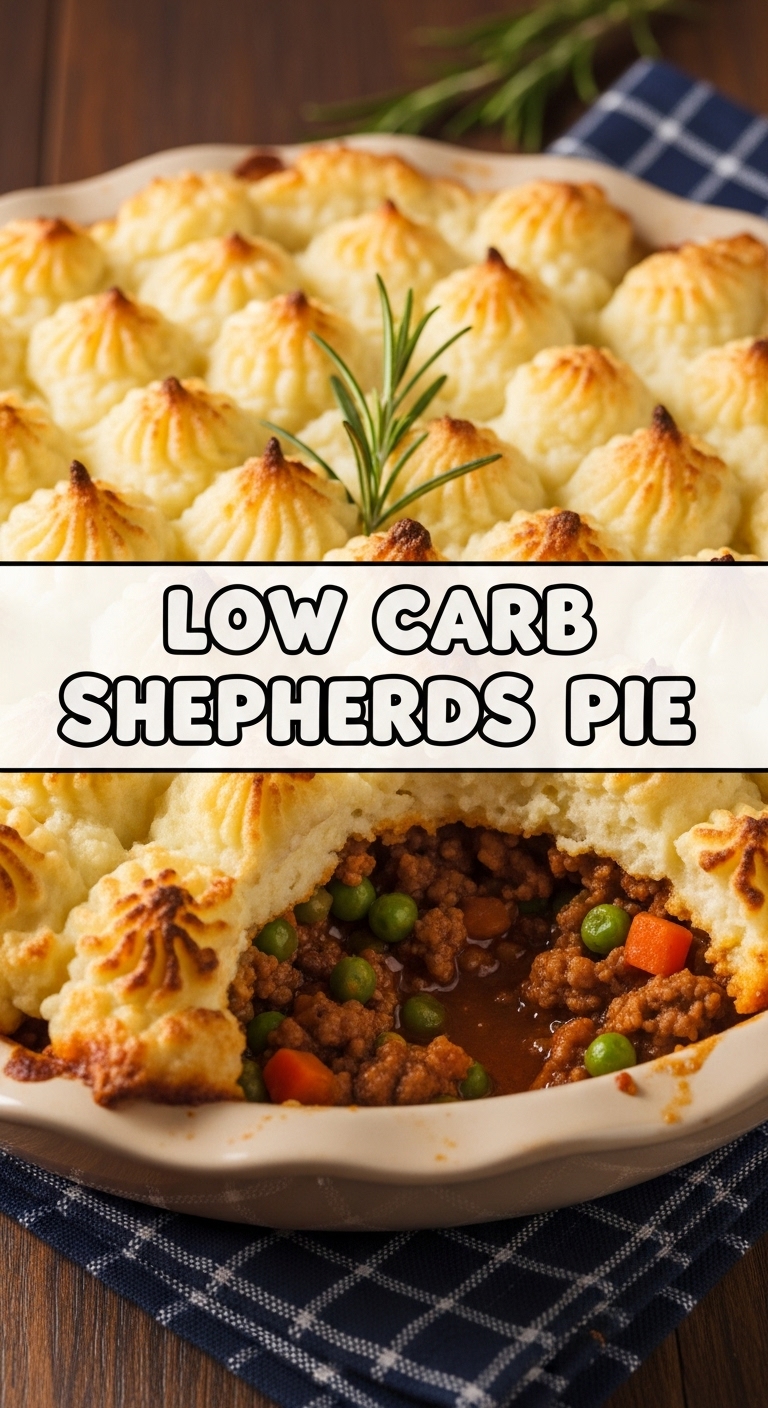
- Cauliflower Power: 1 large head cauliflower, chopped into florets (our low-carb superhero!)
- Dairy Dreams for the Mash: 1/4 cup heavy cream or cream cheese; 2 tbsp butter (because butter makes everything better, **IMO**)
- Cheesy Crown (Optional but encouraged): 1/2 cup shredded cheddar or Parmesan (for that glorious golden crust)
Step-by-Step Instructions
- Cauli-Prep Party: Get your cauliflower florets tender. Steam, boil, or microwave ’em until they’re super soft. Drain really well – **this is key for non-watery mash!**
- Meat Mania: In a large oven-safe skillet (or a regular skillet if you’re transferring later), brown your ground meat over medium-high heat. Break it up as it cooks. Once browned, drain any excess grease. We want flavor, not an oil slick!
- Aromatic Awesomeness: Toss in the chopped onion and celery (if using) with the browned meat. Sauté for 5-7 minutes until they soften. Add the minced garlic and mushrooms (if using) and cook for another minute until fragrant.
- Flavor Town Express: Stir in the tomato paste, Worcestershire sauce, dried thyme, and rosemary. Cook for a minute to toast the spices, then pour in the beef broth. Bring it to a simmer, then reduce heat and let it bubble gently for 5-10 minutes until the sauce thickens slightly. Season generously with salt and pepper.
- Mash Magic: While the meat mixture simmers, mash your cooked cauliflower. Add the heavy cream (or cream cheese) and butter. Mash until smooth and creamy. A hand blender works wonders here for super silky mash! Taste and adjust seasoning – it often needs more salt and pepper than you think!
- Assemble Your Masterpiece: Pour the meat mixture into a 9×13 inch baking dish (if you didn’t use an oven-safe skillet). Evenly spread the cauliflower mash over the top of the meat. If you’re feeling cheesy, sprinkle that shredded goodness all over the mash.
- Bake It ‘Til You Make It: Pop it into a preheated oven at **375°F (190°C)** for 20-25 minutes, or until the filling is bubbly and the top is beautifully golden brown. If you want extra browning on the cheese, hit it with the broiler for the last 2-3 minutes, but **watch it like a hawk!**
- Patience, Grasshopper: Let your pie rest for 5-10 minutes before serving. This helps it set and prevents it from turning into a sloppy (but delicious) mess.
Common Mistakes to Avoid
- **The Soggy Bottom Blues:** Not draining the meat *and* the cauliflower properly. You want flavor, not a swimming pool in your pie!
- **Under-Seasoning the Cauli:** Seriously, cauliflower mash needs a generous hand with salt and pepper. It’s not a potato, it’s a blank canvas!
- **Impatience is Not a Virtue:** Rushing the baking or not letting it rest. You’ll end up with a wobbly, falling-apart pie. Give it time to set, trust me.
- **Forgetting to Preheat:** Rookie mistake. Always preheat! Your pie deserves a warm welcome and even cooking.
Alternatives & Substitutions
- **Meat Swaps:** Ground lamb (traditional!), ground turkey, or even a mix of ground pork and beef work great in the filling.
- **Veggie Remix:** Instead of celery or mushrooms, try a handful of frozen green beans, diced zucchini, or even a bit of spinach wilted into the meat mixture. Just avoid high-carb root veggies if you’re strictly low-carb.
- **Dairy-Free Mash:** Swap heavy cream for full-fat coconut cream and butter for a dairy-free butter alternative.
- **Cheese Please:** Any good melting cheese will do for the topping! Gruyere, mozzarella, or a sharp white cheddar would be delish.
FAQ (Frequently Asked Questions)
- “Can I make this ahead of time?” Absolutely! Assemble the pie, cover it, and pop it in the fridge for up to 2 days. Just add an extra 10-15 minutes to the baking time if baking from cold.
- “Is it freezer-friendly?” You bet! Bake it, let it cool completely, then wrap individual portions (or the whole thing) tightly and freeze for up to 3 months. Thaw in the fridge overnight and reheat.
- “I hate cauliflower. Any other low-carb topping ideas?” Oof, tough crowd! You could try a turnip or celeriac mash, but they have a slightly different flavor profile. Or just embrace the cauli, you might be surprised!
- “What’s the best way to get super smooth mash?” A potato ricer or an immersion blender after the cauliflower is cooked and drained will give you the silkiest mash.
- “Can I use store-bought pre-minced garlic?” Well, technically yes, but why hurt your soul (and your taste buds) like that? Fresh is always best, **FYI**. But hey, no judgment if you’re in a pinch!
- “How long does it last in the fridge?” Covered tightly, it’s good for 3-4 days. Perfect for meal prepping!
Final Thoughts
See? I told you it was easy! You just whipped up a gourmet, low-carb masterpiece that’s going to make your taste buds sing. Go on, pat yourself on the back, you culinary genius. Enjoy every delicious, guilt-free bite of that warm, comforting goodness. Now go impress someone—or yourself—with your new culinary skills. You’ve earned it!


