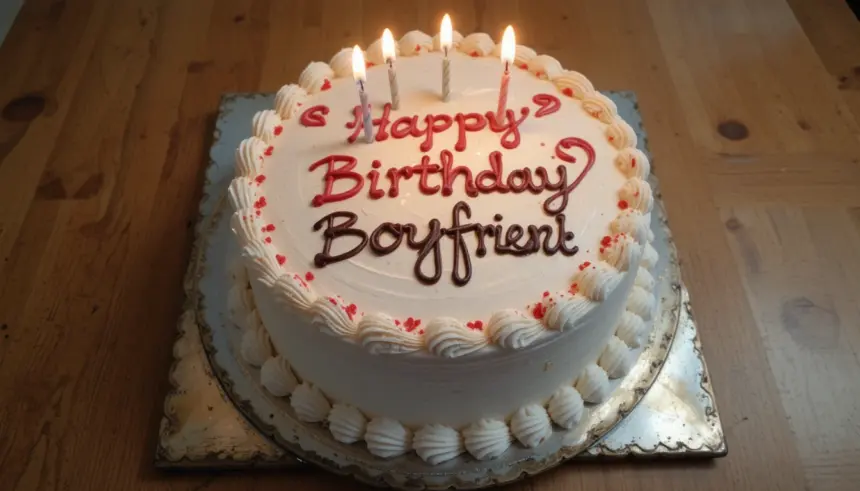
So, your main squeeze’s birthday is sneaking up, and you wanna whip up something sweet without, you know, actually *stressing out* and turning your kitchen into a war zone? Girl, I hear you. And I got you. We’re talking simple, we’re talking delicious, and we’re talking a homemade cake that says “I love you” way better than any store-bought number. Let’s make some magic!
Why This Recipe is Awesome
Okay, first things first: This isn’t just *any* recipe. This is THE recipe for when you want to look like a culinary genius but actually put in minimal effort. It’s basically **idiot-proof** – even I didn’t mess it up, and my track record with baking is… let’s just say “adventurous.”
Seriously though, this cake is super moist, packed with chocolatey goodness, and comes together faster than you can say “Happy Birthday, babe!” Plus, it uses super basic ingredients you probably already have lurking in your pantry. No fancy-pants stuff here, just pure, unadulterated deliciousness that will totally impress your boyfriend (and his taste buds). You might even trick him into thinking you spent hours slaving away. Mission accomplished!
Ingredients You’ll Need
Get ready, buttercup! Here’s what you need to gather for your masterpiece. Don’t worry, it’s all chill stuff.
- 1 ½ cups (190g) All-Purpose Flour: The foundation of all good things cakey.
- 1 ½ cups (300g) Granulated Sugar: For that sweet, sweet love.
- ½ cup (45g) Unsweetened Cocoa Powder: Because chocolate is always the answer.
- 1 teaspoon Baking Soda: Our fluffy friend.
- ½ teaspoon Baking Powder: The baking soda’s equally important sidekick.
- 1 teaspoon Salt: Just a pinch, to make everything taste *more*. Don’t skip it!
- 2 large Eggs: Binders, baby! And they add richness.
- 1 cup (240ml) Milk: Whole milk is great, but whatever you’ve got works. Adds moisture!
- ½ cup (120ml) Vegetable Oil: This is our secret weapon for a super moist cake. Seriously, **don’t use melted butter here if you want ultimate moistness.**
- 2 teaspoons Vanilla Extract: The MVP of flavor. Go for the good stuff if you can!
- 1 cup (240ml) Boiling Water (or hot coffee): Sounds wild, but it makes the chocolate flavor *pop*. Trust the process!
For the Easy Chocolate Buttercream Frosting:
- 1 cup (226g) Unsalted Butter: Softened, please! Take it out of the fridge an hour or two before.
- 3-4 cups (360-480g) Powdered Sugar (Confectioners’ Sugar): Your frosting’s best friend. Sift it if you’re feeling fancy to avoid lumps.
- ½ cup (45g) Unsweetened Cocoa Powder: More chocolate, because why not?
- ¼ cup (60ml) Heavy Cream (or milk): To get that perfect silky consistency.
- 1 teaspoon Vanilla Extract: A little extra flavor boost!
Step-by-Step Instructions
Alright, apron on, good tunes playing, let’s get baking!
- Preheat & Prep Party: Get that oven fired up to 350°F (175°C). Then, grab two 8-inch round cake pans. Grease ’em well with butter or cooking spray, then dust with a little flour. **Seriously, don’t skip the greasing and flouring, or your cake will stage a rebellion.**
- Dry Mix Magic: In a large mixing bowl, whisk together the flour, sugar, cocoa powder, baking soda, baking powder, and salt. Make sure there are no lumpy bits. You want everything well combined.
- Wet Mix Wonders: In a separate, medium bowl, whisk together the eggs, milk, vegetable oil, and vanilla extract until they’re all friends.
- Combine Forces: Pour the wet mixture into the dry mixture. Mix on low speed (or by hand with a whisk) until *just* combined. You want to see some streaks of flour, not a completely smooth batter yet.
- The Secret Weapon Revealed: Carefully, and I mean carefully, pour in the boiling water (or hot coffee). The batter will be super thin, and you might think you messed up. Don’t panic! Whisk it all together until smooth. This step is **FYI**, pure magic for chocolate cakes.
- Bake It Up: Divide the batter evenly between your two prepared cake pans. Pop them into your preheated oven and bake for 30-35 minutes, or until a toothpick inserted into the center comes out clean.
- Cool Down Crew: Let the cakes cool in their pans on a wire rack for about 10-15 minutes. Then, carefully invert them onto the wire rack to cool completely. **This is crucial – do not even *think* about frosting warm cakes unless you enjoy a melted, sliding mess.**
- Frosting Time! (while cakes cool): While your cakes are chilling out, let’s make some glorious buttercream. In a large bowl, beat the softened butter with an electric mixer until it’s super light and creamy (about 2-3 minutes). Gradually add the powdered sugar, cocoa powder, vanilla extract, and a splash of heavy cream. Start with 3 cups of sugar and add more if you want it sweeter or thicker. Beat until the frosting is light, fluffy, and spreadable. Add more cream/milk if it’s too thick, or more powdered sugar if it’s too thin.
- Assemble & Decorate: Once your cakes are *fully* cool (we’re talking room temperature, folks!), it’s assembly time! Place one cake layer on your serving plate. Slather a generous amount of frosting on top. Place the second cake layer on top, then frost the top and sides of the entire cake. Get creative! Smooth it out, make some swirls, or go for that rustic, imperfect look. It’s homemade, after all!
Common Mistakes to Avoid
Listen, we all make mistakes. But here are a few rookie errors to steer clear of if you want this cake to be a success story:
- Not preheating your oven: Thinking you don’t need to preheat? That’s like trying to run a marathon without warming up. Your cake won’t bake evenly, if at all.
- Overmixing the batter: Once you add the wet to the dry, mix until *just* combined. Overmixing develops the gluten too much, and you’ll end up with a tough, rubbery cake. No one wants that.
- Not greasing AND flouring your pans: A sticky situation indeed! If you skip this, your beautiful cake layers will mock you by refusing to come out of the pan in one piece.
- Frosting warm cakes: I cannot stress this enough. Frosting a warm cake is a one-way ticket to melted, runny, frosting disaster-ville. Be patient!
- Skipping the boiling water/hot coffee: I know it sounds counterintuitive, but it’s crucial for the texture and truly enhances that deep chocolate flavor. It’s not just for making coffee, you know!
- Eyeballing ingredients: Baking is a science, my friend. Use proper measuring cups and spoons for best results. It’s not like cooking where you can just “add a bit more.”
Alternatives & Substitutions
Feeling a little rebellious, or just missing an ingredient? No worries, we’ve got options!
- No Cocoa Powder? No Problem! Want a vanilla cake instead? Just omit the cocoa powder from the cake batter (and frosting!) and maybe add an extra teaspoon of vanilla extract to both. Boom, vanilla cake!
- Milk Alternatives: Almond, oat, soy, or even lactose-free milk will all work just fine in the cake batter. Dairy-free dream, anyone?
- Oil vs. Butter in Cake: While I highly recommend vegetable oil for that ultimate moistness, you can swap it for an equal amount of melted unsalted butter if you prefer the buttery flavor. Just know your cake might be slightly less moist. **IMO**, oil wins for this recipe!
- Frosting Variations: Not a buttercream fan? Try a simple chocolate ganache (melted chocolate chips with heavy cream, pour over cool cake), or even a cream cheese frosting for a tangy twist. If you’re really in a rush, a simple dusting of powdered sugar can look elegant too!
- Coffee Not Your Jam? If the thought of coffee in your cake makes you cringe, just use plain boiling water. It still does the trick for enhancing the chocolate flavor without adding a coffee taste.
FAQ (Frequently Asked Questions)
Got questions? I’ve got (casual) answers!
- Can I make this gluten-free? Absolutely! Just use a 1:1 gluten-free all-purpose flour blend in place of regular flour. Make sure your blend contains xanthan gum!
- How long does this cake last? Covered tightly at room temperature, it’s good for 2-3 days. In the fridge, it’ll last up to a week. But honestly, it’ll probably be gone before then.
- Can I bake it in one pan instead of two? You can! Use a 9×13 inch pan, but the baking time will be longer (probably 40-50 minutes). Just keep an eye on it and use the toothpick test.
- What if I don’t have baking soda AND baking powder? Can I just use one? Uh oh. No, my friend. They do different jobs and are both essential for the cake’s lift and texture. Time for a quick grocery run!
- Can I half the recipe if I only want a small cake? You totally can! Just use half of all the ingredients and bake in two 6-inch pans or even as cupcakes. Adjust baking time accordingly.
- Is this recipe *really* for beginners? OMG yes. If you can measure ingredients and follow instructions, you can make this cake. It’s designed to be foolproof, trust me.
- Can I use margarine instead of butter for the frosting? Well, technically yes, but why hurt your soul (and your taste buds) like that? Butter just makes the frosting so much richer and creamier. Splurge a little!
Final Thoughts
Phew! You did it! You just baked a whole damn cake from scratch, and it’s going to be amazing. Seriously, give yourself a massive pat on the back. This simple birthday cake for your boyfriend isn’t just a dessert; it’s a testament to your (newfound) baking skills and your sweet efforts. He’s going to love it, and **you** should be super proud.
Now, go impress someone—or just yourself, honestly—with your new culinary prowess. You’ve earned every single bite. Enjoy the cake, enjoy the compliments, and happy birthday to your lucky guy!
