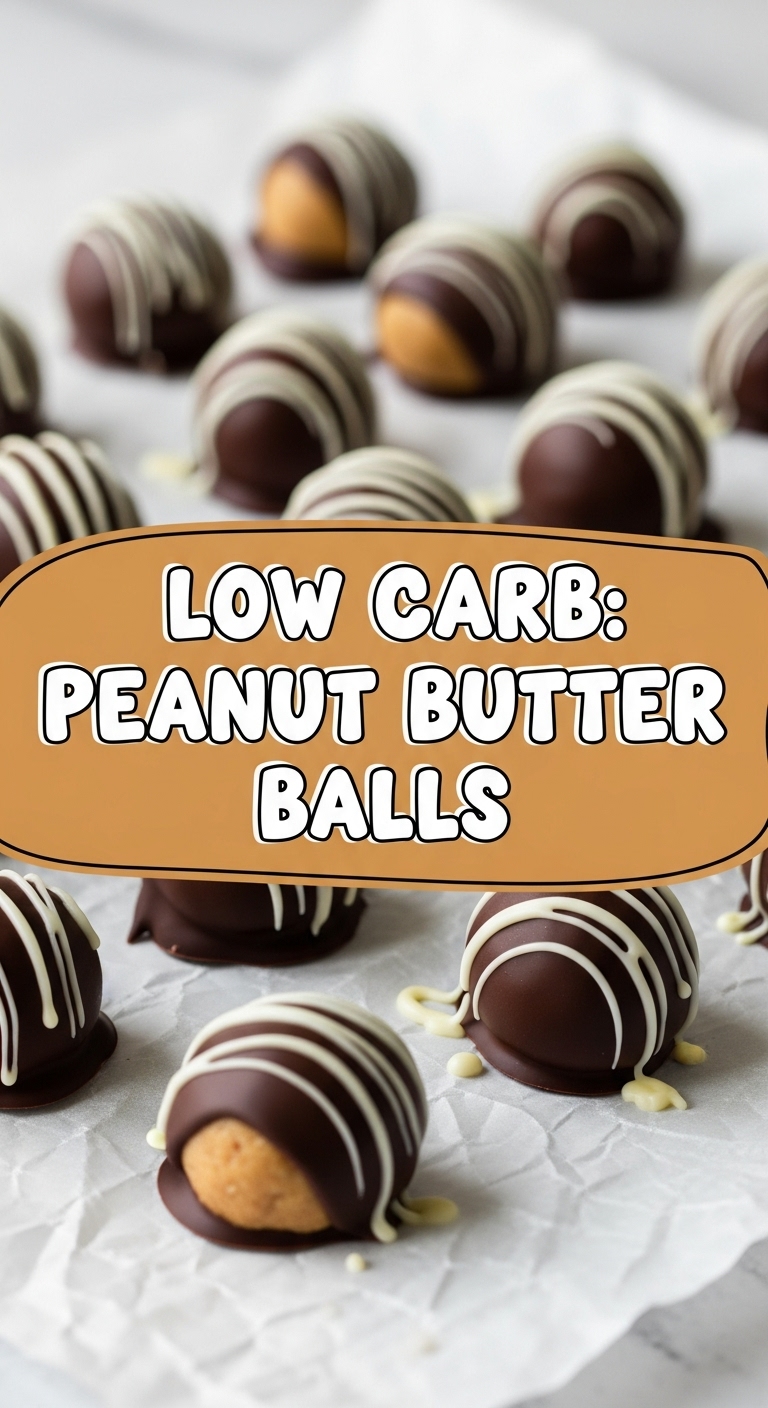
So, you’re hit with that all-too-familiar craving. You know, the one where your brain screams “GIMME SOMETHING SWEET AND PEANUT BUTTERY!” but your jeans quietly whisper, “Maybe not the whole cake, friend?” Yeah, I get it. And guess what? I’ve got your back. Forget complicated baking projects that leave your kitchen looking like a war zone and your patience worn thin. We’re talking about making these glorious, ridiculously easy, low-carb peanut butter balls that taste like pure joy and take minimal effort. Seriously, even I, the queen of kitchen chaos, can whip these up without a single culinary meltdown.
Why This Recipe is Awesome
Okay, let’s break down why these little nuggets of deliciousness are about to become your new best friend. First off, they’re **no-bake**. That’s right, no oven required! You can keep your oven mitts tucked away in their drawer, probably judging your life choices. Second, they’re low-carb, which means you get all that decadent flavor without the sugar crash or the carb guilt. Winning! Third, they’re practically **idiot-proof**. If you can stir and roll, you can make these. I’m telling you, it’s so simple, even my cat watched me make them with an air of mild approval. Plus, they come together in like, 15 minutes flat (plus chill time, but that’s passive effort, so it doesn’t count!).
Ingredients You’ll Need
Get ready for a shockingly short list. You probably have most of this stuff lurking in your pantry already. No obscure, “where do I even buy that?” ingredients here!
- **1 cup Creamy Peanut Butter:** The good stuff. Make sure it’s the natural kind, without added sugar. The runnier, oily type works best for texture.
- **1/2 cup Powdered Erythritol (or other granulated low-carb sweetener):** This is where the sweet magic happens without the sugar. Powdered is key for a smooth texture, so don’t skip that!
- **1/4 cup Butter, melted (or Coconut Oil for dairy-free):** This is our binding agent and flavor booster. Go for the good butter; your tastebuds will thank you.
- **1 teaspoon Vanilla Extract:** Adds that warm, comforting “dessert” vibe. Don’t underestimate its power!
- **Pinch of Salt:** Just a tiny bit to balance the sweetness and really make that peanut butter flavor pop.
- **Optional: Sugar-Free Chocolate Chips or Unsweetened Cocoa Powder:** For when you’re feeling fancy or just need that chocolate fix.
Step-by-Step Instructions
Alright, apron on (or not, we’re not judging), let’s get rolling!
- **Melt and Mix:** Grab a medium-sized mixing bowl. Melt your butter (or coconut oil) in the microwave for about 30 seconds until it’s liquid. Pour it into the bowl.
- **Combine Everything Else:** Add the peanut butter, powdered erythritol, vanilla extract, and pinch of salt to the bowl with the melted butter.
- **Stir It Up, Buttercup:** Get a sturdy spoon or a spatula and mix everything together. Keep stirring until it’s **super well combined** and forms a thick, uniform “dough.” It should be firm enough to roll. If it feels too sticky, pop it in the fridge for 10 minutes to firm up a bit.
- **Roll ‘Em Out:** Now for the fun part! Scoop out small amounts of the mixture – about 1 tablespoon each – and roll them between your palms into cute little balls. They don’t have to be perfect spheres, embrace the rustic charm!
- **Optional Chocolate Dip/Roll:** If you’re using chocolate chips, melt them gently (microwave in 30-second bursts, stirring each time). You can either drizzle the melted chocolate over your balls or roll them completely in it. If using cocoa powder, just roll the balls in it for a delicious, slightly bitter coating.
- **Chill Out:** Place your beautiful peanut butter balls on a plate or a baking sheet lined with parchment paper. Stick them in the fridge for at least 30 minutes to firm up. This step is crucial, don’t skip it!
- **Devour:** Once they’re firm, they’re ready to be devoured. Store any leftovers (if there are any, let’s be real) in an airtight container in the fridge.
Common Mistakes to Avoid
Because nobody wants a peanut butter ball tragedy, right? Pay attention, rookie!
- **Not Chilling Enough:** This isn’t just a suggestion; it’s a command. If you try to eat them straight away, they’ll be a soft, glorious mess. Delicious, but messy. **Patience, my friend!**
- **Using Granulated Sweetener Instead of Powdered:** Unless you like crunchy peanut butter balls (which is a different recipe entirely), do not use regular granulated sweetener. It won’t dissolve properly, and your balls will be gritty. Trust me, I made this mistake so you don’t have to.
- **Ignoring the Salt:** It seems tiny, but that pinch of salt really elevates the flavors. Don’t skip it unless you want something a bit bland.
- **Using Very Runny Natural Peanut Butter without Adjustment:** Some natural PBs are super runny. If your mixture feels too soft even after chilling for a bit, add a tiny bit more powdered sweetener until it firms up.
Alternatives & Substitutions
Feeling adventurous? Or just out of an ingredient? Here are some ideas:
- **Nut Butter Swap:** Not a peanut butter fan? Or maybe you’re allergic? You can totally swap the peanut butter for almond butter, cashew butter, or even sunflower seed butter (for a nut-free option). Just make sure they’re natural and unsweetened.
- **Sweetener Switch:** Erythritol is my go-to, but you could use allulose, xylitol (just keep it away from dogs!), or a monk fruit/erythritol blend. Always use powdered for the best texture!
- **Make it Vegan:** Super easy! Just use coconut oil instead of butter. Boom, vegan-friendly deliciousness.
- **Add-ins:** Want more texture? Stir in some finely chopped nuts (pecans, walnuts), shredded unsweetened coconut, or even some hemp seeds for a protein boost.
- **Coatings Galore:** Beyond chocolate, you can roll these in unsweetened cocoa powder, finely chopped nuts, or even a sprinkle of flaky sea salt for a gourmet touch.
FAQ (Frequently Asked Questions)
- **”Can I use crunchy peanut butter?”** Technically, yes, but the texture will be, well, crunchy. If you’re into that, go for it! For a smooth, melt-in-your-mouth experience, creamy is the way to go.
- **”How long do these last?”** In an airtight container in the fridge, they’re usually good for up to a week. If they even last that long. Mine typically disappear within 2-3 days, mysteriously.
- **”Can I freeze them?”** Absolutely! They freeze beautifully. Pop them in a freezer-safe bag or container, and they’ll be good for a couple of months. Just let them thaw for a few minutes before eating. **Pro tip: they’re surprisingly good frozen too!**
- **”My mixture is too sticky to roll! Help!”** Don’t panic! This usually means it’s a bit too warm or your peanut butter was extra runny. Just pop the bowl into the fridge for 10-15 minutes, then try again. It should firm right up.
- **”Can I make these sweeter?”** If your sweet tooth is extra demanding, you can add another tablespoon or two of powdered erythritol. Just remember to taste as you go!
Final Thoughts
So there you have it, folks! Your new favorite low-carb, no-bake, utterly delightful peanut butter balls. They’re quick, they’re easy, and they’re exactly what you need when that craving hits. Now go impress someone—or yourself—with your new culinary skills. You’ve earned it, you glorious, low-carb snack hero! Enjoy every single, guilt-free bite!

