Okay, listen up, fellow holiday survivor! Christmas is coming, and you know what that means: a whole lot of joy, a whole lot of chaos, and a whole lot of tiny humans bouncing off the walls. How do we survive it? Food crafts, my friend. Edible ones, because let’s be real, who needs more plastic junk filling up the house? Today, we’re diving into the glorious world of Christmas edible crafts for kids that are so easy, even *you* (yes, you!) won’t break a sweat. Let’s get sticky!
Why This Recipe is Awesome
Because it’s basically a magic trick! This edible craft keeps the kids busy (for at least 15 blissful minutes, which, let’s be honest, feels like an eternity during the holidays). It tastes delicious, and you get to look like a Pinterest parent without *actually* putting in Pinterest-level effort. Plus, it’s virtually impossible to mess up, even after your third eggnog. Trust me, I’ve tested it. No fancy skills needed, just a willingness to embrace the sprinkle explosion.
Ingredients You’ll Need
Gather ’round, my little helpers (or just you, armed with coffee and a silent prayer). Here’s what you’ll need for our super fun, super edible, and super low-stress Christmas craft:
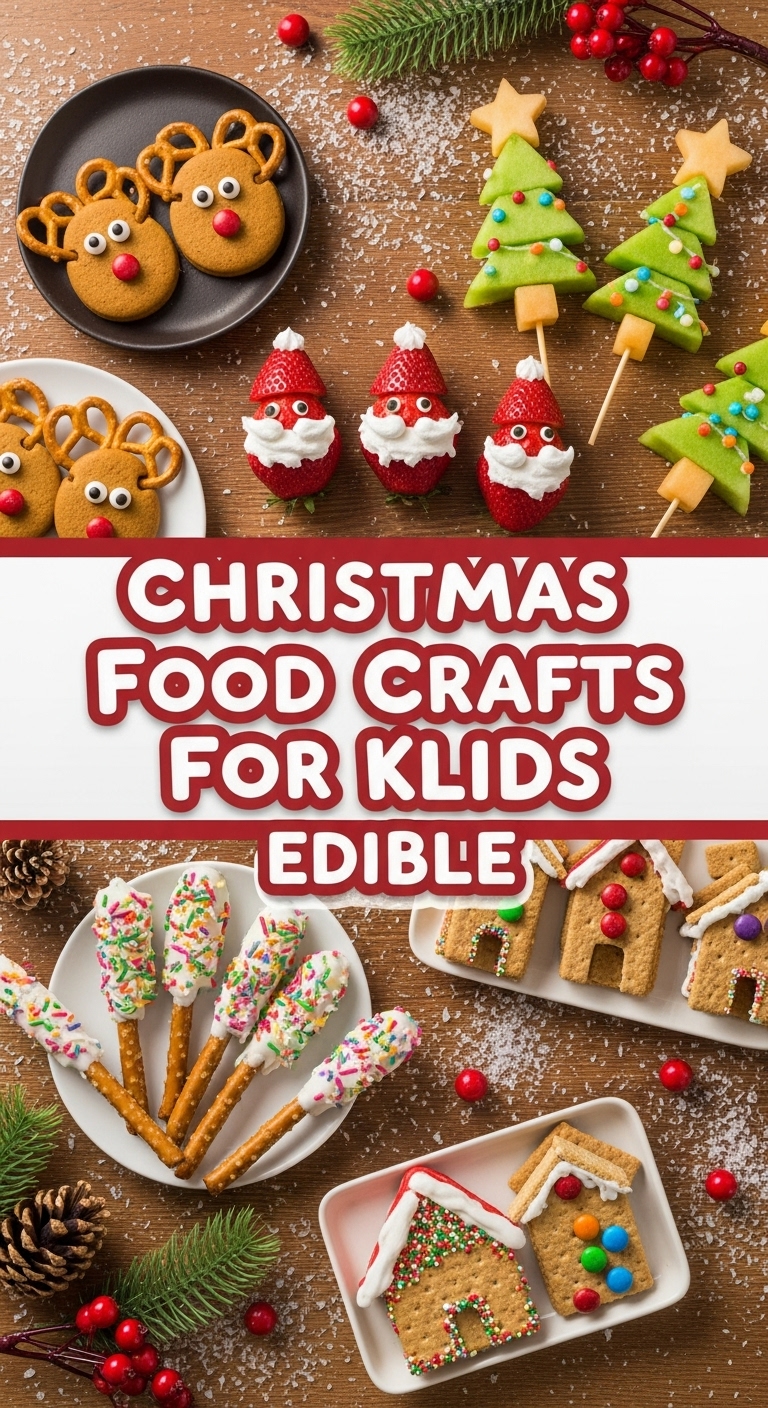
- Pretzel Rods: The sturdy kind, not those wimpy little twists. We need something that can handle a serious chocolate dip and a kid’s enthusiastic decorating.
- Chocolate: Your choice! White, milk, dark – pick your poison. Or all three for a colorful, delicious array. Chocolate chips or candy melts work best for easy melting.
- Sprinkles: Oh, the sprinkles! The more ridiculous, the better. Think jingle bell shapes, snowflakes, plain colorful chaos, edible glitter. Seriously, go wild.
- Crushed Candy Canes: Because smashing things is therapeutic for both kids and adults. Plus, peppermint and chocolate are a match made in heaven.
- Mini M&Ms/Skittles: For little pops of color and crunch. Small candies are easier for tiny hands to manage.
- Parchment Paper: Your sanity’s best friend. Do NOT skip this unless you enjoy scrubbing hardened chocolate off your kitchen counter.
- Baking Sheet(s): To hold all your masterpieces (and contain the inevitable sprinkle fallout).
Step-by-Step Instructions
Alright, let’s get those little hands busy (and maybe sneak a few ingredients yourself, I won’t tell). These steps are short, sweet, and to the point.
- Prep Your Station: First things first, line your baking sheet(s) with parchment paper. This is your foundation for success, folks. Trust me on this one.
- Melt Your Chocolate: Grab your chosen chocolate (chips or candy melts) and a microwave-safe bowl. Microwave in 30-second bursts, stirring really well after each burst. Don’t overheat it! We want smooth, dippable goodness, not a clumpy, sad chocolate disaster. If using a double boiler, keep the water barely simmering.
- Dip Those Pretzels: Hold one end of a pretzel rod and dip about two-thirds of it into the melted chocolate. Give it a gentle swirl and let any excess chocolate drip off back into the bowl. We’re aiming for a nice, even coating.
- Decorate Like a Boss: Before the chocolate sets, this is where the magic happens! Let the kids go absolutely wild with sprinkles, crushed candy canes, M&Ms, whatever edible glittery goodness you’ve got. You can roll the pretzel in a shallow dish of sprinkles or just sprinkle them on top.
- Let Them Set: Carefully place your decorated pretzel rods on the prepared parchment paper. If you’re impatient (like me!), pop the baking sheet into the fridge for 10-15 minutes to speed up the setting process.
- Devour (or Share!): Once the chocolate is firm, your delicious, festive, and kid-made pretzel wands are ready to eat! Or, if you’re feeling incredibly generous, you can package them up as cute holiday gifts.
Common Mistakes to Avoid
Even though this craft is practically foolproof, there are a few little oopsies that can happen. Learn from my chocolate-covered mistakes, my friend!
- Overheating the Chocolate: This is the big one. Too much heat and your chocolate will seize up and turn into a grainy, unworkable mess. Low and slow, people! Microwave in short bursts, stirring, stirring, stirring.
- Not Enough Sprinkles: Is there even such a thing as “too many sprinkles”? IMO, no. But running out mid-craft can cause a mini-meltdown (from the kids, not the chocolate). Stock up!
- Letting Kids Eat All the Sprinkles *Before* They Touch a Pretzel: Happens to the best of us. Set boundaries early, or have a secret “snack sprinkle” stash.
- Forgetting the Parchment Paper: Seriously, I warned you! Hardened chocolate directly on a baking sheet is no fun to clean. Learn from my past life of scrubbing.
- Trying to Do This After a Full Day of Holiday Shopping: Your patience will be tested. Prep everything *before* the madness, or save it for a less draining day.
Alternatives & Substitutions
Feeling creative? Or maybe you just ran out of pretzel rods (gasp!). No worries, here are some fun alternatives:
- Different Bases: Instead of pretzel rods, try large marshmallows on sticks (for cute “snowmen”), Nilla Wafers, plain digestive biscuits, or even plain sugar cookies. The chocolate dipping method works for almost anything!
- Chocolate Varieties: If you don’t have regular chocolate chips, candy melts are a fantastic, super-easy alternative, especially for vibrant colors like red and green. You can also use good quality baking chocolate, just chop it finely for easier melting.
- Topping Swaps: No candy canes? Try mini chocolate chips, shredded coconut (looks like snow!), chopped nuts (if no allergies), mini gummy bears, or even crushed cereals for extra crunch.
- Dietary Needs: For dairy-free versions, use dairy-free chocolate chips. Gluten-free pretzel rods are also readily available if needed! See? Everyone can join the fun.
FAQ (Frequently Asked Questions)
Got questions? I’ve got answers! (Mostly.)
- Can I use regular chocolate bars instead of chips? Yep, absolutely! Just chop ’em up into smaller pieces first so they melt more evenly and quickly.
- My chocolate seized! What now? Oh, the heartbreak! Unfortunately, once chocolate seizes (turns clumpy and stiff), it’s really hard to bring it back. Your best bet is to start over with fresh chocolate. Better luck next time, chef!
- How long do these decorated pretzels last? In an airtight container at room temperature, they’ll probably be good for a week or two. But let’s be real, they rarely last that long in my house!
- Can the kids help with melting the chocolate? Supervised, absolutely! It’s a great opportunity to teach them about kitchen safety. But maybe you handle the initial hot-out-of-the-microwave transfer yourself. Safety first!
- What if I don’t have parchment paper? Aluminum foil works in a pinch, but make sure to spray it lightly with non-stick spray first. Otherwise, you might end up with foil-covered chocolate (not ideal).
- Is this *actually* easy? My friend says all “kid crafts” are secretly hard. My friend, if I can do it, you can do it. It’s practically a no-brainer. The biggest challenge is usually just containing the sprinkle chaos. You’ve got this!
- Can adults join in the decorating fun? Is that even a question?! Grab a pretzel, grab some sprinkles, and embrace your inner child. It’s a fantastic stress-reliever during the holidays, trust me.
Final Thoughts
See? Told you it was easy! Now you’ve got happy kids (or at least momentarily distracted ones), a cute edible craft, and you didn’t even break a sweat. You’ve created something delicious and memorable, and you’ve kept the holiday spirit alive without losing your mind. Go on, pat yourself on the back. You’ve earned that extra cookie (or five). Happy crafting, you magnificent human!


