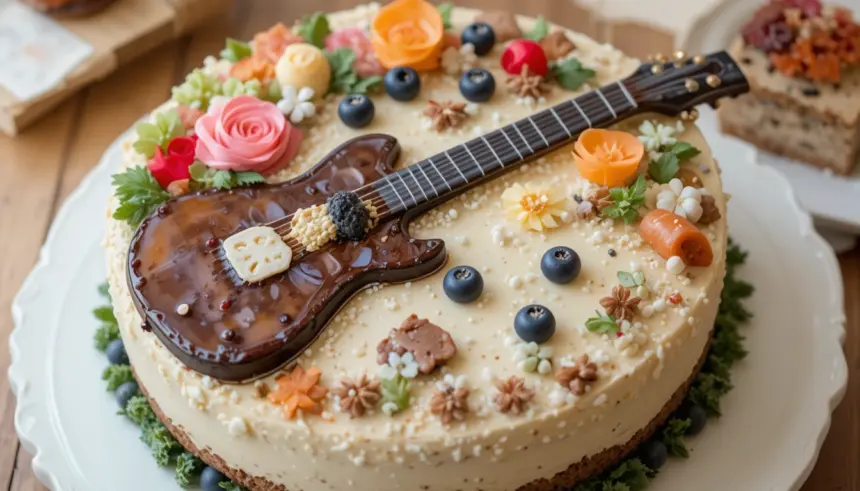
So, you’ve got a favorite playlist on repeat, a cozy blanket, and suddenly a craving hits. But not just any craving, oh no. We’re talking something cute, personal, and maybe a little extra. Something that screams “I love music and also tiny, perfect cakes!” Enter: the Bento Cake Music Design. Because why have a regular cake when you can have a mini masterpiece that hits all the right notes? (See what I did there? 😉)
Why This Recipe is Awesome
Honestly, this isn’t just a recipe; it’s a mood. This bento cake is the culinary equivalent of your favorite indie playlist – small, perfectly formed, and makes you feel good. It’s awesome because:
- It’s literally a **personal-sized party**. No sharing required, unless you’re feeling generous (but why start now?).
- It’s surprisingly **easy to decorate** with a music theme. Seriously, if you can draw a wonky stick figure, you can pipe a musical note.
- It looks super impressive without requiring a culinary degree. Your friends will be like, “Whoa, did you *make* that?” And you’ll just casually shrug.
- The whole process is a vibe. Put on some tunes, get your baking groove on, and enjoy the sweet, sweet symphony of success.
Ingredients You’ll Need
Time to gather your band members for this delicious jam session. We’re keeping it simple for a small 4-inch cake. Double if you want to make two (one for you, one for… still you).
- For the Cake Batter (Vanilla is our chosen melody):
- 1/2 cup (113g) unsalted butter, softened (the star of the show, don’t skimp!)
- 3/4 cup (150g) granulated sugar (for that sweet, sweet harmony)
- 1 large egg, room temperature (the binder, keeps it all together)
- 1 teaspoon vanilla extract (the soulful flavor)
- 1 cup (120g) all-purpose flour, sifted (the foundation)
- 1 teaspoon baking powder (our little lift kit)
- 1/4 teaspoon salt (brings out all the other flavors, don’t forget it!)
- 1/2 cup (120ml) whole milk, room temperature (for a tender crumb)
- For the Buttercream Frosting (Piping perfection!):
- 1/2 cup (113g) unsalted butter, softened (again, quality matters here)
- 2 cups (240g) powdered sugar, sifted (for smooth moves)
- 1 teaspoon vanilla extract (more flavor, yes please!)
- 1-2 tablespoons milk or cream (to get that perfect consistency)
- Pinch of salt (optional, but good for cutting sweetness)
- Food coloring: black (for notes!), maybe a pop of color for the background if you’re feeling fancy.
Step-by-Step Instructions
Alright, maestro, let’s get baking! Follow these simple steps and you’ll be rocking out in no time.
- Prep Your Stage: Preheat your oven to 350°F (175°C). Grease and flour a 4-inch round cake pan (or line with parchment paper). This is crucial! No one likes a sticky situation.
- Cream It Up: In a medium bowl, cream together the softened butter and granulated sugar until it’s light and fluffy. Like, 3-5 minutes of good beating. This adds air and makes your cake tender.
- Egg-cellent Addition: Beat in the egg and vanilla extract until just combined. Don’t overmix here, we’re not making scrambled eggs.
- Dry Meets Wet: In a separate bowl, whisk together the sifted flour, baking powder, and salt. Now, gradually add the dry ingredients to the wet ingredients, alternating with the milk. Start and end with flour. Mix until just combined – **stop as soon as you don’t see any dry streaks**. Overmixing develops gluten, making your cake tough. No thanks!
- Bake It Till You Make It: Pour the batter into your prepared pan. Bake for 25-30 minutes, or until a toothpick inserted into the center comes out clean. Let it cool in the pan for 10 minutes, then invert onto a wire rack to cool completely. Patience, young padawan!
- Whip Up the Frosting: While your cake cools, beat the softened butter for your buttercream until creamy. Gradually add the sifted powdered sugar, vanilla, and salt. Then, slowly add milk/cream, one tablespoon at a time, until you reach your desired piping consistency. It should be smooth and spreadable, but not runny.
- Cake Layering (If You Cut It): If your cake rose significantly, you might want to level it and slice it horizontally to make two thinner layers. Spread a thin layer of frosting between the cake layers.
- Crumb Coat Magic: Apply a thin layer of frosting all over your cake. This is called a crumb coat, and it traps any loose crumbs, giving you a smooth canvas later. Chill the cake in the fridge for 15-20 minutes until the crumb coat is firm.
- Final Frosting Flourish: Once chilled, apply a thicker, even layer of your main frosting color to the cake. Use an offset spatula or bench scraper to smooth it out.
- Design Your Masterpiece: Divide a small portion of your frosting and color it black. Fit a piping bag with a small round tip (like Wilton 3 or 4). Pipe small musical notes, a treble clef, or even tiny piano keys onto your cake. Get creative! Think simple and elegant.
Common Mistakes to Avoid
Even the pros (like me, sometimes!) trip up. Here’s how to sidestep some common recipe pitfalls and keep your cake looking like a dream, not a disaster:
- Not Preheating the Oven: Rookie mistake! Your cake needs that immediate heat boost to rise properly. Don’t be that person.
- Overmixing the Batter: Remember, once the wet and dry ingredients meet, it’s a quick mix. Mix too much, and your cake will be dense and chewy instead of light and fluffy. We want fluffy!
- Not Sifting Powdered Sugar: Lumps in your buttercream? Not cool. Sift that sugar, my friend, for silky smooth frosting.
- Impatience with Cooling: Trying to frost a warm cake is like trying to ice skate uphill – messy and pointless. Wait until it’s **completely cool**, or your frosting will melt and slide off.
- Ignoring the Crumb Coat: Skipping this step is like trying to play a symphony without tuning your instruments first. You’ll end up with crumbs in your beautiful outer layer, and nobody wants a confetti cake when they asked for a music cake.
Alternatives & Substitutions
Feeling adventurous? Or just out of an ingredient? Here are some quick fixes and fun twists:
- Gluten-Free: Swap out the all-purpose flour for a 1:1 gluten-free baking blend. Easy peasy!
- Dairy-Free: Use plant-based butter (like Miyoko’s Kitchen) and a dairy-free milk (almond, oat, or soy) for both the cake and frosting.
- Flavor Swap: Instead of vanilla, try almond extract for a marzipan-y vibe, or a dash of instant espresso powder for a mocha cake. For the frosting, consider adding some lemon zest or a fruit puree for a different flavor profile.
- Design Simplicity: If piping notes feels too intimidating, you can use edible markers (food-grade pens) to draw on the cooled, frosted cake. Or, just sprinkle some cute musical note sprinkles if you can find them!
- Chocolate Lover’s Dream: For a chocolate cake, reduce flour by 1/4 cup and add 1/4 cup unsweetened cocoa powder. For chocolate buttercream, melt some good quality chocolate and stir it into your finished frosting. Yum!
FAQ (Frequently Asked Questions)
Got questions? I’ve got (mostly) witty answers!
- Can I make this cake ahead of time? Absolutely! Bake the cake layers, wrap them tightly in plastic wrap, and freeze for up to a month. Thaw in the fridge, then frost. You can also make the frosting a few days ahead and store it in the fridge, then re-whip before using.
- My buttercream is too stiff/too runny, what do I do? Too stiff? Add milk/cream a teaspoon at a time. Too runny? Add more sifted powdered sugar a tablespoon at a time. It’s like adjusting the volume on a speaker – fine-tuning is key!
- How do I get my musical notes to look neat? Practice makes perfect, but for a bento cake, small is often better. Use a very small round piping tip, keep consistent pressure, and pipe on chilled frosting. And hey, a little rustic charm never hurt anyone!
- Can I use a different size cake pan? Sure, but you’ll need to adjust baking time and possibly ingredients. For a 6-inch pan, you might need 1.5x the recipe and a slightly longer bake. Always test with a toothpick!
- What if I don’t have a piping bag? No worries! A Ziploc bag with a tiny corner snipped off works in a pinch. Just don’t snip too big a hole, or your notes will look more like blobs.
- How long does a bento cake last? Covered and stored in the fridge, it’ll be good for 3-4 days. But honestly, it’s so delicious, it probably won’t last that long. 😉
Final Thoughts
And there you have it, folks! Your very own bento cake, infused with a love for music and a whole lot of deliciousness. This little cake is perfect for celebrating small wins, treating yourself, or making someone’s day a little brighter. It’s a sweet, personal gesture that says, “I made this just for you… or just for me.” Now go impress someone—or yourself—with your new culinary skills. You’ve earned it!
