So you’re staring at the clock, the kids are bouncing off the walls, and the phrase “I’m bored!” is starting to sound like a broken record, huh? Same. What if I told you we could turn that energy into mad scientist vibes right in your kitchen? No fancy gadgets, just pure, unadulterated food fun. Get ready to unleash your inner mad food scientist, because boredom is officially on the chopping block!
Why This Recipe is Awesome
Because, let’s be real, screen time limits are hard, and craft supplies run out faster than ice cream in summer. This “recipe” for fun is basically guaranteed giggles and maybe, just maybe, some sneaky learning without anyone realizing they’re doing science. It’s affordable, uses stuff you probably already have, and the mess is part of the magic (mostly). Plus, who doesn’t love playing with their food? It’s basically permission to do all the things your mom told you not to. Winning!
Ingredients You’ll Need
- A few curious kids (or adults!): The main ingredient, obviously. Bring their sense of wonder, a dash of patience, and a willingness to get a little sticky.
- Food Coloring: The magic dust of the food experiment world. Don’t skimp on this! More colors, more fun.
- Sugar: Granulated, powdered, brown – any kind works. It’s not just for sweetness; it’s for science!
- Various liquids: Water (duh), clear sodas (Sprite, 7UP), milk, fruit juices. The more variety, the better.
- Baking Soda & Vinegar: The classic fizzy duo. Think mini volcanoes, but in a cup.
- Red Cabbage: Yep, this humble veggie is secretly a pH indicator. Prepare for some mind-blowing color changes!
- Cornstarch: For that legendary non-Newtonian fluid experience (aka Oobleck!).
- Clear Glasses/Jars: Essential for observing all the cool stuff happening. Transparency is key.
- Spoons & Droppers: For precise (or not-so-precise) mixing and transferring.
- Measuring Cups/Spoons: Because even mad scientists need a little accuracy.
- Tray or Newspaper: To contain the chaos. Trust me on this. Cleanup is always easier when you plan for it.
Step-by-Step Instructions
Prep Your Mad Scientist Lab: Lay down that newspaper or grab a big tray. This is ground zero for edible (and sometimes non-edible but food-based) science. Get all your “ingredients” within easy reach. Safety first, fun immediately after!
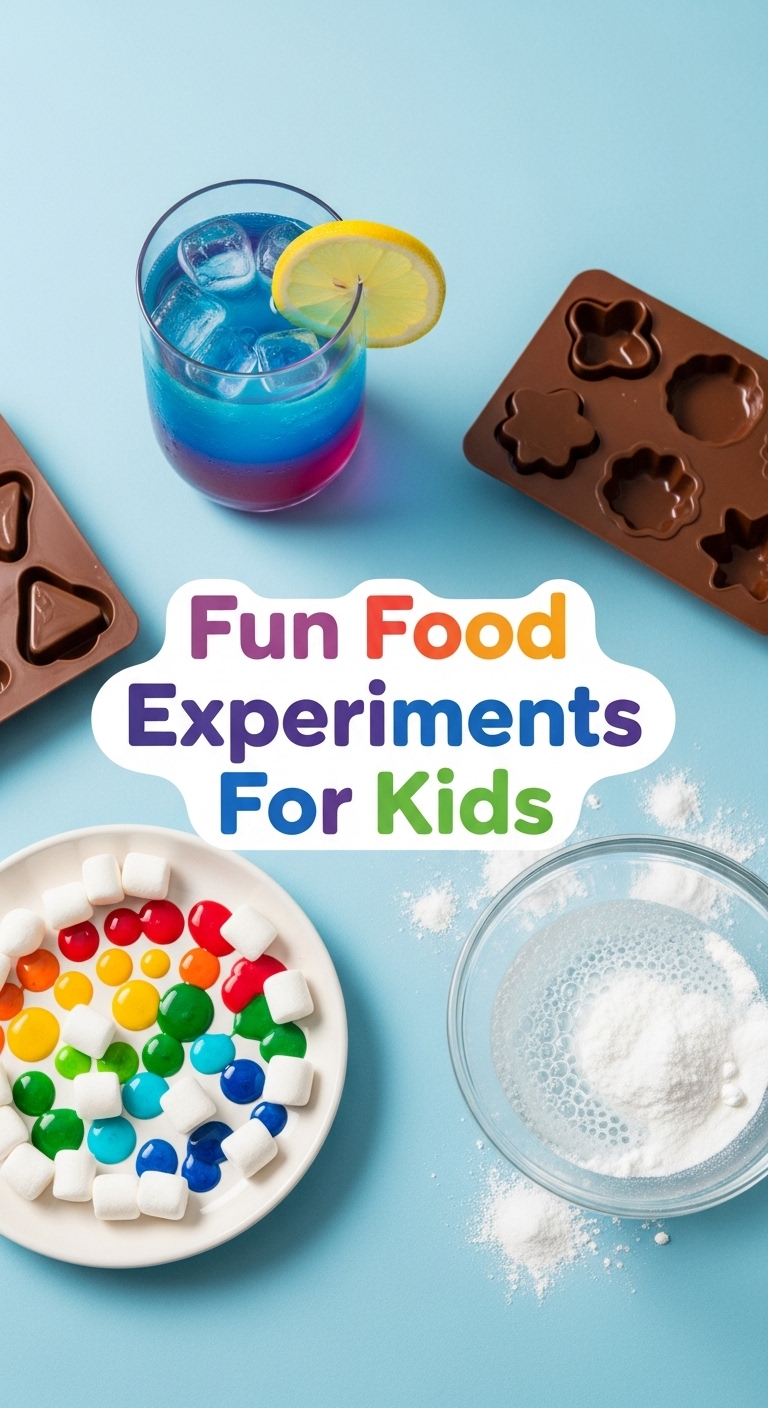
Experiment 1: Rainbow Layered Drinks (Density Fun!)
- Grab several clear glasses and a few different sugary liquids (e.g., grape juice, orange juice, clear soda, water with sugar dissolved in it). The key is varying sugar content – more sugar means more density.
- Start with the densest liquid first (most sugar). Carefully pour a small layer into the bottom of a glass.
- Then, very, very slowly, using the back of a spoon to diffuse the pour against the side of the glass, add the next less dense liquid on top. Keep going with progressively less dense liquids.
- Watch in awe as your liquids stack up like magic! It’s like a liquid rainbow party!
Experiment 2: The Mighty Volcano in a Cup (Fizzy Fun!)
- Place a small amount of baking soda (about a tablespoon) in the bottom of a clear cup. Add a few drops of food coloring – any color you like!
- Now, for the eruption: slowly pour in some vinegar. You’ll get an instant, satisfying fizzing volcano!
- Pro Tip: Add a squirt of dish soap for even more bubbly drama! You’re basically creating a mini eruption.
Experiment 3: Color-Changing Magic Potion (pH Power!)
- First, make your magic potion base: Finely chop or shred some red cabbage. Put it in a bowl and pour hot (not boiling) water over it. Let it sit for about 15-20 minutes, then strain out the cabbage. You’ll be left with a beautiful purple liquid. This is your pH indicator!
- Pour small amounts of this purple liquid into several clear cups.
- Now, add different household liquids to each cup: lemon juice, vinegar (acidic – watch it turn pink/red!), baking soda dissolved in water, dish soap (alkaline – watch it turn blue/green!).
- This one always blows minds! It’s like having a secret wizard in your kitchen.
Common Mistakes to Avoid
- Forgetting the Cleanup Plan: Rookie mistake! Always lay down a protective layer or prepare a designated “splash zone.” A damp cloth nearby is your best friend.
- Skipping the “Why”: After the “oohs” and “aahs,” take a moment to briefly explain *why* something happened. “The sugar makes it heavy!” or “The acid and base make bubbles!” It adds to the wonder and makes you look super smart.
- Being Afraid of Mess: This is where the fun lives! Embrace the drips, the splashes, the sticky fingers. It means everyone’s having a good time.
- Doing Too Much at Once: Pace yourselves, food scientists! Pick one or two experiments, enjoy them, then move on. You don’t want to overwhelm anyone.
Alternatives & Substitutions
- For Layered Drinks: Try different sugar concentrations in just water with food coloring. Or use different fruit juices – the darker the better for visual contrast. Just remember: more sugar = heavier liquid.
- For Fizzy Volcanoes: Lemon juice can substitute for vinegar if you’re in a pinch, but vinegar usually gives a stronger reaction. You can also experiment with different cup sizes for different eruption scales.
- For Color-Changing Potion: If red cabbage isn’t available, blueberries or even grape juice can sometimes offer subtle color changes with acids/bases, though not as dramatic. **Turmeric powder** (yellow) also turns red with bases – try it! IMO, it’s pretty cool.
- Oobleck!: Don’t forget the classic cornstarch and water mixture. It’s not strictly edible (unless you’re really daring), but it’s an incredible non-Newtonian fluid that will mesmerize everyone. Just mix cornstarch with water until it’s thick but still flows. It’s solid when you punch it, liquid when you let it go!
FAQ (Frequently Asked Questions)
- Is this going to be super messy? Well, honey, it’s *food experiments with kids*. What do you *think*? Yes, it will be messy, and that’s totally okay! Embrace the chaos, prep for it, and have fun.
- What age is this best for? Honestly, anything from toddlers (with supervision, obviously, so they don’t eat all the baking soda) to teens and even grown-ups. Who doesn’t love a good fizzy eruption?
- Can we eat all of it? Some parts, yes! The layered drinks are tasty. The volcano? Probably not ideal. The red cabbage indicator liquid? Tastes like cabbage water, so maybe skip that. Always use your best judgment!
- Do I need special equipment? Nah, not really. Basic kitchen stuff is usually all you need. Clear glasses are helpful, but even plastic cups work.
- What if it doesn’t work perfectly? Science is all about trial and error, my friend! Don’t stress if the layers mix or the volcano fizzles a bit. Just try again, or try a different experiment. The point is to have fun exploring.
- How long does this take? As long as you want! You can do one quick experiment in 15 minutes or spend an hour exploring multiple. It’s flexible fun!
Final Thoughts
So there you have it, your ultimate guide to turning boredom into brilliant, bubbly, and sometimes tasty food experiments. You’ve got the tools, the knowledge (and probably a little bit of food coloring on your hands already). Now go impress someone—or yourself—with your newfound mad food scientist skills. Seriously, these moments are gold, creating memories and maybe even sparking a future scientist. You’ve earned those smiles (and maybe a quiet cup of coffee after cleanup). Get experimenting!


