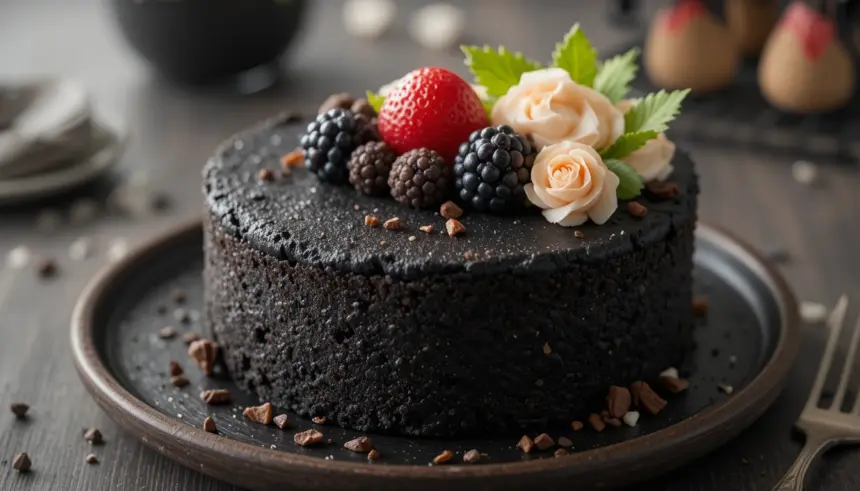
So, you wanna bake something that looks super chic, screams “I’m sophisticated and effortlessly cool,” but doesn’t require selling a kidney for ingredients or spending a whole day in the kitchen? My kind of person! We’re diving headfirst into the mysterious, elegant, and surprisingly easy world of the **Bento Cake Aesthetic Black**. Get ready to impress your friends (or just yourself, no judgment here) with this little stunner.
Why This Recipe is Awesome
Let’s be real, who has time for giant, multi-tiered cakes that require an engineering degree to assemble? Not us! This Bento Cake is the culinary equivalent of a perfectly tailored little black dress – chic, compact, and always in style. It’s perfectly portioned, which means less guilt (maybe?) and zero waste. Plus, it’s got that dramatic, mysterious black aesthetic that just *pops* on Instagram. Seriously, this isn’t one of those recipes where you end up with a kitchen looking like a flour bomb went off and a cake that vaguely resembles a leaning tower of Pisa. Nope, this is **idiot-proof**, even I didn’t mess it up, and that’s saying something.
Ingredients You’ll Need
Gather your battle gear, I mean, ingredients! Most of these are probably chilling in your pantry already. Or, you know, a quick trip to the store where you pretend you’re a professional chef buying exotic spices.
- **For the Cake:**
- 1 ½ cups (180g) All-Purpose Flour (aka plain flour) – Sift it, darling, makes a difference!
- 1 cup (200g) Granulated Sugar – Sweetness is key, obviously.
- ½ cup (50g) Unsweetened Cocoa Powder (Dutch-processed for a richer, darker color!) – Don’t skimp here, it’s our dark magic.
- 1 teaspoon Baking Soda – Our little lift-me-up.
- ½ teaspoon Salt – Balances all that sweet goodness.
- 1 cup (240ml) Milk (full-fat for ultimate moistness, because why not?) – Room temperature, please!
- ½ cup (120ml) Vegetable Oil (or any neutral oil) – Keeps it super moist, trust me.
- 2 large Eggs – Again, room temperature is your friend.
- 1 teaspoon Vanilla Extract – The good stuff, not the imitation kind if you can help it.
- Black Food Gel (NOT liquid dye!) – This is your secret weapon for that true black.
- **For the Black Buttercream Frosting:**
- 1 cup (226g) Unsalted Butter, softened – The unsung hero of all good frostings.
- 3-4 cups (360-480g) Powdered Sugar (aka icing sugar), sifted – Start with 3, add more if needed.
- 2-3 tablespoons Milk or Cream – To get that perfect consistency.
- 1 teaspoon Vanilla Extract – More vanilla? Always!
- Pinch of Salt – Cuts through the sweetness.
- Generous amount of Black Food Gel – Be brave, go bold!
Step-by-Step Instructions
Alright, apron on, good vibes only! Let’s get baking!
- **Preheat & Prep:** Preheat your oven to 350°F (175°C). Lightly grease and flour two 4-inch or 6-inch round cake pans. If you have parchment paper, line the bottoms. This ensures no sticking disasters.
- **Mix Dry Stuff:** In a large bowl, whisk together the sifted flour, sugar, cocoa powder, baking soda, and salt. Make sure there are no lumpy bits.
- **Mix Wet Stuff:** In a separate medium bowl, whisk together the milk, oil, eggs, and vanilla extract until well combined.
- **Combine & Conquer:** Pour the wet ingredients into the dry ingredients. Mix on low speed with an electric mixer (or by hand with a whisk) **just until combined**. **Do not overmix!** Overmixing leads to tough cakes, and we want fluffy ones.
- **Add the Black Magic:** Now for the fun part! Add a good amount of black food gel to your batter. Mix gently until the batter is uniformly black. The darker, the better, IMO!
- **Bake It Up:** Divide the batter evenly between your prepared cake pans. Bake for 25-30 minutes, or until a toothpick inserted into the center comes out clean.
- **Cool Down:** Let the cakes cool in their pans for about 10-15 minutes before inverting them onto a wire rack to cool completely. **This step is crucial!** Frosting a warm cake is a one-way ticket to a melted mess.
- **Make the Black Buttercream:** While the cakes are cooling, beat the softened butter in a large bowl with an electric mixer until light and fluffy. Gradually add the sifted powdered sugar, alternating with milk/cream, until smooth and creamy. Beat in the vanilla and salt. Now, add your black food gel, a little at a time, until you achieve a deep, rich black. Beat until beautifully smooth and fluffy.
- **Assemble Your Masterpiece:** Once the cakes are completely cool, level them with a serrated knife if needed. Place one cake layer on your serving plate or cake stand. Spread a generous layer of black buttercream on top. Place the second cake layer on top. Frost the top and sides of the cake with the remaining buttercream, smoothing it out with an offset spatula or bench scraper.
- **Decorate & Devour:** Get creative! Add some sprinkles, edible glitter, or chocolate shards. Take a picture, brag a little, then dig in!
Common Mistakes to Avoid
We’ve all been there. Learning from mistakes is part of the journey, but why not learn from mine?
- **Not Preheating the Oven:** Rookie mistake! An oven that’s not up to temp can mess with your cake’s rise and texture. **Always preheat!**
- **Overmixing the Batter:** This is the arch-nemesis of fluffy cakes. Mix until just combined, then stop. Walk away from the mixer.
- **Using Liquid Food Coloring for Black:** Don’t do it! Liquid dyes will make your batter grayish and watery. **Black food gel is non-negotiable** for that intense black.
- **Frosting Warm Cakes:** This isn’t a suggestion, it’s a command: **Cool your cakes completely!** Unless you want your frosting to turn into a sad, puddly mess.
- **Eyeballing Ingredients Too Much:** Baking is a science, folks. While cooking allows for more improvisation, baking prefers precision. Measure carefully!
Alternatives & Substitutions
Feeling adventurous or just missing an ingredient? No worries, we’ve got options!
- **Flour Power:** If you don’t have all-purpose flour, you can use self-raising flour and omit the baking soda (or reduce it to ½ tsp). Just make sure to check the leavening agent in your self-raising flour.
- **Buttercream Alternatives:** Not a fan of traditional buttercream? You could try a **black whipped ganache** (heavy cream + chocolate + black gel) for a richer, less sweet option, or even a cream cheese frosting (add black gel, of course!).
- **Oil vs. Butter in Cake:** While this recipe uses oil for supreme moisture, you *could* swap it for melted butter for a different flavor profile, but expect a slightly denser cake.
- **Decoration Galore:** Don’t limit yourself to plain black! Add some contrasting sprinkles (silver, gold, or even white pearls look stunning), edible glitter dust, fresh berries for a pop of color, or tiny chocolate curls. Make it yours!
FAQ (Frequently Asked Questions)
Got questions? I’ve got answers! (Mostly.)
- **”Can I make it not black?”**
Well, technically yes, but why ruin the aesthetic? Kidding! You can absolutely omit the black food gel and have a delicious chocolate bento cake. Or, swap the black gel for any other food gel color you fancy!
- **”Do I really need room temperature ingredients?”**
YES! It’s not just a fancy baker’s quirk. Room temperature eggs and milk emulsify better with the other ingredients, resulting in a smoother batter and a more even, tender crumb. It makes a difference, I promise!
- **”How long does this bento cake last?”**
If covered properly, your cake will stay fresh at room temperature for 1-2 days. Pop it in the fridge, and it’ll be good for 3-4 days. Just bring it to room temp before serving for the best texture.
- **”Can I make this into cupcakes instead?”**
Absolutely! This recipe works perfectly for cupcakes. Just fill your cupcake liners about two-thirds full and bake for a shorter time, usually around 18-22 minutes. Keep an eye on them!
- **”What if I don’t have small cake pans?”**
No small pans? No problem! Bake the batter in a regular 8 or 9-inch round pan, then use a cookie cutter or a small bowl as a guide to cut out smaller rounds once the cake is cool. You might even get a few mini bento cakes out of it!
- **”My black frosting turned purple/gray! Help!”**
Ah, a common predicament! You likely didn’t add enough black food gel, or you used a liquid dye. Keep adding more gel until it’s super dark. Sometimes, a tiny drop of blue or even green food gel can counteract any reddish or purplish undertones. Practice makes perfect!
Final Thoughts
There you have it! Your very own, effortlessly cool, aesthetically pleasing black bento cake. Whether you’re making it for a special someone, a dramatic party, or just because you wanted something delicious and edgy, you’ve conquered it. Now go impress someone – or yourself – with your new culinary skills. You’ve earned it! Don’t forget to snap a pic and send it my way. Happy baking!

